180-Gallon Upgrade Starts NOW!!!

The friendliest place on the web for anyone with an interest in aquariums or fish keeping!
If you have answers, please help by responding to the unanswered posts.

ryshark

Aquarium Advice Addict
Joined
Jul 25, 2007
Messages
1,649
Location
Southern California
Currently I have a 75-gallon tank which I am running out of room for new coral and my blue hippo tang is starting to out grow it. My wife has known for the past 6-months or so that I want to eventually upgrade to a 180-gallon tank. I figured I would take on that project in about a year from now. However, my pregnant wife (first baby) came up to me a week ago and said that if I am going to upgrade she would rather I do it now before the baby comes (due January 29th) "so I won't be focusing all my attention on the fish when I upgrade in a year from now." I don't know if that would really have been the case but I didn't argue.

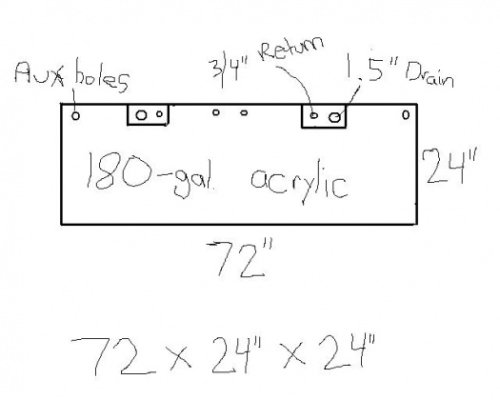
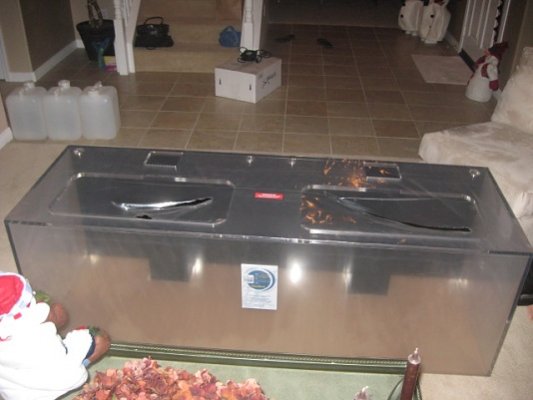
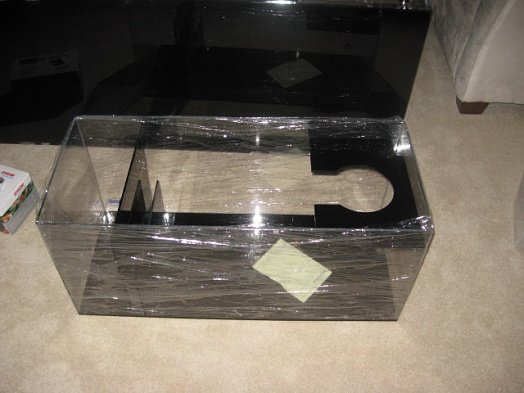
After much thought and research I decided to go with an acrylic tank since I live in California. I already ordered the Stand and Canopy. I also ordered the tank yesterday and the picture below is what I came up with. Please let me know what you think because it is not too late for me to change it up. I chose to go with 2-overflows and with a 3/4" return coming through the overflow which I will plumb to either the two holes in the center/top of the tank or the holes on the sides of the tank. My drain holes are 1.5" and I am going with a black back. I also upgraded the thickness of the acrylic on the top of the tank so I can have bigger access openings. Let me know what you think, because as I said I have until tomorrow to change anything. This is a top down, birds eye view.
 

Attachments

  • 180 upgrade.jpg
    180 upgrade.jpg
    37.4 KB · Views: 303
That looks good. The only thing I can think of is you have 4 aux holes? Assuming that's for a closed loop, is your plan 1 for intake and 3 output?
 
That looks good. The only thing I can think of is you have 4 aux holes? Assuming that's for a closed loop, is your plan 1 for intake and 3 output?


Those 4-holes are on the top panel of the acrylic not the back. The reason for the two extra holes is 2 things 1. I'm not sure if I want to plumb my return lines through the overflow and over to the middle two holes with lockline going into the water or plumb them to the sides of the tank into the outside holes. So I figured I will have them cut both sets so if I change my mind I am still ok. 2. I will probably have the return pipe plumbed into the middle holes and then I will put powerheads on the side and I figured I can put the plug/cord from the powerhead through those holes on the side.

Cccapt- a couple days ago I was looking at your build thread and how you managed to move the 75 and put the new tank in its spot. I am going to have to do the same.... breakdown the 75 move it and rebuild it somewhere else. Then I can put the 180 in its spot and start plumbing etc etc.
 
I got a few things from Marinedepot that arrived today. As you can see below I got the Caribsea South Seas Base Rock 40lbs, they price matched another online fish site and I am VERY pleased with this rock. I only got 40lbs because I wanted to see how it looked first. I plan on getting another 80lbs of this stuff, which comes out to roughly $1.74 per pound after shipping and everything.
I also got an Eheim 1262 for my return pump. I have heard many good things about this pump, I hope it lives up to its expectations.
Finally I got 2x 4" fans for my canopy to keep the metal halides as cool as possible.
I ordered my tank stand/canopy and tank 3-weeks ago, I am starting to lose patients now. I will call the LFS tomorrow to see what is going on.
 

Attachments

  • IMG_1776.jpg
    IMG_1776.jpg
    71.3 KB · Views: 234
  • IMG_1768.jpg
    IMG_1768.jpg
    69.8 KB · Views: 226
  • IMG_1775.jpg
    IMG_1775.jpg
    50.9 KB · Views: 215
  • IMG_1770.jpg
    IMG_1770.jpg
    75.6 KB · Views: 218
Today, I had to relocate my aquarium to another part of the room in order to clear up the wall where the new tank is going. This whole process took me about 8-hours which was a little longer than I thought. I transfered everything into a 50-gallon rubbermaid container and a 15-gallon container, relocated the stand/tank about 10-feet away and then built it back up again. I was as careful as possible not to stir up the sandbed which may have caused big issues. So far so good.
Below is also a picture of my 180-gallon still in the bag. I picked it up yesterday along with the new stand and canopy. When I got home I realized that they gave me the wrong stand. I had to take it back today and the correct stand won't be in for over a week. This was very dissapointing because I wanted to have everything done by X-Mas.
 

Attachments

  • IMG_1778.jpg
    IMG_1778.jpg
    68.6 KB · Views: 239
  • IMG_1779.jpg
    IMG_1779.jpg
    74.2 KB · Views: 229
  • IMG_1781.jpg
    IMG_1781.jpg
    58.6 KB · Views: 247
  • IMG_1782.jpg
    IMG_1782.jpg
    68.6 KB · Views: 251
Bummer about the stand. New tank looks good tho.


Before I started the relocate the tank project, I was thinking it would only take a few hours. In the back of my mind I remembered reading your build and how long it took. And ofcourse it ended up being an all day event for me as well. HUGE bummer about the stand, I was looking forward to getting things done, plus I already waited over 3-weeks for that stand and they couldn't get it right.
 
Next dilemma, my wall where the 180 is going only has one 15amp circuit. The dining room behind the tank wall is on a different 20amp circuit, so I was going to pull the wire from the dining room through the wall and have a gfi receptical where my new tank is. However, I found that the 20amp circuit in my dining room is also connected to the microwave that runs at 1600watts and the refrigerator too. So I am going to have to have an electrician come out to put a dedicated 20amp circuit on my tank wall.
 
I got a few things from Marinedepot that arrived today. As you can see below I got the Caribsea South Seas Base Rock 40lbs, they price matched another online fish site and I am VERY pleased with this rock. I only got 40lbs because I wanted to see how it looked first. I plan on getting another 80lbs of this stuff, which comes out to roughly $1.74 per pound after shipping and everything.

where didi you order your rock?
marine depot. i wanna know where you price matched?
 
marine depot. i wanna know where you price matched?

I had them price match dtpetsupplies who sells it for $47.99 for 40-lbs plus $21.80 shipping to my house for a total of $69.79 or $1.74 per pound, well worth it in my opinion. I would have just ordered it from DTs but Marinedepot is closer to my house so with ground shipping I get stuff next day. If you do order it, make sure you get the caribsea south seas rock, and NOT just the cheaper caribsea base rock. The Caribsea south seas base rock is much nicer.
 
Next dilemma, my wall where the 180 is going only has one 15amp circuit. The dining room behind the tank wall is on a different 20amp circuit, so I was going to pull the wire from the dining room through the wall and have a gfi receptical where my new tank is. However, I found that the 20amp circuit in my dining room is also connected to the microwave that runs at 1600watts and the refrigerator too. So I am going to have to have an electrician come out to put a dedicated 20amp circuit on my tank wall.

Replace the breaker in your panel box for that circuit with a 20-30amp GFCI breaker and you will be good to go.
 
I picked up my sump today. 36x16x16 for $200 brand new, not too bad. I plan on going refugiumless again like I did on my 75-gallon, so this sump is just 2-chambers, one big chamber for my skimmer and then a small chamber for my return pump with 2-baffles separating the two chambers.
 

Attachments

  • IMG_1783.jpg
    IMG_1783.jpg
    70.6 KB · Views: 173
I thought of this, but I am concerned the wire is too small. I guess I could always take a look at what guage it is.

My guess is it is either 12-2 or 14-2, most likely 12-2. I'm sure that the circuit that has your microwave is wired with the same wire as all the other circuits in the house. Point being, you should be fine with just replacing the breaker with a 20-30apm GFCI breaker.
 
Is there a certain way to tell? If I take the "socket" out of the wall does the wire usually say the gauge on there or do I have to measure it somehow?
 
If you can see the sheathing it should be printed on there but you may not have enough slack to see it. It's printed every so often. A wire gauge will tell you exactly what it is.
 
Amps and watts are different. Have you confirmed that the amperage you need is in excess of 15?

General rule of thumb (and general building code). 15amp/14 gauge, 20amp/12 gauge, 30amp/10 gauge.

Divide your total watts by the voltage to get amps or volts X amps = wattage.

For example, a 100 watt lightbulb draws .83 amps (100/120).. So extrapolating from there, a 15amp breaker can support 1800 watts at 120 volts. 20amp 2400 etc..

If you have wire strippers there are gauges on there where you can check the wire gauge. My guess would be 14/2.
 
Yes, I need more that 15amps because the 15amp circuit my 75 is on now is shared with my tv, surround sound etc. I think California codes says that microwave needs a dedicated circuit, so I am in the process of contacting the builder of my house since it was not built to code.

I got two 1.5" bulkheads today for my drains. However, I am now wodering if I got the wrong ones. They are slip on the bottom side and then threaded inside on the top side. Should I have got Slip on both sides instead?
 
Back
Top Bottom