Making Live Rock

The friendliest place on the web for anyone with an interest in aquariums or fish keeping!
If you have answers, please help by responding to the unanswered posts.

Gobyfan

Aquarium Advice Apprentice
Joined
Mar 4, 2013
Messages
10
Location
Rhode Island
So I'm in the midst of putting together a 40 gallon breeder reef tank. Nothing is set up yet, and won't begin to get set up for at least another month or two. So in the meantime while I'm waiting I've decided to go ahead and create my own live rock structures. There are plenty of benefits to creating your own LR just as there are draw backs to it. Before you introduce your structure to a system it is essentially dead rock. You new to give it time to cure, or cycle as most like to say.

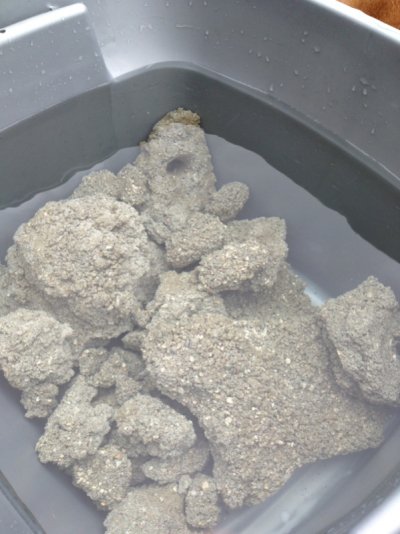
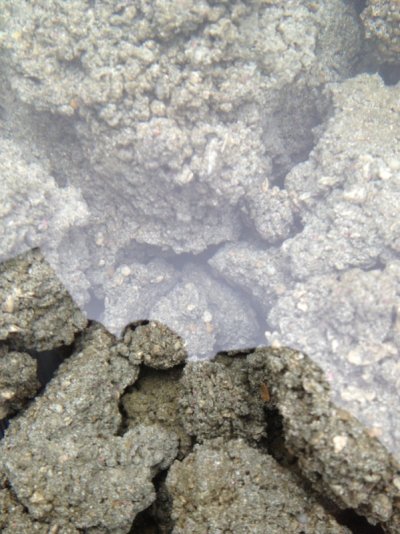
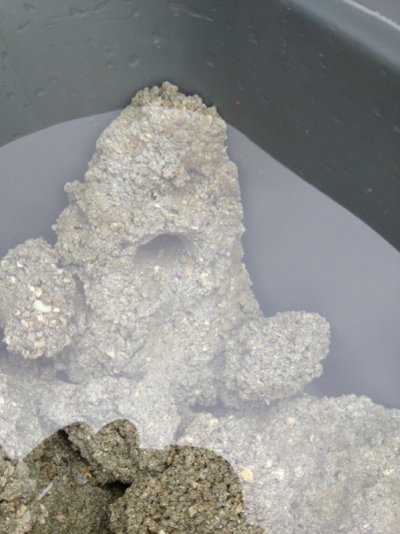
Today I went to my lfs (I had to go to quite a few places to find everything) and a couple hardware stores and picked up a bag of Portland cement, aragonite sand, crushed seashell, play Sand and ice melt. I mixed it all together and created my structure and now it is taking 12 hours to dry in the play sand. Once my structure is done drying I will then have to cure it which consists of allowing the structure to soak in a bucket of fresh water so the ice salt that I used can dissolve fully to creat pockets if air between the concrete. These are important for when cycling the rock, it allows many places for the vital bacterias needed to for and colonize which essentially is what turns it from concrete to LR.

Once the salt is fully dissolved the. I will begin the set up for my aquarium. Since I am making my own live rock I will not be using LR to cycle my aquarium system. I'll use Dr. Tim's One & Only Live Nitrifying Bacteria to cycle the tank along with one or two raw shrimp. Once my system is cycled then I will add my LR and allow the rock to cycle in my system for a full month to a month and a half before adding fish.

I'll be keeping this thread updated with my progress. And once I if my structure out I the tub of sand I'll have pictures to post. I'm sure I'll have plenty of questions as I go, an please feel free to ask me any questions you guys have.  thanks guys!!!
 
This is the 40gb I'm gonna be using. Possibly where I'm going to be putting it. I might take the draws out of the dresser and make cabinet doors or I might jut by a stand. Haven't decided yet. :)

image-4289406198.jpg
 
So yesterday I didn't have the chance to post on here, but I went and dug my rock out of the sand it was drying in. It didn't work out quite like I planned. I had hoped to make my live rock as on complete structure, unfortunately there were week spots in the cement and it ended up breaking into separate pieces, but they still look cool and will do their job :)

So after I dug them out of the sand I rinsed them quite thoroughly with the hose to wash off any diode sand/rock. Now before I had mentioned that you needed to mix ice salt to your rock. Now I have my rock soaking in a storage tote full of water. This is going to dissolve the salt that is still trapped inside the cement, and will create small pockets and spaces for the beneficial bacteria to thrive.

Make sure you're shanking the water of the tote every couple of days. Eventually you want the salt content in the water to be at 0. I'll change my water tomorrow since I filled it yesterday and probably won't start testing it until at least a week. By then it should already be zero.

Here are some pictures of my rock already soaking in the water. You can see how some I shaped into stelagmites, and some have caves or deep crevices and tunnels going through them. One of the benefits of creating your own rock is being able to control their shape and layout.
 

Attachments

  • image-2094955427.jpg
    image-2094955427.jpg
    159.6 KB · Views: 126
  • image-1470045567.jpg
    image-1470045567.jpg
    202.3 KB · Views: 121
  • image-3951664763.jpg
    image-3951664763.jpg
    145.6 KB · Views: 111
  • image-597435279.jpg
    image-597435279.jpg
    159.1 KB · Views: 110
Looking good. One thing I might add is I believe you need to cure the cement for a couple of months before it no longer will leach out and raise your ph. Also I hear adding vinegar to the bucket helps that go smoother. Great start!
 
Yes you're right I actually forgot to mention that. The ph of the water should be at 7.5 then the cement should be fully stabilized. Most of what I have read says this should take a week up to 2 weeks depending on the size of rocks. And thank you for the vinegar tip, I'm definitely going to try that out!
 
Curious, but why play sand? why not all argonite?

The play sand is what you use to mold the shapes of the rock, not what you use to make the actual rock

Rock looks good though! I was going to do the same thing with my 55 but was impatient and ordered dry rock


Sorry for high jacking ?
 
I use man made live rock and it looks better than any reef live rock I have ever seen. It also has many more crevices for the bacteria to live. It also helps save our reefs !!!!(y)
 
The play sand is what you use to mold the shapes of the rock, not what you use to make the actual rock

Rock looks good though! I was going to do the same thing with my 55 but was impatient and ordered dry rock

Sorry for high jacking dde36

^^ yeah you don't want to mix the play sand with ur mixture. After I shaped a section of my structure I piled play sand around it so the mixture would hold its place.

Thanks aadair!

I'll have some new pics up tomorrow (hopefully). I didn't get a chance to get any when I changed the water for the first time the other day because I changed it in the middle of a snowstorm, but the water was dyed a light yellow color, so at least I know it's working right. next water change I'll test the ph to make sure most of the cement has already stabilized.
 
I use man made live rock and it looks better than any reef live rock I have ever seen. It also has many more crevices for the bacteria to live. It also helps save our reefs !!!!(y)

=D all the reasons I chose I make mine!!! Lol...most importantly it helps to save our reefs.
 
I did this once in the past, but I used portland cement and the crushed oyster shells that they sell for chickens. I mixed the cement and oyster shells so there was just enough cement to hold it together, and used more oyster shells instead of sand to form the rocks.

Worked really well, but I had a hard time getting the cement to fully hydrate. I was changing the water for a couple months.

Oyster shells in place of sand would probably help the cement hold its form better, however the sand absorbs moisture which aids in the drying process. So instead of waiting 24 hours for my LR mixture to settle I only waited 12 hours. Which is why I chose to go with sand. :)
 
Oyster shells in place of sand would probably help the cement hold its form better, however the sand absorbs moisture which aids in the drying process. So instead of waiting 24 hours for my LR mixture to settle I only waited 12 hours. Which is why I chose to go with sand. :)

With cement you aren't actually waiting for it to dry. You are waiting for it to cure which is a hydration process. They make cement by driving all of the water out of limestone. As it cures it recrystallizes into calcium carbonate. Cement can even be cured underwater. The reason for using the oyster shells in the mix is to give the porous structure to the rocks. The reason for using it as the casting mold is to avoid the silicates that come along with using sand, of course there are silicates in the cement, but they seem to be pretty tightly bound once the hydration is fully completed.

It has been over a decade since I made those rocks so I can't really remember how long I let them harden before I took them out. I suspect I formed them, and just left them until the next day for good measure.
 
Back
Top Bottom