ODNO for 29 gallon

The friendliest place on the web for anyone with an interest in aquariums or fish keeping!
If you have answers, please help by responding to the unanswered posts.
Now that everything was marked and drilled, I was ready to install. First thing I did was mount the ballast. I simply used my new bolts. I bought 1" bolts, but could have used 1/2" instead. I'll cut them down and cap them later.

Link - Ballast secured
Link - Ballast wires run through

I also found out that those same 1" bolts where FAR too large for the encaps. Luckily I had some smaller bolts from another project. I'm not sure the size of them, but they worked perfectly.

Link - End cap bolts

Before I installed the end caps, I wired up the bulbs. I used two 24" T12 bulbs wired in a series. Simple wiring job. The sockets on the end caps are the easiest things I have EVER worked with. I was amazed!!!! This ballast also comes with an over abundance of wiring for a small 30" hood. I'm sure that for a 48" it would be perfect/just pushing it. I decided no to cut anything. I may change my mind if the heat ends up being a true issue. I also decided to wire straight to 4X. I've also already started on the DIY CO2 so I'm not worried about it. I used the old wire nuts. They're much easier than soldering or using crimp ends.

Link - Power side
Link - Return side

More to come on the next post...
 
krap101 said:
what keeps it from tipping over> that does look pretty heavy?

It is VERY heavy. It's borderline out of balance. I tested it over and over again and it's able to sit on it's own.... you know those cartoons where the car is teetering on a cliff and a fly/butterfly lands on the hood and over it goes? Well, I'm convinced that the setup is that close. lol. In all actuality though, I could rest all of my testing supplies, food, etc (all that would fit anyway) on the ballast and it still stayed down. Don't ask me how, but it's fine. Just really heavy.
 
Now that everything was set up, I made a test run with the bulbs. First try everything was perfect. Did I notice a difference? HELL YES!!!! I even took out the GE bulb and the stock bulb was WAY brighter than it used to be. I'm not sure just how much brighter, but it's significant. I'm sure a T8 setup would really shine.

Anyway, once the test was successfuly, I wired up the switch and soldered it up. I ran out of wire nuts and didn't have small enough heat shrink tubing so it's an ugly job (but safe and secure). I didn't take any pics of this process since it's simple enough.

Here are the installed pictures. I've really got to grind off the bolts and cap them. Big eye sore. You can also see the overhead of the ballast. It's big enough that I will still be able to use that part of the hood as my "shelf" for the food and testing supplies; though not all of them will fit.

Link - Hood top
Link - Hood overhead

More to come on the next post...
 
So here are the visual results. I didn't have enough time to measure much of anything. I just noticed a MAJOR difference in the tank lighting. Stupid me forgot to take a picture of the stock lighting though. :(

This is the shot in the dark WITH the flash of my camera. Looks like daylight to me.
Link - With the flash

This is the shot in the dark without the flash of my camera. This was the only light on aside from the T.V. No, that is not a ghost. It is not my wife either. I believe it was the TV reflection.
Link - Without the flash

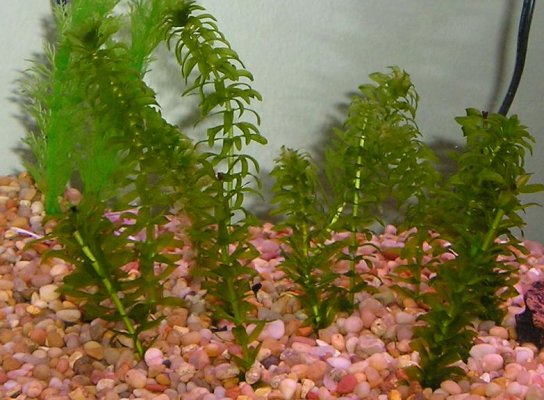
It's nice and bright. Do excuse the dead anacharis on the filter intake and the falling background though. I had just brought it home and was putting it back there when 1) I realized I had no tape and 2) the wife said I could get my stuff. I dropped everything and took off!

Aside from the extra bright light, I do notice that the hood gets warm quickly. I left it on for about 30 minutes and it didn't get hot to the touch, but you could tell it was warm under there. In some of the pics you probably noticed the 80mm case fans. I will be putting two on top (one on each stock vent). This should keep it fairly cool. I'm just working on an on/off switch right now for them.

I haven't checked wattage or current draw yet. I also haven't checked water temps. I'm positive they're going to go up though. I plan to do all of my checking tomorrow.

So what is my WPG? Well, I'm not sure. I'm using 2 20W bulbs in series at 4X. Sources say that this will be a 100% increase. This being the case, I'm looking at 80W, or 2.75WPG. Unfortunately, we're not 100% efficient so I would expect to only get 80% of it, or 72W and 2.48WPG. In any rate, I believe I'm right close to 2.5WPG. Time will tell I suppose. I'll just have to watch and see how my Anacharis starts to go. CO2 will probably be a must in the very near future.

So, be on the lookout for more information tomorrow. As of current, I'm very happy with the results. There really isn't any technical reason why somebody cannot do this. It wasn't hard at all. I spent about 4 hours of work on it, but only because I wanted to be 100% sure I was doing it right. It's probably a 2-4 hour project for a beginner like me. You don't need advanced tools either. The outcome is also very good compared to the time/effort/money you put in to it. Right now, I can't think of anything bad to say....

Stay tuned for more information tomorrow!
 
krap101 said:
can you show the before and after of your tank?

Wish I could, but like I said, I wasn't thinking clearly and didn't take a before shot of the lighting. I'm was like a child at Christmas.... rushing to play with my new toys.

This is the closest thing I have. It was taken at night without the use of the flash. I'll see if I have anything else on my computer though. I'm kicking myself 100 times over about not getting a comparitive shot.
 

Attachments

  • ana1.jpg
    ana1.jpg
    80.2 KB · Views: 33
to be honest with you I think you have alot more light there then you might think.. the wpg rule doesnt relly apply when it comes to ODNO the lummens get shot up to 3.9X at 4X.. lummens is what is important when it comes to what your plants need out of the lighting.. not how much electricity your using.. the lack of reflector might bring it down to what your thinking though..
By the way.. This ROCKS!!! Im am very happy this worked out for you.. I would have felt bad if it didnt.. :roll: Im thinking that most people would tell you to paint the inside of the striplight white to help with reflecting the light if you cant squeze a reflector in there....

at the CF comment earlier.. you can OD two 18" lamps in series as well.. space relly isnt a issue..
 
greenmagi said:
question.. is that the reflection of your wife on the tank in the without a flash picture..?

lol, no. I made a comment about it with the picture. I think it's a reflection of the TV... or at least I hope it is. 8O

About your comment of the reflector... I wasn't factoring that in. I also wasn't factoring in the lumen wattage. Perhaps these factors are countering each other and I'm right at what I noted, maybe a bit less.

So did you get yours up and running?

At any rate, I'm up there on the light scale. I'm not pleased with the GE Plant and Aquarium bulb though. It's WAY to yellow. Perhaps it's still in the correct spectrum though so I'm going to give it some time. Eventually I will switch out to a T8 bulb I think.
 
This is a great thread! I might try this for my 20 gal tank with now 1 15W bulb, and make it 2... :mrgreen:
 
Great Billsgate! Thanks for the feedback. Do ask if you have any questions. You could really drive that tank to 3.0WPG + :D
 
I Think I may be driving at 2X and not 4X, but I can't find any confirmation. The ballast has 4 wires (2 blue and 2 red). I wired both blues together and both reds together. I then kept both wires seperated and ran them to the end cap. The more I think about it, I think this is 2X, but I'm not sure. The bulbs are still getting all 4 leads, just not on the same wire. Do I need to combine all 4 leads to one wire to see 4X? I attached a [ugly] diagram of my wiring. Black and Gray are the power in leads. Yellow is the return. Red and Blue are in the wires in question. Purple and Green are my jumpers to place the bulbs in series.

What do you guys think?
 

Attachments

  • wiring_175.jpg
    wiring_175.jpg
    13.8 KB · Views: 316
I still have to find my fixture.. its in another town!..LOL.. I dont have a camera either so documentaion would have to be in the form of writing.. no good...
 
After reading more information, I think I am at 4X. Since all 4 leads are going to the same bulb (just jumped across the filament), it's wired as 4X in series. As a result, I'm probably right at or just under 2.5WPG. See this link.
 
Are you using a reflector? Your wpg hitting the tank may be much less if you aren't.

Great thread :)
 
No reflector right now. How much do you think I'm losing without even just a white painted hood? Is it a significant loss? I'm looking around for cheap reflectors that I can cut up and stick in there. It'll probably take a week or so until then.
 
I've no idea how to guesstimate loss, but figure you still lose most of the top half of the bulb. To give you an idea, I used a white painted hood with 2x23W spiral flourescents (restrike is an issue here), then switched to 2x13W AHSupply kit with their reflector. Check out how much light hits the bottom of the tank in each pic.

2x23w
2x13w
 
Back
Top Bottom