Rick's 1st SW Tank - 125G Build

The friendliest place on the web for anyone with an interest in aquariums or fish keeping!
If you have answers, please help by responding to the unanswered posts.
Haven't updated in ages....been too busy I guess.

Finished building my canopy and ended up getting an 8 bulb t5 fixture. I ended up going with a 48" fixture instead of a proper 60" for my tank. I didn't like the 60" bulb selection at all. That and the 48" fixture was nearly half that of the 60".

My sump tank ended up cracking x-mas day. Found out I made the baffles just a tad bit wider than the tank. It was such a snug fit i probably could have done without silicone. After I noticed a small crack on xmas i bought a new 40G breeder and sanded down the baffles so no pressure was on the glass.

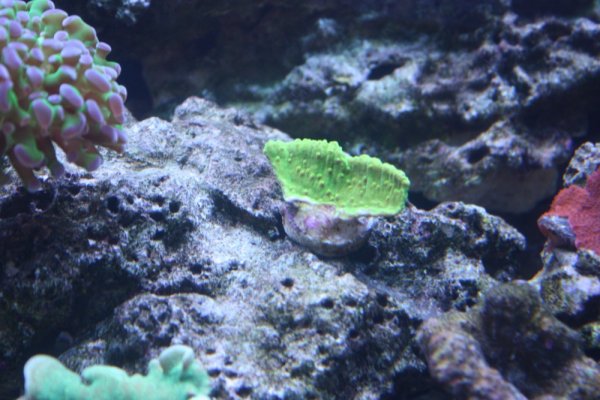
I've been adding corals slowly but surely since getting the lights set up. I'll need to start dosing soon. Debating on Kalk or maybe a 2part. Not sure which route i want to go.


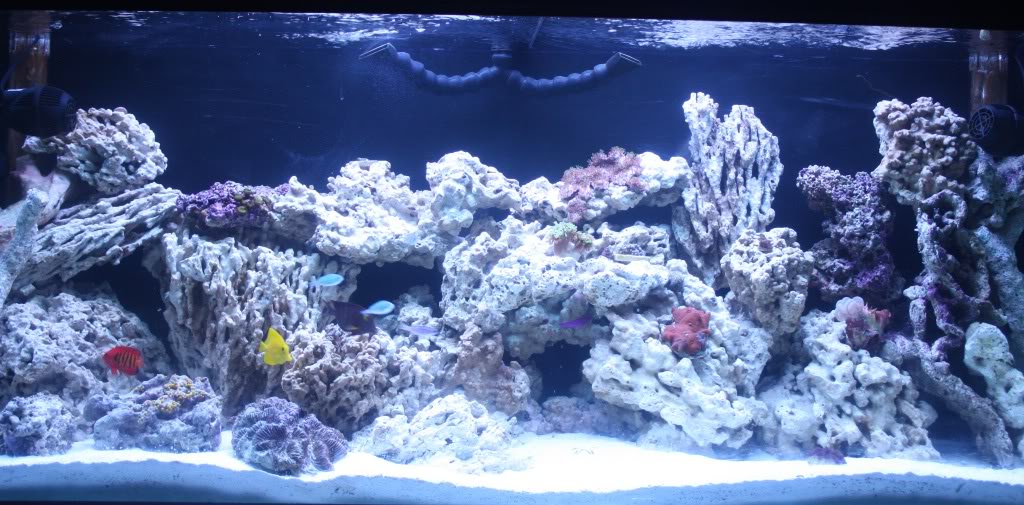
Enough rambling...here's a couple updated pics so far:

FTS:
img_1768475_0_1b011a4e639479f24f6fcd92aac3bd15.jpg


Another shot:
img_1768475_1_2ec1bfca8a78cdf9a9aa17138f0be152.jpg


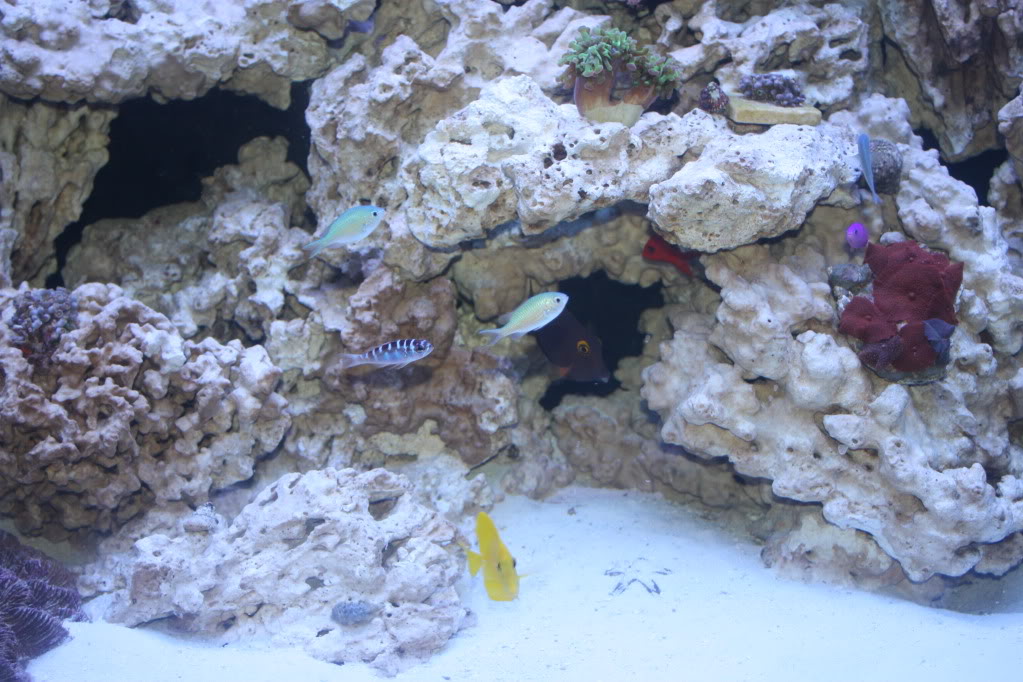
So far, I've got the following in my tank:
Yellow Tang
Yellow Eyed Kole Tang
Flame Angel
3 Blue Green Chromis
Purple Dottyback
Starry Blenny
Paired Pink Spotted Watchman Goby & Pistol Shrimp
Blue Dot Goby
Chalk Basslet
Blue Crocea Clam
Assorted shrimps/CUC
Corals

To round out the tank/ future fish:
2 Designer Clowns (Next Week)
Fathead Sunburst Anthias
Purple Tang (If bioload permits)

The tank looks fantasitc, nice and bright. I really like the fish selection!
 
That green monti...are you sure that's not a pavona?

Ben awhile since I posted. Not sure how I unsubscribed myself from my own thread. lol

But yup Doug, that's the pavona. Mixed up the pictures, here's the lime in the sky green monti:
 

Attachments

  • IMG_9991.jpg
    IMG_9991.jpg
    248.3 KB · Views: 78
So I decided to save a few bucks and make a DIY Biopellet Reactor. I've been looking to get biopellets in my system for some time now. They last a long time and from what I've seen, do a pretty good job of removing nitrates & phosphates.

Cost of materials came in under $12.
 

Attachments

  • IMG_0036.jpg
    IMG_0036.jpg
    180.9 KB · Views: 103
Started to put the reactor together. Started by drilling 2 holes into the top cap. (Caps are 4" PVC). One will be for the incomming water and the other for the outgoing. For the exit water I sawed off part of a male 1/2" PVC adapter and bonded it to the cap using plastic epoxy:
 

Attachments

  • IMG_0059.jpg
    IMG_0059.jpg
    108.4 KB · Views: 67
  • IMG_0066.jpg
    IMG_0066.jpg
    77.8 KB · Views: 45
  • IMG_0067.jpg
    IMG_0067.jpg
    93.5 KB · Views: 57
Last edited:
Also worked on the incomming water pipe system. Made a filter plate from scrap acrylic I had from making my sump baffles. Ended up using a jigsaw to cut the circular plate. At this point I really thought about buying a hole saw to get a good plate going but in the end, it just didn't seem worth it to nearly double the cost of the project. Doesn't look as well as I'd like but the reactor will be out of sight under the tank.

Drilled plenty of holes into the filter plate using a 7/64" drill. A step down and the holes seemed too small. A size up and they seemed too big. Will see how it works and can change them if necessary.
 

Attachments

  • IMG_0057.jpg
    IMG_0057.jpg
    127.1 KB · Views: 49
Put together the rest of the incomming water pipe system. To hold the plate in place I cut a 1/2" PVC pipe connector in half to make "rings" that would sandwich the plate steady around the 1/3" pipe. Used the PVC blue glue to bond the incoming water adapter, pipe, and "rings".
 

Attachments

  • IMG_0058.jpg
    IMG_0058.jpg
    127 KB · Views: 42
  • IMG_0061.jpg
    IMG_0061.jpg
    69.8 KB · Views: 56
  • IMG_0071.jpg
    IMG_0071.jpg
    94.5 KB · Views: 49
AquaRick said:
Put together the rest of the incomming water pipe system. To hold the plate in place I cut a 1/2" PVC pipe connector in half to make "rings" that would sandwich the plate steady around the 1/3" pipe. Used the PVC blue glue to bond the incoming water adapter, pipe, and "rings".

I believe you need 2 plates as well as sponges. Filter floss works great and is what I use.
 
Attached the acrylic housing tube to the top cap. I was going to use plastic epoxy for this but I didn't feel comfortable with how it sat in between the tube and cap. It didn't seem like the epoxy sat well in the gap. Decided to use silicone for this. Silicone was much easier to "push" into the gaps and crevices. I used GE type 1 clear silicone. (Just and FYI, any silicone without mold resistors is fine. Color of silicone has to affect on the organisms etc). Now waiting a day or so for the silicone to cure. Will do a water test to see how it goes. If everything is fine, I'll epoxy the incoming adapter to the top cap.
 

Attachments

  • IMG_0075.jpg
    IMG_0075.jpg
    103.8 KB · Views: 62
  • IMG_0077.jpg
    IMG_0077.jpg
    79.8 KB · Views: 60
I believe you need 2 plates as well as sponges. Filter floss works great and is what I use.

I'll be testing the reactor without bonding the bottom cap. I'd like to see how well of a fluid motion I can get. If the fluid dispersion isn't too good I may drill small holes around the bottom of the pipe to help move the biopellets around.

I don't plan on using sponges or filter media on the reactor. I'd like to keep maintenance to a minimum. The output of the reactor is being fed directly to my skimmer. The sugar film created as a byproduct will be removed from the system by the skimmer.

Just curious why did you use filter floss on yours? The second bottom plate is to help guide water up along the sides of the reactor; but I believe I can do this without a 2nd plate either by drilling holes as mentioned before or change the water flow into/out of the reactor with the 2 ball gate valves the reactor system will have.
 
AquaRick said:
I'll be testing the reactor without bonding the bottom cap. I'd like to see how well of a fluid motion I can get. If the fluid dispersion isn't too good I may drill small holes around the bottom of the pipe to help move the biopellets around.

I don't plan on using sponges or filter media on the reactor. I'd like to keep maintenance to a minimum. The output of the reactor is being fed directly to my skimmer. The sugar film created as a byproduct will be removed from the system by the skimmer.

Just curious why did you use filter floss on yours? The second bottom plate is to help guide water up along the sides of the reactor; but I believe I can do this without a 2nd plate either by drilling holes as mentioned before or change the water flow into/out of the reactor with the 2 ball gate valves the reactor system will have.

I used filter floss to prevent media from entering my tank
 
Well, I finished my DIY bipellet reactor. To be honest, it did a fine job...I just wasn't totally satisfied with it.

I've decided to go for a larger cylinder for the reactor. I was using a 3.75" OD acrylic tube. I think I'll be going for a 5 or 6" OD tube. At a foot height, the volume in there will be more than enough for a 300g tank I plan to upgrade to at some point. Also, although silicone worked well to bond the acrylic to the PVC I just wasn't too satisfied with how it may or may not come apart in the future. I'll definitely be using all acrylic + some Weldon #16 on this build. It may increase the price a bit; but well worth it for peace of mind.

To be safe, I'll be going all acrylic on the reactor and using two 1/2" bulkheads for the in & out lines of the reactor.

A few notes so far:

1) A bottom plate is not a must need for the reactor. The biopellets had very good fluidity without a bottom plate to push water in all areas of the reactor.

2) Filter floss/sponge is not needed below the top plate of the reactor. With 2 ball gate valves (before and after the reactor lines), the level of control is more than adequate to make sure the top level of the biopellets are well below the top plate.

3) I tied my Mag9.5 return pump into the reactor line. Experimenting with different amounts of flow, I've found the best fluidity to come from using the same PVC width for both the in and return lines. I've seen other reactors use a 1/4" in/out line so I used 1/4" tubing for the return line to begin with. I didn't like how well I could regulate the flow with the 1/4" tube valve. Maybe it was the manufacturer or not; but using a 1/2" PVC ball valve gave much better control than the 1/4" tube valve.
 
Hows the tank coming along? I just read through the thread so forgive me if I didn't see it, but what kind of skimmer did you go with?
 
New to Salt Water Hobby

I am in my 4th week of building my first Reef Aquarium. I purchased a 29 gal BioCube. I purchased the live rock, put in a few snails, crabs and a few inverts. Looking forward to buying a few more fish before installing some coral.

I am having fun so far!

Jerry
Eastchester, NY
 
Back
Top Bottom