105"x38"x20" stand I built

The friendliest place on the web for anyone with an interest in aquariums or fish keeping!
If you have answers, please help by responding to the unanswered posts.

Greg5OH

Aquarium Advice Apprentice
Joined
May 13, 2015
Messages
40
Designed to accept a 9 foot tank. Would have to be custom built/expensive. Id like to do a full marine setup with a tank this size eventually, but that is not for a long long time.

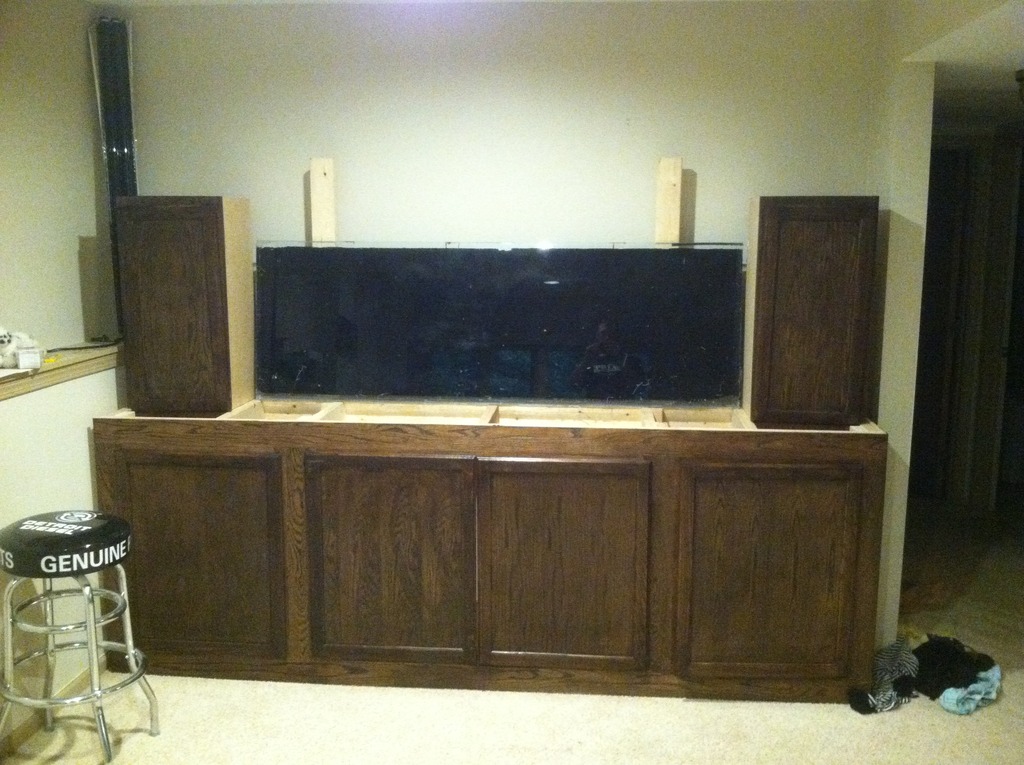
Anyway, stand is made with ALOT of pine 2x4, redundant bracing, then 3/4 red oak boards and cabinets. Cant tell as the secondary "inner bracing" as i call it is obscured by the oak facing in the second pic. I have the 2x4 on their short side screwed up into the long rail up top with support beams on all 4 sides running to the lower rail. She is one sturdy girl.

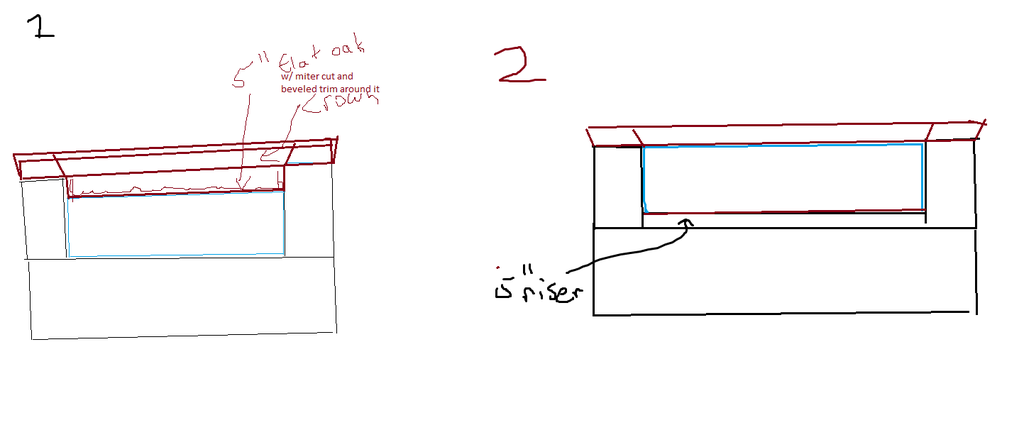
Right now being set up for my 125 6' tank. Will have a nice flip top lid on hydrualic prop rods, it will contain a piece of glass ot help with evaporation, as well as the LED light. 6" crown molding canopy tilt hood

Total height will be just over 6' tall.


1JFTJmT.jpg
 
nice job is that where it is going to stay , cause I see it blocks off part of window
ans I bet that thing weighs a ton ,
 
nice job is that where it is going to stay , cause I see it blocks off part of window
ans I bet that thing weighs a ton ,

hmm dont know where you see a window there haha. Yes that is its final position. I made it to fit into that little nook there. Need to pick out some nice handles with the wife still. Well and actually..rebuild and put the aquarium in there!
 
thats not a window at the end of the tank stand , saw the sill thats why I thought it was a window
 
ah nono, my basement has the whole wall done like that, the otehr wall opposite has the same but much smaller. The tank is facing a very large bay window, 6' x10' But there is no direct sunlight that ever gets through it as the deck is over that window. In the summer its dark down there, but there is ambient light during the winter when the sun reflects off the snow. The tank is about 20 feet away from the window
 
mocked up the rear pane. of the tank.
img_3250167_0_9b7b49624c1b48027bc6132a3e70411a.jpg


originally I was going to do a drop down section of the hood over the tank as it is 5" lower than the top of the cabinets, but have come to the conclusion, I will build a 5" riser for the tank, under which will be a big pull out drawer or perhaps just a pull out table top to rest drinks on or whatnot. Considering this but realistcaly probably will just be a flat panel of oak as there are plenty of areas for storing stuff (point of the side cabinets for food etc).
So just a 2x4 riser to net me 5" raised tank height, oak board on the front, and then the top can be all in one plane 6" crown molding.

basicaly number 2:
img_3250167_1_a04a51d121ce4da58d2eb3b46daf5e6d.png


the top cabinets are pushed back about 8" from the front of the cabinet, so if looking at the tank from the side the molding will actually be in 2 planes. This gives the tank more depth, and canb be viewed from more angles.
 
my original 125 i was rebuilding cracked at the top corner and fell apart, a good 6" x 6" section as I was tightening down the clamp to get air out of the one seam that didnt want to hold on its own. Well..that was a bummer. But i picked up another 125 in good condition with good main and secondary seals. i had the guy fill it with water, and then i drianed it looking at all seams to make sure this thing is good to go. It was indeed. Picked it up for 150, and am putting it on the stand tomorrow. Painted the back and part of the sides black for that nice showcase look. This tank has two top plastic braces, for a total of 3 lateral braces. One main seal had a bit of shrinkage in it, right in the middle of the seam in a few areas but these areas did not shrink/enlarge at all when filled and drianed with water. I am confident with it. Just need to finish cleaning the brown alread off the side seals. using soap water and vinegar with a yellow/green dish sponge. Will probably come off easier once tank is full of water.
At least I can use the botom pane of my old tank for the hook of new tank. It will be raised up approx 1 inch from the tank top, will be eclosed on 3 sides, open to the rear, so will have a littel strip for gas exchange but will greatly help with evaporation..I hope. hoses and cables will run out the back. If the evaporation is still bad I am thinking of gluing on strip sof glas son the rear to only leave room for the filter hoses and cables...bad idea?
 
Got it up finally, i mixed 30lbs of natural clay with about 120lbs of soil, and capped with with 100 lbs of black beauty blasting sand. The BB cap was nice, definitly minimizes sediment getting stirred up. Plus the black sand looks awesome, however wont be seeing much of it as i want to plant that short grass type stuff along the whole foreground. Dont remember what its called But I have a bunch of it in my 15g which will be turned into a shrimp tank. I graded the substrate so the rear is higher, giving it a natural slope, and allows deeper sub for bigger rooting plants. Filled it 3/4 up with water. need to extend one hose on the fx5 and I will start turning the water, and do a fishless cycle soon.

my wife, being unimpressed with the picture and skeptical of the whole situation. I needed a human to show the scale of it better. Definitely feels larger in person standing beside it. I need to go pick up one of those 2 step stools to service the tank now.
I am considering buying 3 new coralife 6700 bulbs for my 5' light i got for free, might cost me 30 bucks vs spending 165 on the nice 72" beamworks LED. It will happen eventually, but this will be temporary.
693tXmp.jpg
 
quick Q, wondering how my plant and driftwood setup shoudl be.

my sub slopes up towards rear of the tank. Wondering if i should do A or B.
A brings both sides low then high in the middle with a central peice of wood or whatnor,
B has high growth on the side with more of a void in the middle. with driftwood on either sides of this "void"

I am personally leaning towards B i think, as it makes your eyes scan the whole tank rather than having a big cluster in the middle. Opinions? I know theres some japanese sacred formulas and rules of thirds to follow here, but I do not know them.

kpTI2b3.png
 
Choice A!
Have you ever seen "thegreenmachine" natures chaos video on YouTube. A similar set up would look awesome in a tank like yours!


Sent from my iPhone using Aquarium Advice
 
got my stnad coming along nicely, added a beuty trim around the edge to break up the vertical wall of oak. routed both sides of some 2"x1" red oak for it, so all there is left now is the top hood and crown molding. Got the material for it, hoping to be staining the whole thing before the weekend is over.

tank has been cycling over a week, waiting on polishing pads to help clea rup the water. did two 25% changes which helped. got my pleco and lone albino cory in there, both seem to be doing well. seller screwed up my order so still dont have water param test kit.
6500k ligth will be in tomorrow.

YWC8PSI.jpg

XppQp4W.jpg

dst6znt.jpg

glue is ugly, obviously still need to sand it. But the trim ring was a great idea, wasnt going to do one at first.
 
Hey man!!! That stand looks amazing!!! One cool part about the hobby is the DIY aspect. And the trim is such a good idea! Are you going to stain it all dark?


Sent from my iPhone using Aquarium Advice
 
It was originally goign to be stained the brown color like the rest of the stand, but wife and i decided we dont really like the broiwn, so now i have to sand at least the clear coat off most of everyhtign and will be going ebony over it. maybe 1 coat iwll do, hoping to get a burnt/burnished effect with it.

Im going to leave the one trim and the tops unfinished untill I get the rest stained, to see if maybe a different shade, or jsut clearing it would give it some high light and make the stand more prominent
 
105"x38"x20" stand I built

Word man!!! That first picture you posted with the boards around the base of the tank, look really good unstained!
( cedar or red oak I think you mentioned?)

Sent from my iPhone using Aquarium Advice
 
105"x38"x20" stand I built

quick Q, wondering how my plant and driftwood setup shoudl be.


my sub slopes up towards rear of the tank. Wondering if i should do A or B.

A brings both sides low then high in the middle with a central peice of wood or whatnor,

B has high growth on the side with more of a void in the middle. with driftwood on either sides of this "void"


I am personally leaning towards B i think, as it makes your eyes scan the whole tank rather than having a big cluster in the middle. Opinions? I know theres some japanese sacred formulas and rules of thirds to follow here, but I do not know them.


kpTI2b3.png


Very nice stand and setup. That cabinet space is huge. Plenty of room for a decent size CO2 tank or pretty much anything else.
Will you be installing light inside of the cabinet? An expensive shop light or led strip should do fine. Perhaps have it come on/off with a trigger on one of the doors.
How has the design come along inside the tank? This might be a little late but here is an article about layout: [URL="http://aquascapinglove.com/basics/getting-started-aquascaping/]Getting Started with Aquascaping[/URL]

Edit: I like B assuming the DW is off center a bit.
Sent from my iPhone using Aquarium Advice
 
didnt think of light inside the cabinetr, not really necessary as I have a pot liugth almost directly infront and above the tank which shines a lot of light into it with the doors opened up.

I have decided on B as well, just need to find a nice center piece of driftwood (will offset it 2/3 from the right), that doesnt cost 100$+

Right now I am showcasing 125 gallons of muck, super cloudy water still, the jet fell off the filters output when i was messing with it besicaly destroying the cap on one end of the tank and pumping soil everywhere. Right now I have osme baby swords in there, some tall random plant from LFS, and what a seller desribed as (weird octoput plant) to me it looks like chives. Have a bunch of saggitarious coming which will be my fore/midground plant. So need to start doing large water changes to clear the tank up. It has never been very clear.
PS that water clear stuff, does it work by bonding suspensed particles so the filter cna pick it up better? I have 2 polishing pads in the fx5 but they dont seem to be doing much.

Some more pics. The woodwork is basicaly done, on to sanding and staining. Just have to make some small 1" drop beuty oak veneers under the crown to cover the pine back board. Got the glass for the top ordered. It encomases the whole surface area of the aquarium, and leaves a 3" tall slit along the back for gas exchange. the LED will sit ontop of the glass. I have a very wide plastic center brace on the tank, so raising the light should help lessen the shadow cast by it in the center.
I am also re staining the whole thing, to me much much darker, almost a burn oak look, still a satin clear. Got some nice brushed stainless handles for it too. You can see from the right side i kinda goofed and the crown cant go all the way full depth, so I had to stop it up against the wall. Will add some pine backing baord behidn it so you cant see all the way through.

49GIsWZ.jpg

YOfE5xK.jpg

YOfE5xK.jpg

flip up top. Fits nicely. Still need to make a rear brace so the glass has full support around the perimeter and to add overall rigidity. Using hydauylic prop rods like on the trunk of cars (but much less force) to help with opening and keeping it open. I dont want to use a prop rod in fear of knocking it over, and having the lid come down causing all sorts of damage.
c6YiiNv.jpg
 
Wow what a gorgeous setup! Who needs TV when you have TV like this?? That I could watch for hours...


Caleb
 
That's one heck of a build there man! Nice work!!

Sent from my SAMSUNG-SM-G900A using Aquarium Advice mobile app
 
Back
Top Bottom