You are using an out of date browser. It may not display this or other websites correctly.
You should upgrade or use an alternative browser.
You should upgrade or use an alternative browser.
200g Plywood Build
- Thread starter Flake
- Start date
The friendliest place on the web for anyone with an interest in aquariums or fish keeping!
If you have answers, please help by responding to the unanswered posts.
If you have answers, please help by responding to the unanswered posts.
Flake
Aquarium Advice Addict
i've heard good things about koralia. If you say you like them, I trust you. 
Flake
Aquarium Advice Addict
So, what is the bestest most superduper sump plan, my sump masters? 
I've been looking into something simple like this one:

Not my art xD
I've been looking into something simple like this one:

Not my art xD
Flake
Aquarium Advice Addict
Haha. Koralia it is. Which magnum do you use? What's your flowrate of choice?
Ok, i was looking at your pictures of you building your stand i could have swore you were my cousin. You look just like her. I thought for a second my cousin was the fish enthusiast. The funny thing is she lives in Georgia too. I almost peed my pants.
*EDIT*
Either way i cant now but i will draw up some of my sump designs tonight.

*EDIT*
Either way i cant now but i will draw up some of my sump designs tonight.
Flake
Aquarium Advice Addict
hahaha etunes xD
i've got a couple twins apparently. I've heard that before.
Thanks for the vids fishmonkey. I like his design.
i've got a couple twins apparently. I've heard that before.
Thanks for the vids fishmonkey. I like his design.
fishmonkey
Aquarium Advice Addict
yep its what i made and it works great!
Flake
Aquarium Advice Addict
i may try this. It's nice to see one that's not amazingly complicated.
fishmonkey
Aquarium Advice Addict
so now what do you need help with?
Flake
Aquarium Advice Addict
unless anyone wants to take a vacation to scenic georgia and help sand, i think i'm good for now xD
Speakerman
Aquarium Advice FINatic
I use 2 koralia #3 for my 75g, in addition to my 1100gph return pump, it's nearly too much water flow. With a tank your sized, I'd probably do a 2400gph return pump with 4 koralia #3
You'll want a pair of skimmer boxes, I used these and they are easy to install and work great. However they come with a glass drill bit, and you'll need a wood bit, I'm sure you could call the owner and tell him what you'll need and he'll hook you up, probably be cheaper as well. TX Holey Rocks
As far as your sump goes, it's really a must, and I wouldn't consider you tank finished or even that it can hold water until you have your sump build and tested as well.
It's not completely necessary to have baffels, I have a 35g sump with no baffels and a 39g refugium. However if you built your sump from plywood, it would be extremely easy to build it with baffels, something simple, like 1 small section for the drop-in and skimmer, 1 large section for refugium, 1 small section for the return pump. Sump's main purpose is to hide your skimmer(and other equipment), act as a refugium and increase water volume. imo
Flake
Aquarium Advice Addict
So slight progress and some decisions.
Got the top jigged out. (yay!) Decided to fiberglass first and use the pond armor as a gel coat. A really uber gel coat.
The next decision is that we had to scrap lighting plans D: (onoz) Since the tank is going to be right behind the sofa, having MH lighting means they need to be suspended. Basically, i'd be sunburning anyone who sat there. So flourescents are back. we're putting on 3 24" fixtures so its going to be bright enough.
The sofa being really heavy and in front poses a problem for the sump as well. So i'm doing things a little different. There will be a large rubbermaid tub down there with the skimmer in it and two canister filters. I'm baisically making a sump using the tank as the chamber. A sump will most likely be added at a later date once we see what the routine is going to be like on this tank but for now, this is the best way to do this for the space it needs to be in.
Boulder
Aquarium Advice Activist
- Joined
- Jun 9, 2009
- Messages
- 167
Flake - gonna be an inspirational build to follow. Best of luck!
Can I ask, what kind of joint did you use at your corners? It looks like a straight butt joint with wood-screws into the ply. So is there a reinforcement block to support the corner from both axis? Probably couldn't really add a dado or box corner or dovetail to add strength ... I'm curious to how you are getting your corner strength.
Can I ask, what kind of joint did you use at your corners? It looks like a straight butt joint with wood-screws into the ply. So is there a reinforcement block to support the corner from both axis? Probably couldn't really add a dado or box corner or dovetail to add strength ... I'm curious to how you are getting your corner strength.
MichaelsLilGray
Aquarium Advice FINatic
subscribing to this one ^.^
Speakerman
Aquarium Advice FINatic
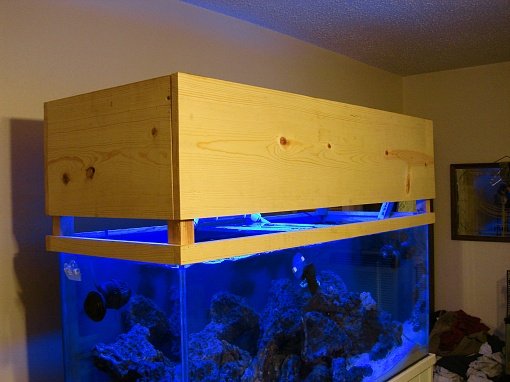
metal halides do not need to be suspended, or hung from the ceiling.
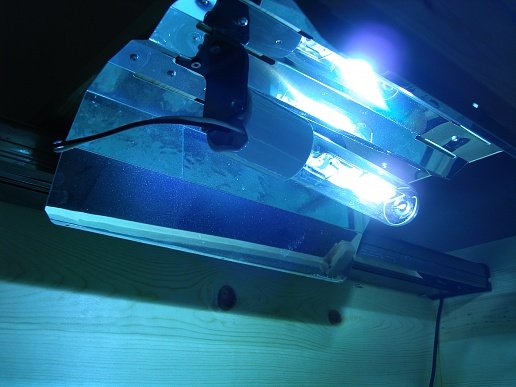
This is something I threw together in about an hour's work. Then about another hour mounting and fabricating the mount for my MH socket. (which I could have bought for like 5 bucks..)
It'd be pretty easy to build one for your tank, and if you build it high with an open top and vented sides the heat isn't an issue. (heat rises) sucks cooler air in through the sides and up through the top as it heats, sort of convection cooling.
Attachments
Speakerman
Aquarium Advice FINatic
oh, the front panel, is a door, the hinges are mounted on top and it flips up, cost me about 40 bucks total.
Flake
Aquarium Advice Addict
Thanks!
I'm no carpenter so I don't know joint names. The plans I've found basically just use enough screws to distribute the pressure in the tank. I think that's what you're asking.
We strengthened a garf plan.
http://garf.org/tank/buildtank.asp
Looking at plans may answer your question better than I can.
I'm no carpenter so I don't know joint names. The plans I've found basically just use enough screws to distribute the pressure in the tank. I think that's what you're asking.
We strengthened a garf plan.
http://garf.org/tank/buildtank.asp
Looking at plans may answer your question better than I can.
Flake
Aquarium Advice Addict
Problem with that, Speakerman, is that putting on an open canopy is just inviting a cat to get in it. It's a big box. 
Speakerman
Aquarium Advice FINatic
egg crate the top of it.
Flake
Aquarium Advice Addict
You underestimate these cats. I wouldn't trust egg crate with that kind of weight. We have a few 20lb tomcats that love being high and warm, I don't really want them up there at all.
Similar threads
- Replies
- 2
- Views
- 230
- Replies
- 4
- Views
- 466
- Replies
- 2
- Views
- 329
- Replies
- 3
- Views
- 377


