72 AGA Bowfront DIY Stand results !

The friendliest place on the web for anyone with an interest in aquariums or fish keeping!
If you have answers, please help by responding to the unanswered posts.

Toker95

Aquarium Advice Regular
Joined
Mar 11, 2005
Messages
74
Location
Eastern Shore Maryland
Howdy folks,

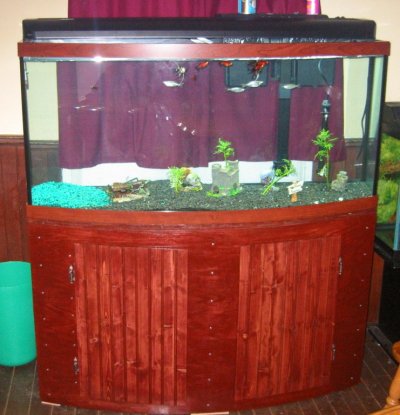
Some of yuo may recall a number of questions I posted in relation to building a stand for a 72 gallon AGA bow front tank. Well, it took about 4 weeks, an hour or two every other night to finish it. Totalled about 30-40 hours total. (And i still have some finishing touchs).

Anyway, since I've seen so very few of these as a DIY, I felt compelled to post pictures. I will be more than happy to take custom pictures on request for anyone that is interested.

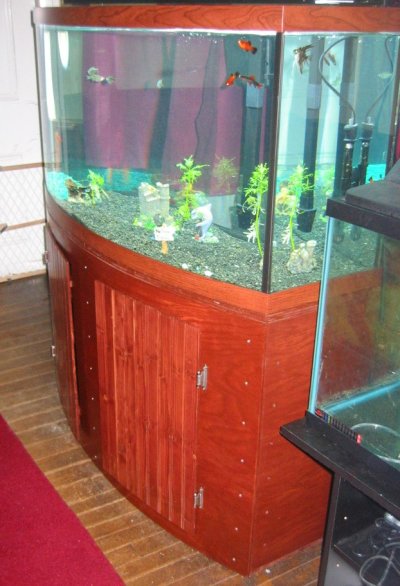
Bear in mind that I still need to redo the doors (good idea, bad implementation, I'll explain later), I haven't put the door magnet or handles on, and the tank-to-stand molding is not on. Nor have I built the hood (thats gonna wait a little while).

Nonetheless, this is made with 4 2x4 pillars in the centers and front corners. 2x6 in the rear corners. 3/4" Oak Veneer plywood on the top, bottom and sides. 1/4" Oak Veneered plywood on the front and shelves. And Pine wainscot was used for the doors. All stained with Olympic's Red Mahogany(sp?) oil stain, and Olympic Polyeurethane.

Total cost not including labor and grief from wife = $145 +/- $10... I could have easily spent another $50 on some more refinements, but I'm very happy with what I have.
 

Attachments

  • full_frontal.jpg
    full_frontal.jpg
    186.9 KB · Views: 233
  • view_from_right.jpg
    view_from_right.jpg
    189.6 KB · Views: 232
thats amazing 8O . is it at the foot of your bed? i see a post. that would be nice, if your at the right angle your fish will look enormous watching you sleep. and when you wake up you see this huge face staring at u :)
 
Nope - Dining room. You see a chair that survived my cropping (sigh).

I love the look of a bowfront. It seems that if you look horizontally into it, you get a good view, but if you look down into it, or from the side to the center it will play some games with your eyes.

Unfortunately for this tank, we live in a 150+yr old farmhouse. Its really not in the greatest shape, and while my wife had some really nice ideas on where to place the tank, we really had to consider floor strength with this tank. I would be forced to consider reinforcing the floor if we moved it from its location, or acquired anything larger.

I honestly cannot say enough about how scary it was filling this thing. While I am no expert carpenter (as you can tell), I can still make my way through projects. However without an easy way of -testing- the stand, it took alot of research and faith.

Anyway.... enough blabbering, off to bed for me I think...
 
lol even young people need their rest :). my friends they stay up all night chatting lol. i get all like annoying and boring when im tired :). today was the last day for school!
 
Nicely done! (y) That'll give me inspiration to begin the stand for my 75 gal.

I still need to redo the doors (good idea, bad implementation, I'll explain later)


What happened with the doors? Just taking notes here since it will soon be my turn. :)
 
I can't thank you all enough for your praise. I'll see if I can show you better pictures of some of the flaws. But I'm glad that there are others who agree with me, that for a non-expert, it turned out pretty nice. I think my wife's only real complaint is the screws. I had completely intended to stain over them, which I did on the shelves. However I had to stain it in pieces, which meant the pieces were Poly'd before the screws went in. Jury is still out on how I will darken them. (*I* like them the way they are, nice contrast).


fishyrican said:
Nicely done! (y) That'll give me inspiration to begin the stand for my 75 gal.

I still need to redo the doors (good idea, bad implementation, I'll explain later)


What happened with the doors? Just taking notes here since it will soon be my turn. :)

In the side view picture you will see how the inside edges of the doors doesn't quite mate with the bowed front of the stand. Thats the major flaw, and why I didn't put the handles or door magnets on yet. Otherwise there are a number of edges, none in front or outside that aren't as squared or smooth as they could be. And the front panel, being 1/4" plywood is very easy to chip, so when you look closely around the sides and door frame, you'll see digs and chips I could fill or sand out. I still have some finishing screws, handles and a molding to go on this. The moulding will cover the bottom finish of the tank and the 'deck' of the tank stand which shows from the side. Just a fancy patterned moulding from lowes. Couldn't get what we REALLY wanted simply because its hard to get thicker moulding to bend enough.

The doors themselves are 3" wide wainscot panels, cut to height (roughly 25 inches, the stand is 29 3/4" high). I backed them with each with two pieces of 3/4" oak plywood (leftover's) that I custom cut to match the curvature. I then used 1" finish nails to tack them in. However on one door, I didn't brace it well enough and cracked the brace. On both, it seems I should have made the curve sharper than necessary. To top it off, the panels have a vertical groove design in them. So each panel has a grove down the center (they are only 5/16" thick to start) which weakens them. Being pine, they tended to naturally warp the sides outward, which is the exact opposite direction I needed them to bend.

Its tempting to spend the $30 and get the Oak wainscot kit instead, despite the Pine staining to match rather nicely. The oak should have far less tendency to warp so easily.

I'll see if I can take some pictures and post them here shortly. Sorry to blabber so much, I'm just happy to be receiving praise.
 
Back
Top Bottom