Algae Turf Scrubber (ATS) DIY build

The friendliest place on the web for anyone with an interest in aquariums or fish keeping!
If you have answers, please help by responding to the unanswered posts.

Floyd R Turbo

Aquarium Advice Addict
Joined
Feb 7, 2009
Messages
1,682
Location
West Des Moines, Iowa
I built this after much thought and design for this tank:

http://www.aquariumadvice.com/forums/f11/tank-journal-125-reef-125546.html

and decided it was worth putting into a separate thread. For those that aren't familiar with what an ATS is, this is the thread that sparked the idea:

Mega-Powerful Nitrate and Phosphate Remover Replaces Skimmer, Refugium, Everything - Reef Sanctuary

Beware, that thread is over 2 years old and 1300+ posts. Here's the site by the guy that started the thread:

Algae Scrubbers • Index page

And here is my design. First, the CAD plans:

img_1165518_0_4d56abade8fafc69dded81fa46129c80.jpg


img_1165518_1_2fbb66b87d8c75d60f6edffe12902649.jpg


img_1165518_2_7e10cd4a282d3a0a0ef831d9990fa17f.jpg


img_1165518_3_dd9f630cb1f1852962e0279336142338.jpg


img_1165518_4_ec6ba33a30fb57cd4a1ec8f779721df7.jpg
 
Next, the finished product. Lots of pics here so this will be several posts:

This is the acrylic box that my Dad made for me:

img_1165519_0_2923d9ba71e0db453c5bedd17d3b904a.jpg


Bulkhead drain (added a second)

img_1165519_1_7835e987646d08a4980d2d129934c911.jpg


Support for sitting on tank

img_1165519_2_780eadc49a69c3638f10b3251be3a1be.jpg


Dry fitting the PVC with the 40 Breeder sump in place

img_1165519_3_ac0e333b12cfa8eb57a5dc3af4d8b3ec.jpg


Overflow pipe with screen

img_1165519_4_59d7811e807c1a66c0b34d84df5bb4cb.jpg


Lights and reflectors installed and wired (power & heat test)

img_1165519_5_c4b845edf19bd92f69e2abc7997fecbb.jpg
 
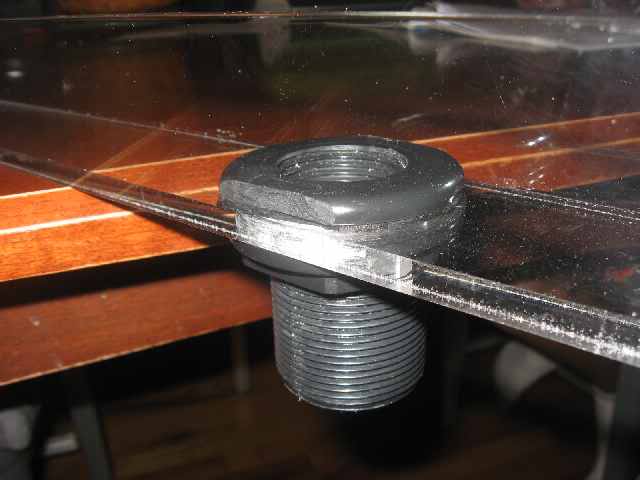
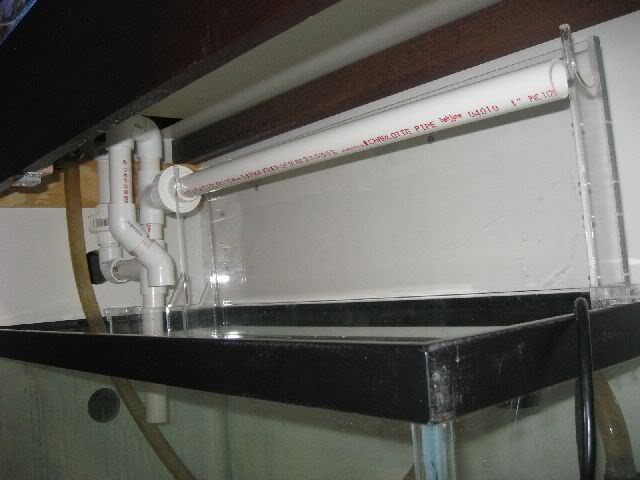
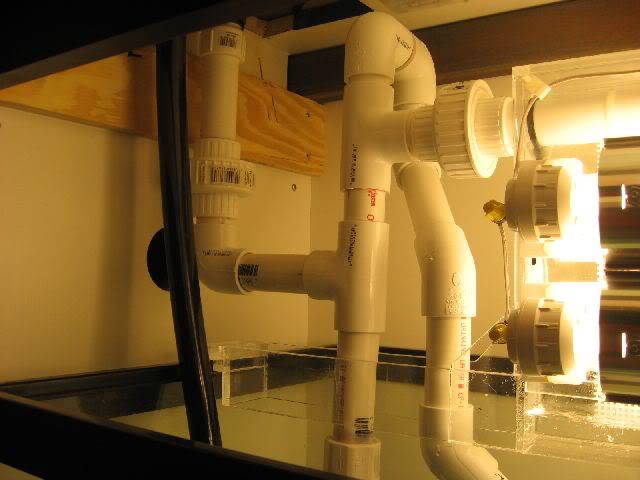
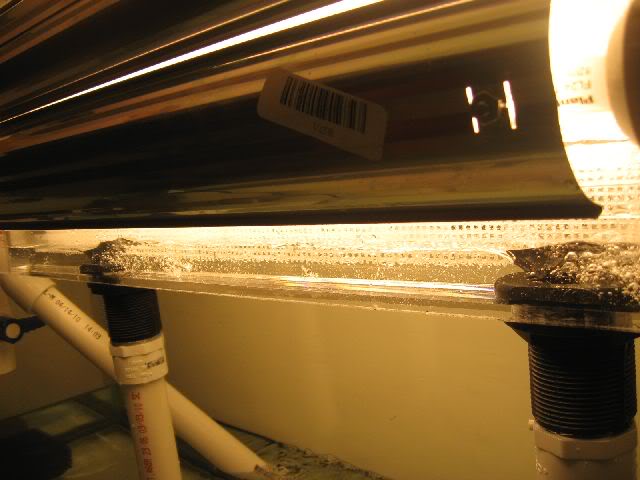
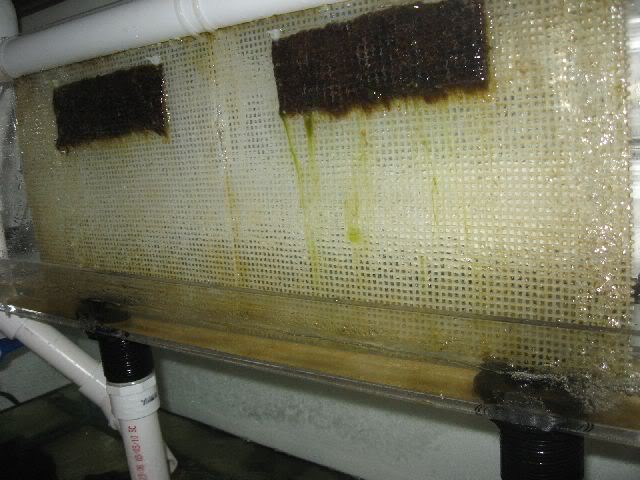
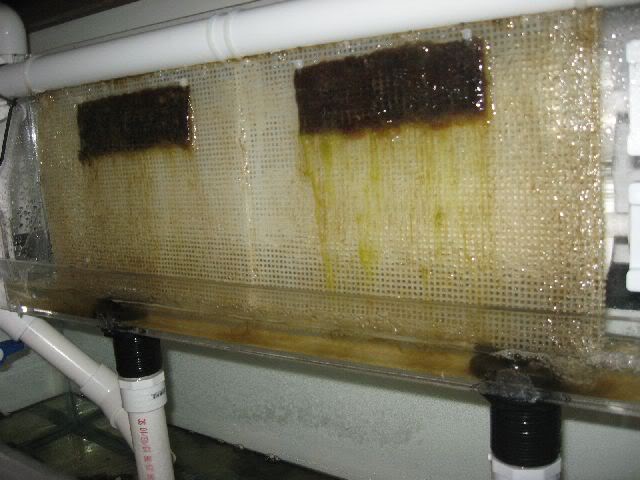
Here's the outflow from the ATS

img_1165524_0_531ee638d33f32c85df3e7663e00a58d.jpg


and then then overflow tube

img_1165524_1_78040284fee5b2ca826865808f03e687.jpg


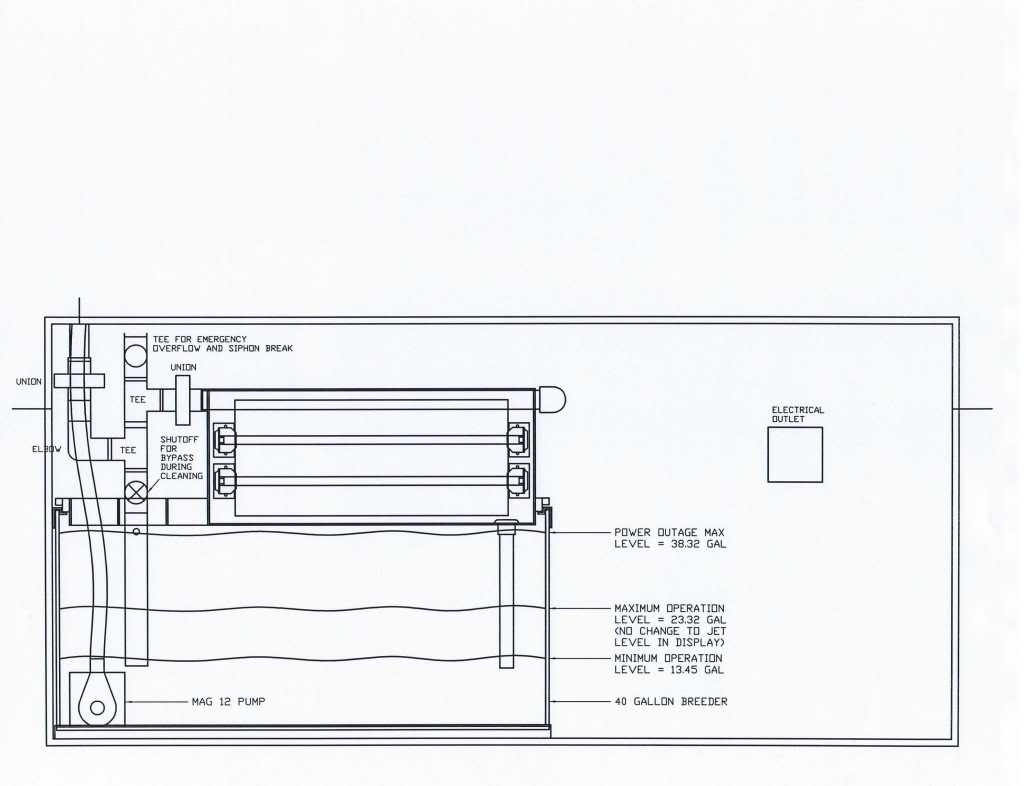
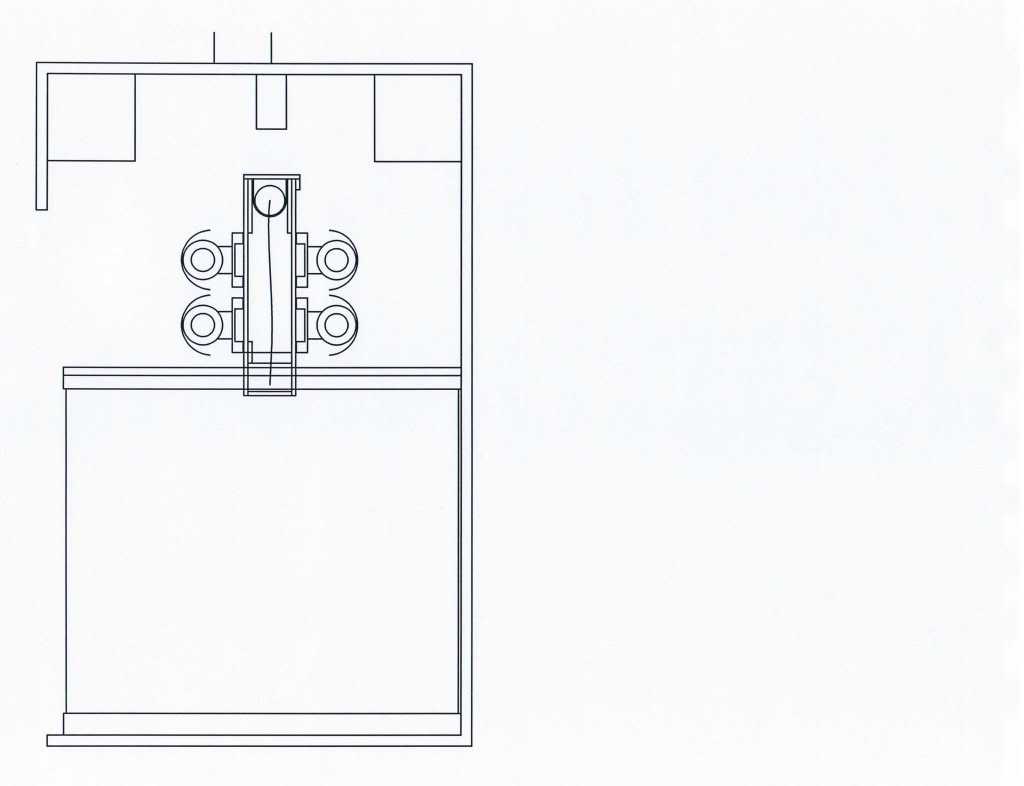
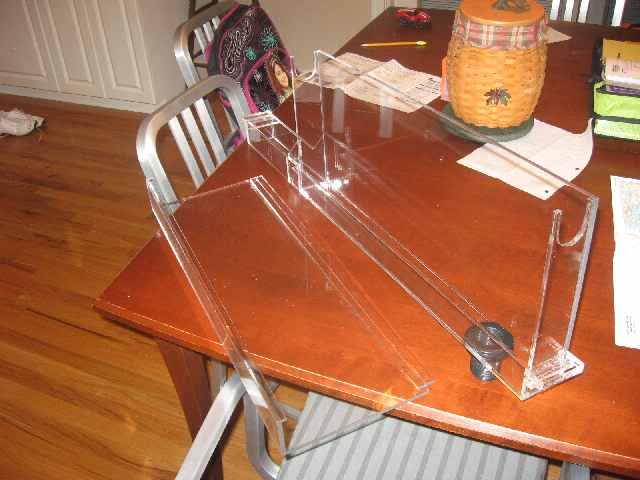
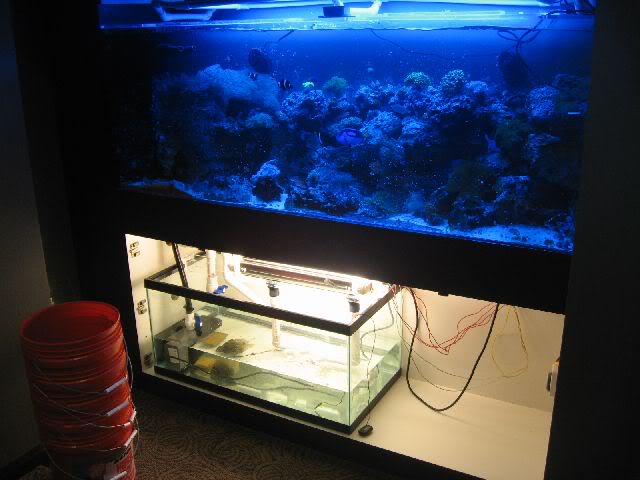
The first issue I discovered was that in the process of taking out the old sump, cleaning the pump, and moving the pump from the far right like it was here:

img_1165524_2_9f731801ac5b5608b22463e23951e662.jpg


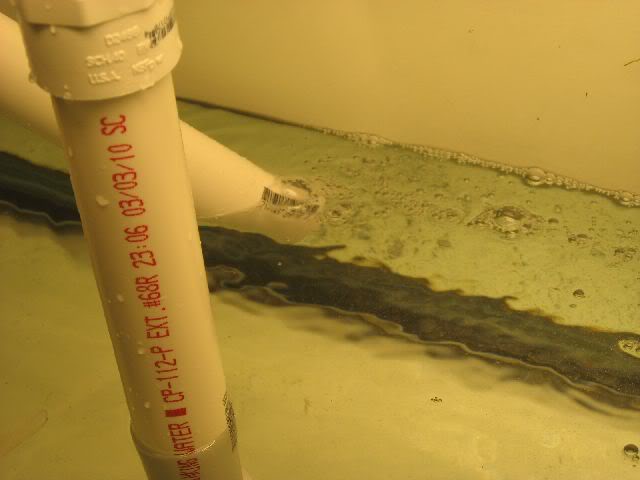
the pump flow rate increased by about 10-15%, which caused there to be enough flow to push over the top of the emergency overflow pipe (which is there in case the screen slot clogs up). It was enough so that I added a pipe extension to prevent splashing. I came back after a couple hours and the air had blown out of the pipe and it was siphoning all the water down the pipe. I shortened the pipe and put my hand over it to reset the flow, and then turned the post-pump shutoff valve about 1/4 of the way, and the emergency overflow stopped.

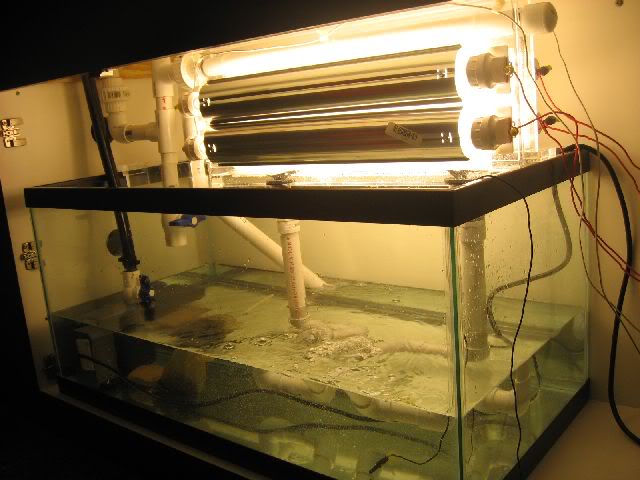
The second issue was that the bubble coming out into the sump from the ATS were occasionally 'blowing' quite a bit. I removed the extensions under the sump water level and turned the second 90 straight up. There is no longer a blowing issue, but there are lots of microbubbles. I had to put the foam intake on the return pump.

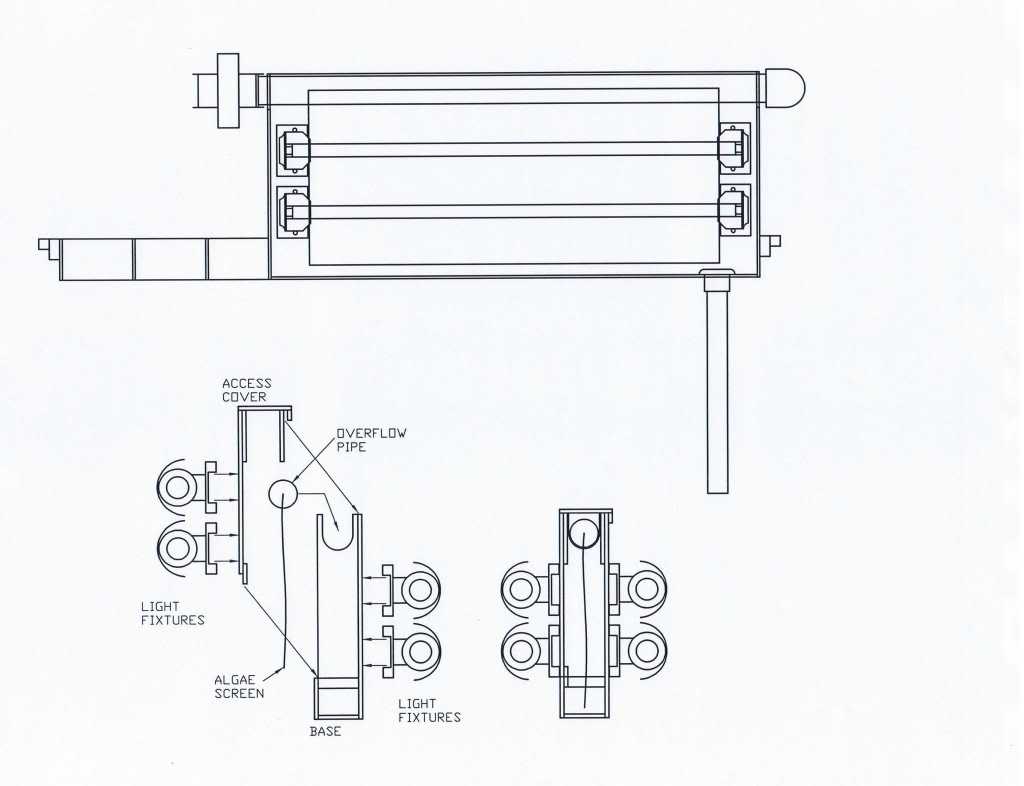
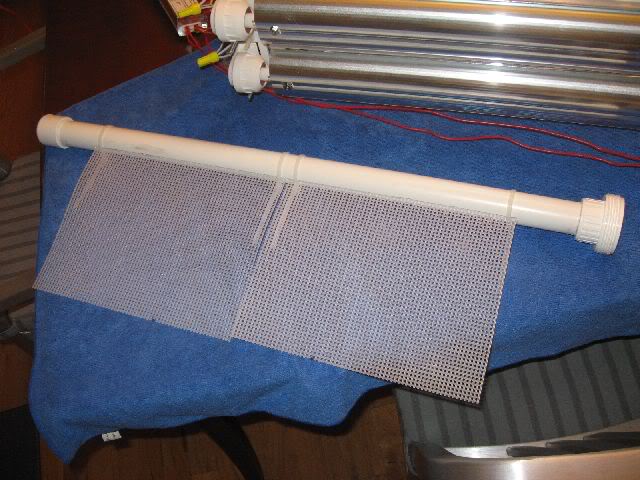
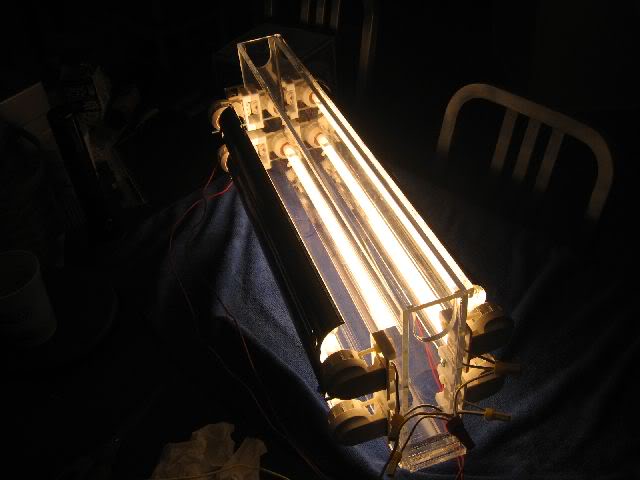
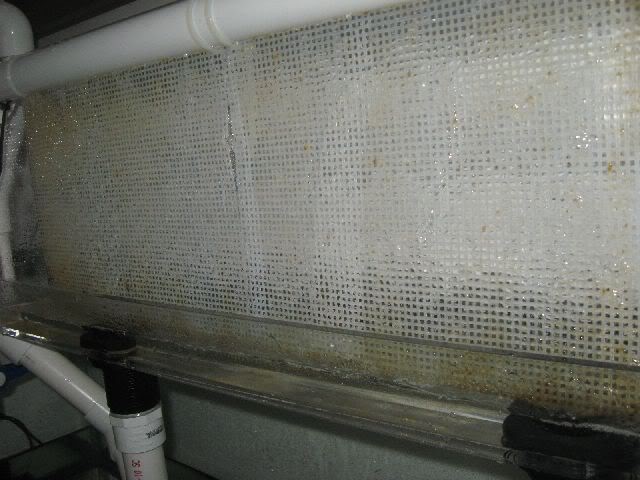
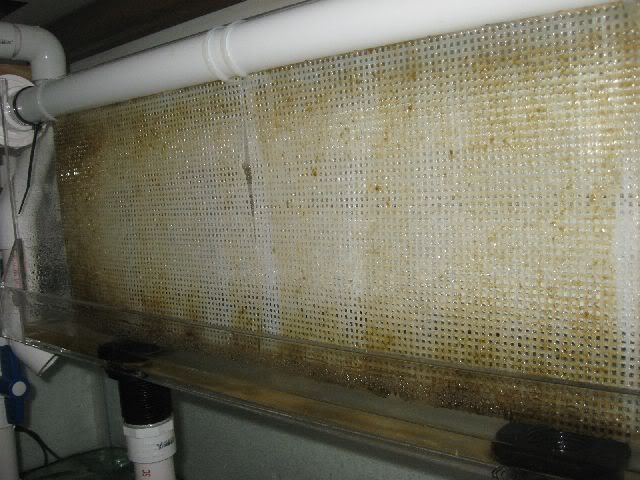
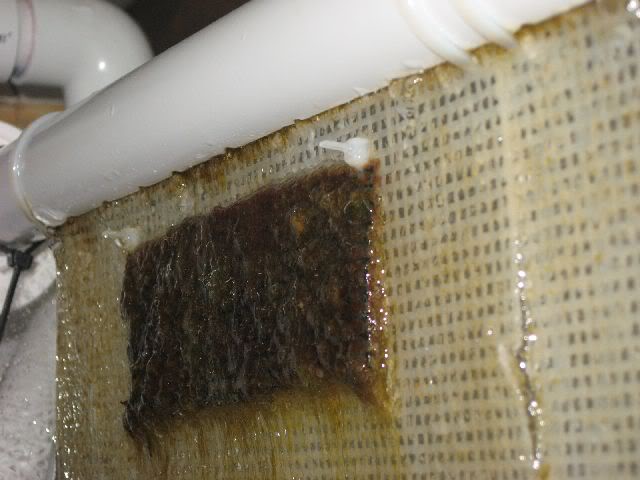
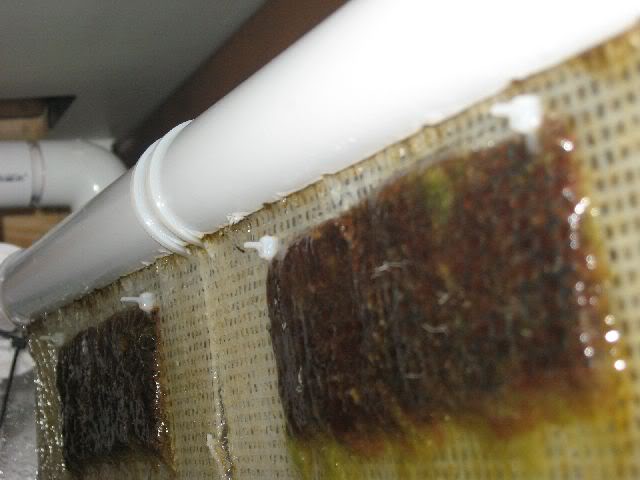
I'm going to have to figure out a way to deal with the microbubbles. The idea behind the ATS is that the water from the DT flows down the illuminated screen, and algae grows (very fast) on that screen. The algae filters all toxins out of the water (ammonia, nitrite, nitrate, phosphate, silicate, heavy metals, etc) and leaves everything in the water that you coral find beneficial. This is the way the ocean performs it's own natural filtration - with algae.

The only maintenance needed is cleaning of the screen, usually every 7 days (give or take, depending on growth) you scrape all the algae off one side of the screen (NOT while it's in the tank) and rinse the screen with fresh water. Freshwater kills off all the excess pods on the screen, which if left alone, would eat the algae until it detaches from the screen and enters the DT, and releases what it has absorbed back into the water (defeating the purpose).

Some of the big bonuses:

First, since the algae on the screen sucks up all the nutrients algae needs to grow, you get no algae growth in your DT - it will even knock out cyano bacteria over time.

Second, you get an endless supply of pods. Before cleaning the screen, you can swish it in the sump to release them, and after cleaning the screen with FW you will have thousands more in no time. This will be great for the Scooter Blenny in the tank.

The second one is where I'm concerned, because due to the amount of microbubbles in the sump, I currently have to use the foam filter on the pump intake. My thought is that the pods should have no problem making it through that foam, through the pump, and into the DT. But if that's not the case, and they can't make it through, I will have to add some up/downs, which will be a pain in the butt with the tank already in place. I have another 40 breeder that I could swap out while I silicone some glass in place, but still, a pain. I am thinking I can make some out of plexiglass and fit it in place with some rubber strips so that it's not permanent.

The other issue with the up/downs is that they would be right under the shutoff valve at the bottom of the overflow. That valve can be opened to shut off the screen so that it can be cleaned, having up/downs right beneath it just makes it a bit more complicated.

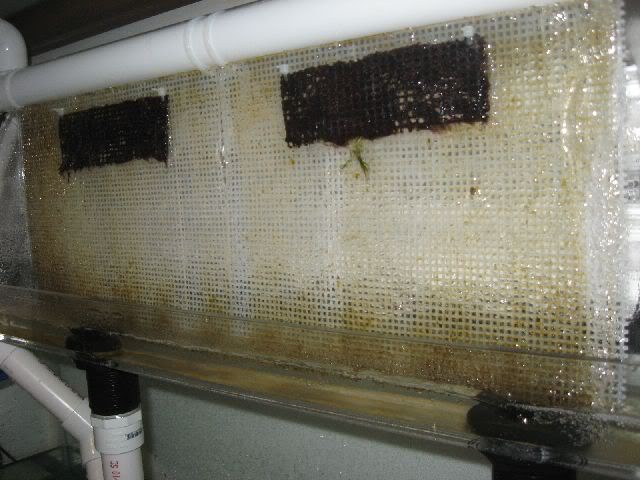
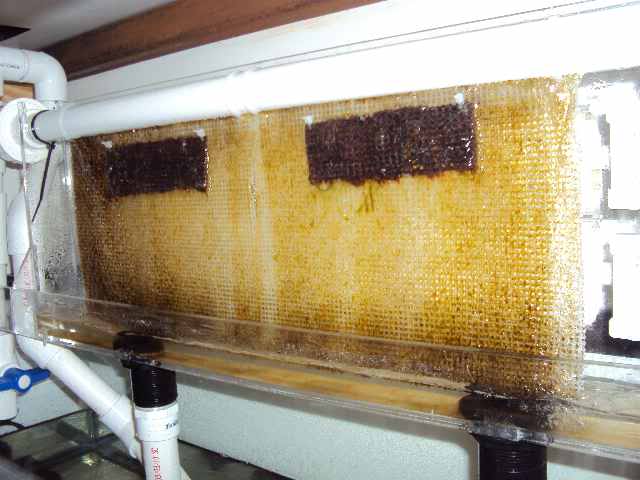
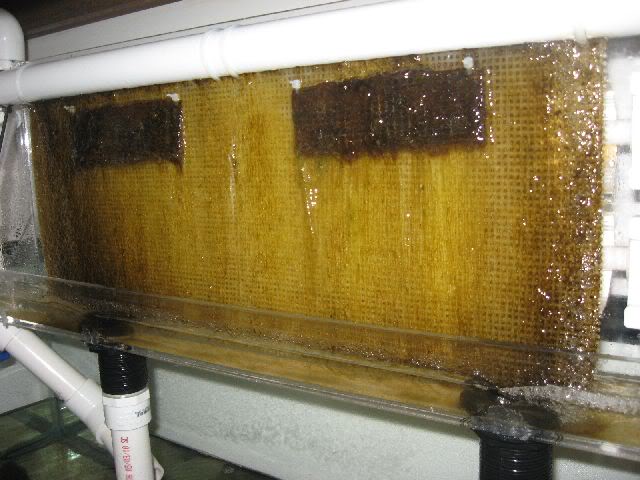
Overall, the build went pretty much just as planned. I ordered a seed screen from Inland Aquatics in Terre Haute, IN today and it will be here tomorrow. I will attach the seed screen to the top edge of the filter screen, and should have a full screen of algae within a week or so.
 
How is your heat sink held together? Glue might actually insulate the ballast. Machine screws and thermal compound or welding would be your best options.
 
I bonded the fins together on the ends with JB weld. I checked the ballast this morning (it runs from 4pm to 7am) and the ballast was just warm to the touch and the fins were about as warm, maybe not quite as warm. The ballast currently is held onto the heat sink with 2 stainless steel screws. When I put it together at the tank, I noticed that it is not fully in direct contact with the heat sink, so I will have to get some thermal compound to ensure full contact with the heat sink. The max temp on the ballast (hotpoint) says max of 70 C and it's nowhere near that, even after running all night. However, if they neglected to leave the base doors open, it might get a little warmer.

The other thing I have yet to add is a fan connected to the same timer to circulate the air around the base cabinet, which will help keep the ballast temp down as well as cool the lights and prevent any possible warping of the acrylic - which is all 1/4", so I'm not too worried about that. But I'd hate to have to re-do the thing (or have my Dad re-do it!!)

I also stopped by a hobby store today and found the PERFECT thing for blocking the light at the top of the tube (I think I forgot to mention that piece - I started another thread about x-ray film for that purpose). It is a sheet of solid black plastic and will definitely do the trick. That is needed so the algae won't grow into the screen slot in the horizontal pipe.

Here it is:

img_1165549_0_9b4e035e751821371d6b96512ba5e6d8.jpg
 
Last edited:
Looks good! Ive built one myself after reading the entire 1300+ post. If it works out I am going to build a better version, something like yours!
 
So, I've come up with a couple ideas for how to solve my microbubble problem without being too complicated, and allowing the pods to have free flow back to the DT.

The first would be to create a series of up/downs using glass (or probably plexiglass) sheets cut just under the interior width of the tank, and then cut pieces of bubble filter foam to fit at the edges to wedge them in and hold them in place, and then more at the bottom to 'seal off' that path (some might get by, but I don't really care).

The second idea would be to add back in the vertical pipes in the ATS outflow (the ones that were blowing), drill a bunch of hole in it or something like that to prevent the blowing issue, and set up a hollowed-out block of foam with slots in the bottom so that the water would flow into it and then down slow enough that the bubbles won't get pulled down.

Any other possible suggestions?
 
Looks good! Ive built one myself after reading the entire 1300+ post. If it works out I am going to build a better version, something like yours!

I'm seriously considering making them myself. My dad (who has been with with acrylic for years making display cases and stands for antique dealers) made that piece in about 2 hours from start to finish. So if you want one custom-made let me know.

I may not worry that much about the microbubble issue after reading this

Mything the Point, Part Three: Conclusion - Reefkeeping.com
 
I'm seriously considering making them myself. My dad (who has been with with acrylic for years making display cases and stands for antique dealers) made that piece in about 2 hours from start to finish. So if you want one custom-made let me know.

Thanks Floyd!

Scott.
 
Here's the progress since Tuesday, I cut out a few notches in the tube to let a little more water thru, it made a little difference, but I still cannot open up the pump valve all the way - which is probably fine.

After much confusion on the shipping date, the seed screen showed up today from Inland Aquatics. I found out that I actually didn't need it in the first place, but found out too late, so oh well.

Here's the screen yesterday (Thursday 10/14, 4 full days)

img_1166665_0_edc74d99132fed78b828e0787e838a79.jpg


Here it is today (Friday 10/15, 5 full days)

img_1166665_1_461791245d78fa83d94c2f9d41eed407.jpg


And with the seed screen added

img_1166665_2_e350fdf908c6d8eec0d061d98086c5c8.jpg


The microbubbles seem to be not quite so prevalent anymore. I'm thinking that the screen is "slime-ing up" and as more algae grows, it may not be that big of an issue. However, I will probably add a bio-ball section around the ATS outflow. I have been informed that those will not stop the baby copepods.
 
Looks awesome, and from reading I might make one myself with a 5-10gallon tank when I get to start up my tank.
 
If you're interested, read that 1300+ post thread and then look at as much as you can on the Algae Scrubber site. It's important to understand the idea so you know how to do it right.
 
Update

Here's an update on the ATS.

Picture from 10/16

img_1168440_0_ccf4179f41bbfe9bac43de166c6dafb2.jpg


And 10/18, before cleaning

img_1168440_1_a653ea6e5a4334056d4387a510b71aa3.jpg


And After

img_1168440_2_2604b48d5f56b8fc6f72221b993a9f26.jpg


Then 10/19

img_1168440_3_e9a58931c4dee8107c16befdb901427a.jpg


and some close-ups of the tube slot, which looks like it is clogging a bit

img_1168440_4_451546410710cced6e1b0ce5cf94dc95.jpg


img_1168440_5_f9bd862d04e9b5be97c6f2ebecda4175.jpg


...so yesterday I extended the cut-outs along the edge of the slot ever so slightly to allow a little more water flow. After I raised the sump level, I got a bit more flow going over the spillway. My goal here is to get the flow even and maximum across the screen. This may take some toying with to get it tuned in right.

I also was able to look at the screen at the insertion point, and it wasn't as bad as I thought. On his site, SantaMonica told me I didn't need the light blocker but really never explained why. I'm thinking it would be good to have, so I'm going to try it, but only after the seed screen can be removed. Right now it's in the way. I was told I didn't really need that either but since I have it, I'll use it - and I'll use it on another system also.

I got the go-ahead to do an ATS on the 200 FOWLR that I also maintain, that one will be much larger - probably 36" wide screen and 48" lights in a similar enclosure sitting on top of a 40 long, because it doesn't have a center brace (40L's are hard to find, but I found one on CL)

Another comment, since I took off the skimmer, Nitrates went up slightly to about 0.5 ppm. Before the first screen cleaning, they went to zero on Salifert kit...and Phosphates are already dropping (from 0.25 down to 0.03-0.10). I have never seen zero phosphates in this tank (even with 250mL Rowaphos) so I will be interested to see when that will happen.
 
Wow, I definitely need a SW tank mentor/tutor, b/c I just read this whole thread and I didn't understand or know anything about half the stuff you were saying Floyd, man I need something lol, but luckily I'm not doing reefs yet, although I now have a very small peice, about the size of less than half of your pinky, so it's pretty small lol, and may not even be alive :( 
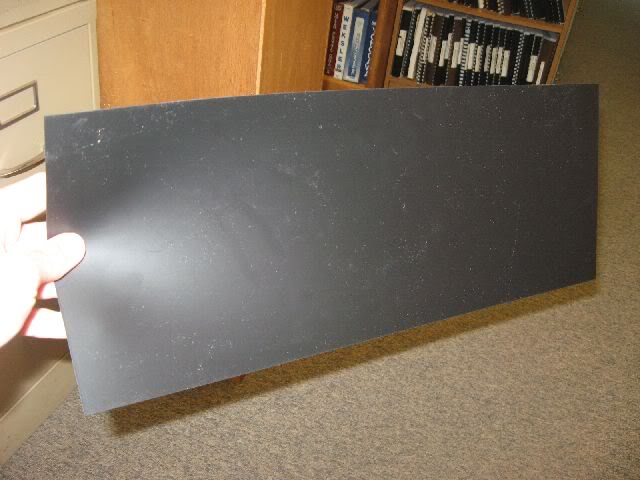
but thats the reason my LFS guy just gave it to me, he said it was dead, and either thats true, or he was hooking me up nice, and he did a lot of that that day... Thanks for being patient!
 
The algae filters all toxins out of the water (ammonia, nitrite, nitrate, phosphate, silicate, heavy metals, etc) and leaves everything in the water that you coral find beneficial. This is the way the ocean performs it's own natural filtration - with algae.

Correction here (because I can't edit that post anymore) an ATS doesn't remove silicates.

I did find out that when you are running an ATS on your system, the algae will produce:

Vitamins:

Vitamin A
Vitamin E
Vitamin B6
Beta Carotene
Riboflavin
Thiamine
Biotin
Ascorbate (breaks chloramines into chlorine+ammonia)
N5-Methyltetrahydrofolate
Other tetrahydrofolate polyglutamates
Oxidized folate monoglutamates
Nicotinate
Pantothenate

Amino Acids:

Alanine
Aspartic acid
Leucine
Valine
Tyrosine
Phenylalanine
Methionine
Aspartate
Glutamate
Serine
Proline


Carbohydrates (sugars):

Galactose
Glucose
Maltose
Xylose

Misc:

Glycolic Acid
Citric Acid (breaks chloramines into chlorine+ammonia)
Nucleic Acid derivatives
Polypeptides
Proteins
Enzymes
Lipids

(copied from a post on Reef Sanctuary thread)

http://www.reefsanctuary.com/forums...kimmer-refugium-everything-33.html#post871008
 
Back
Top Bottom