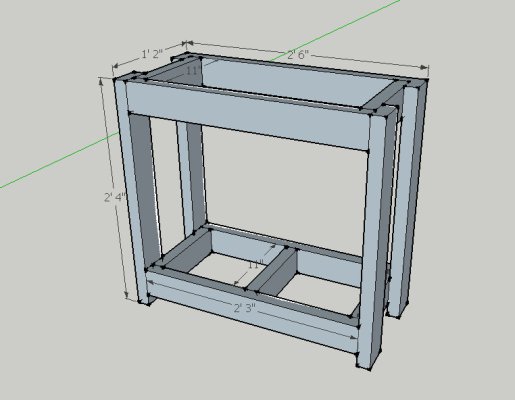
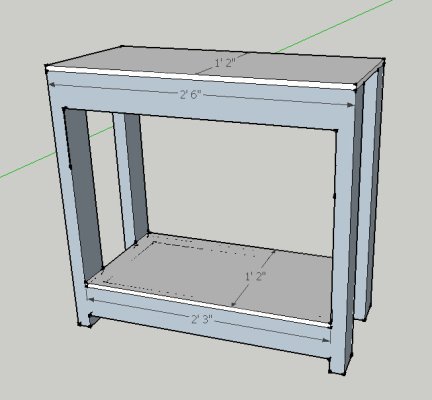
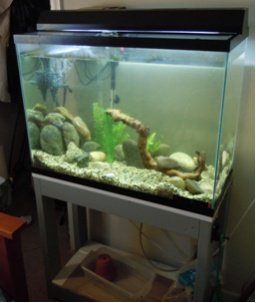
I made a small DIY co2 for my 2.5g but this will be the same setup for this 40g build but with bigger bottles so I decided that since I'm not going to be making another big project for this build for a week or so I'll show you the small DIY co2 I did.
First drill small 5mm holes in the caps of the bottles

One hole in the yeast and sugar bottle cap and two holes in the co2/alcohol filter bottle cap.

These are 20oz bottles. But for my 40g the sugar/yeast bottle will be a 2liter. Yeast bottle is the green one and cap. Filter bottle is the clear one w/ red cap.

Get some airline tubing and cut the end of it at a slant. Push it through the hole and wiggle it through making sure it doesn't collapse in on itself. This should give you an airtight seal w/o silicone.

Next take the other end of the tubing and cut it at a slant. Before you cut it make sure it can go all the way down to the bottom of the filter bottle. Pull it through one of the holes in the cap down below the the waterline of the filter bottle. Then take another separate piece of tubing and stick it through the 2nd hole in the cap. Make sure this one is above the water level of the filter bottle. Sugar and yeast produce alcohol as well as co2 so the filter bottle is simply there to filter the alcohol out of the co2 so none of it gets into your tank which would kill your stock. The line from the yeast bottle must run under the filter bottle's water line to pull out the alcohol. The filter bottles 2nd tubing must be above the water line because this line will go directly into ur tank and you don't want alcohol to siphon into you tank. Just the co2. VERY IMPORTANT!

Now you can see the finished set up minus the sugar/yeast mix and water in the filter bottle. I recommend cutting the line that goes into your tank somewhere and adding a check valve.

My recipe for a 2 liter bottle is 2 teaspoons of yeast and 2 cups of sugar. Fill one bottle 2/3 of the way up with warm water (comfortable showering warmth) and put in your yeast in and shake for 30 seconds. If water is too hot then yeast will die. If too cold yeast will not activate. After the yeast is added then add your sugar to the yeast bottle and shake vigorously for 1 minute. Then fill filter bottle with warm water about 2/3 the way up and screw your caps onto their respective bottles. After that you can diffuse the co2 through various methods into your water. I use a power head to smash the bubble from the airline tubing into smaller bubbles for better diffusion. You can simply run it through your filter's intake too. Wait for about an hour and you should see quite a bit of co2 being produced! For smaller bottle or bigger bottles use the same yeast:sugar ratio. For example a 1 liter bottle you'd use 1 teaspoon of yeast and one cup of sugar.
If you have questions feel free to ask! Thanks and I hope you enjoy this quick DIY project!
First drill small 5mm holes in the caps of the bottles
One hole in the yeast and sugar bottle cap and two holes in the co2/alcohol filter bottle cap.
These are 20oz bottles. But for my 40g the sugar/yeast bottle will be a 2liter. Yeast bottle is the green one and cap. Filter bottle is the clear one w/ red cap.
Get some airline tubing and cut the end of it at a slant. Push it through the hole and wiggle it through making sure it doesn't collapse in on itself. This should give you an airtight seal w/o silicone.
Next take the other end of the tubing and cut it at a slant. Before you cut it make sure it can go all the way down to the bottom of the filter bottle. Pull it through one of the holes in the cap down below the the waterline of the filter bottle. Then take another separate piece of tubing and stick it through the 2nd hole in the cap. Make sure this one is above the water level of the filter bottle. Sugar and yeast produce alcohol as well as co2 so the filter bottle is simply there to filter the alcohol out of the co2 so none of it gets into your tank which would kill your stock. The line from the yeast bottle must run under the filter bottle's water line to pull out the alcohol. The filter bottles 2nd tubing must be above the water line because this line will go directly into ur tank and you don't want alcohol to siphon into you tank. Just the co2. VERY IMPORTANT!
Now you can see the finished set up minus the sugar/yeast mix and water in the filter bottle. I recommend cutting the line that goes into your tank somewhere and adding a check valve.
My recipe for a 2 liter bottle is 2 teaspoons of yeast and 2 cups of sugar. Fill one bottle 2/3 of the way up with warm water (comfortable showering warmth) and put in your yeast in and shake for 30 seconds. If water is too hot then yeast will die. If too cold yeast will not activate. After the yeast is added then add your sugar to the yeast bottle and shake vigorously for 1 minute. Then fill filter bottle with warm water about 2/3 the way up and screw your caps onto their respective bottles. After that you can diffuse the co2 through various methods into your water. I use a power head to smash the bubble from the airline tubing into smaller bubbles for better diffusion. You can simply run it through your filter's intake too. Wait for about an hour and you should see quite a bit of co2 being produced! For smaller bottle or bigger bottles use the same yeast:sugar ratio. For example a 1 liter bottle you'd use 1 teaspoon of yeast and one cup of sugar.
If you have questions feel free to ask! Thanks and I hope you enjoy this quick DIY project!