Here is the parts list folks. Most of the parts can be obtained from most electronics supplies store or mail order outfits.
PARTS LIST
RESISTORS: All ½ watt @ 2%
39 Ohms: R9
330 Ohms: R8
360 Ohms: R6
620 Ohms: R5, R7, R12
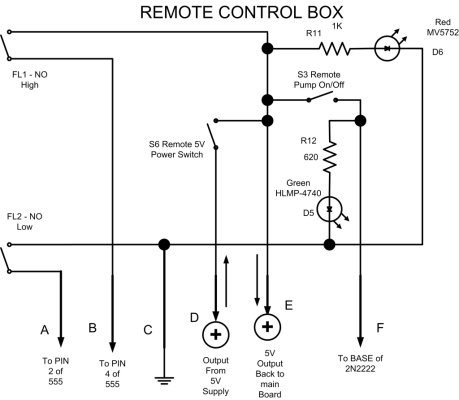
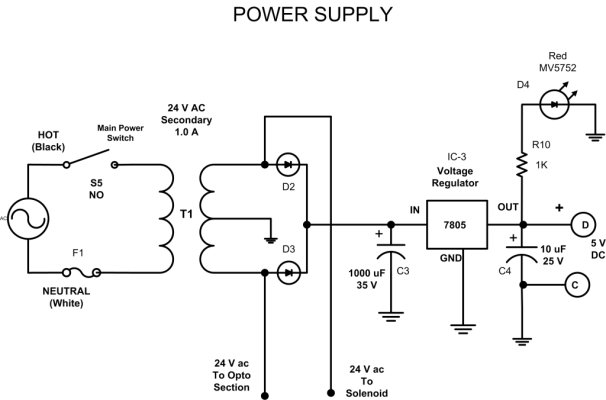
1 Kilo Ohms: R10, R11
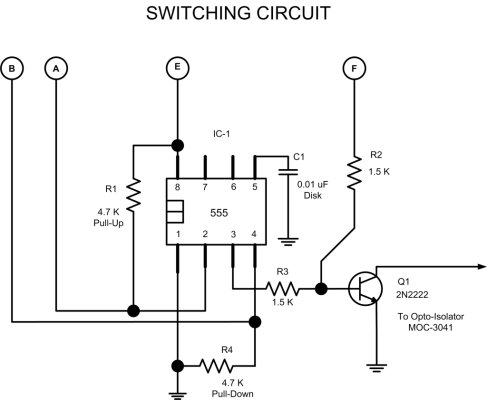
1.5 Kilo Ohms: R2, R3
4.7 Kilo Ohms: R1, R4
CAPACITORS:
C1: 0.01 Microfarad (Disk)
C2: 0.01 Microfarad @ 200 volts (Mylar)
C3: 1000 Microfarads @ 35 volts (Electrolytic)
C4: 10 Microfarads @ 25 volts (Electrolytic)
DISCREET DEVICES:
IC-1: 555 Timer Chip
IC-2: MOC3041 Optoisolator Triac Driver Chip
IC-3: 7805 Voltage Regulator Chip. Rated for 5 volts @ 1 Amp. Case Type: TO-220
Q1: 2N2222 NPN Transistor
Q2: MAC4DLM Triac Chip. Rated for 600 volts @ 4 amps. Case Type: 369D
DIODES/LED:
D1, D5: HLMP4740 Green LED
D4, D6: MV5752 Red LED
D2, D3: Rectifier Diodes. Rated for 125 volts @ 2 amps.
MISCELLANEOUS:
FL1, FL2: Reed Switches – Float Switches Normally Open (
NO) Type
S1, S2, S3, S4: Small Toggle Switches – SPST – Rated for 125 volts @ 2 amps minimum.
T1: Power Transformer – 125V/24 volts CT @ 1 amp.
F1: Fuse – 1.5 amp @ 125 volts
Solenoid: Solenoid Rated 24 volts
AC @ 500 milliamp.
Circuit Boards – Radio Shack Type.
Some Small Wire – Telephone Type Wire
Some Gauge 14 Cable – Power Cord Type
Some Electronics Solder
Some 6 Wire Cable – Telephone Type Wire
Metal Enclosure to House the Main Circuit Boards and Power Supply.
Some Plastic Standoffs to Support and Isolate your Circuit Boards
Electrician Tape
Plastic Enclosure to House your Remote Control Box
Two Wire Quick Connect (4 Required)
Four Wire Quick Connect (2 Required)
Six Wire Quick Connect (4 Required)
8)
")