DIY C02 reactor

The friendliest place on the web for anyone with an interest in aquariums or fish keeping!
If you have answers, please help by responding to the unanswered posts.

brendan

Aquarium Advice Activist
Joined
Nov 28, 2003
Messages
125
Location
Winnipeg CAN
I recently build this Co2 reator. Have anyone tried the same and what success have they had? The pictures shows foam at the end where the bubbles come out, but I have recently add fine woven mesh so the bubble that do get out are really small.
 
Hello, i am thinking of buiding the whole co2 thing do you have any designs or suggestions which can help me. i already have an idea but no designs till now, so i would compare what i am thinking with other ideas :)
 
Forgive me if you already know this, but I like to be sure when people set up CO2. The main thing to remember is to keep close track of your KH and pH, because if you have low KH you are going to create pH fluctuations that can be deadly to the fish.

Here is a link that explains the entire thing, with a schematic for the setup. The only thing I did not do was install a gas separator, but that will prevent the white flossy stuff that will accumulate at the end of your airline (where the bubbles come out) if that becomes a problem.
http://www.qsl.net/w2wdx/aquaria/diyco2.html
 
Here's what I find works best.

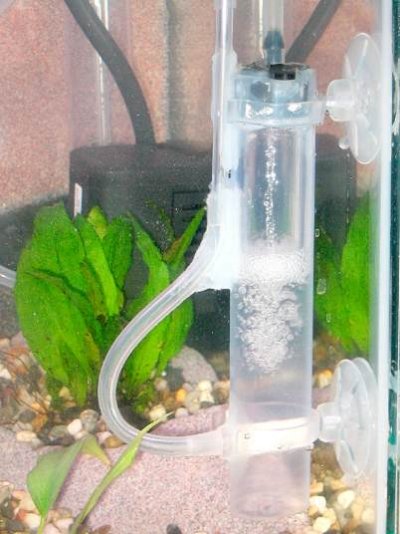
As you can see in the picture, the tube is pointing straight out from the powerhead outflow, what I have recently done is add a 90 degree elbow adaptor to the set up, this now causes the water to shoot downwards. I find this churns up the bubbles better, since they are going up and the water forces them down. Furthermore, at the end of the tube I have replaced the foam insert (shown in the picture) with a piece of mesh (any fine mesh will do, secure it with a zip tie around the outside of the tube, since I found the foam got really clogged with bateria after a while. One other thing which will help is to make sure that the tube (ie the siphon tube) you are using is long enough. Mine is only about five inches, therefor some of the bubble escape out the bottom, a longer one would solve this problem.

The recipe I use, with much success, is as follows:

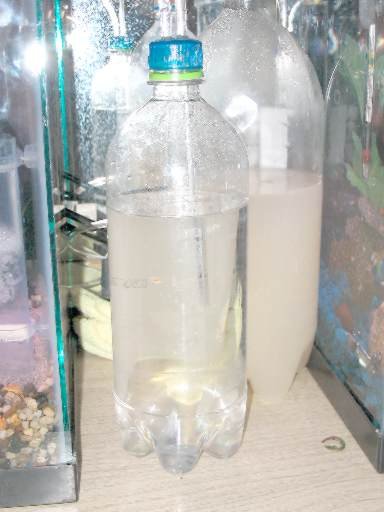
Get a two litre coke bottle, add to this...

Two cups of really hot water, use a kettle for this.
Add to the water two cups of sugar, now shake vigourously till all the sugar is disolved.
Add to more cups of cool water, two tablespoons of yeast and two tablespoons of baking soda, in this order. If the water's to hot it'll kill the yeast.
Finally add two more cups of cold water to the bottle. Shake the bottle up good and plenty.

Now connect you air hose from the bottle to the hole in the tube of the reactor like in the picture.

Things to note:

Make sure you've got an overflow bottle (ie two two litre bottles), I assuming you can figure out how to hook them up so you have only one hose going to the tube in the tank.

Also, this mix last approx. two weeks for me. You'll notice that the gas starts coming out less and less as you get close to the two week period.

Also, after introducing C02 into your tank you'll notice that the ph of your tank will drop, reason being C02 and water produce (I think it's called) Carbon Acid, hense the drop in ph or high acidity level. Get a kh test kit, then look on the net and you should be able to find a ph and kh chart that tells you the C02 level in your tank.

One thing that I have not done and you might want to consider is putting some sort of valve in the line going to the C02 reactor, much like people do when using airstones. This way you'll have a bit of control over the amount of gas going into the tank.

Hope this gives you some ideas.
 
2 tablespoons? The recipes I have use 1/4 to 1/2 teaspoons.

One nifty thing to do use to use the rigid part of a gravel vac tube, and use a piece of foam and some bioballs in there, which will toss around and break up the bubbles even more. Definitely point it straight down and position it low in the tank so the bubbles that escape have a ways to go to get to the surface. I just tried my link and it worked for me - don't know how to fix that!

There are a ton of sites on the net that discuss this, as it is such a cheap and easy way to get CO2 going. Also, that is key advice, Brendan, about the check valve, because when you disconnect your bottles to change the mix you can syphon water out of your tank in no time flat, or this can also happen when the mixture quits producing gas. I use 2 bottles on staggered schedules with a T-valve so there is only one line running into my tank.
 
Both bottles inject gas at the same time. The mixture lasts about two weeks for me, so one week I will change one bottle and leave the other one alone, the next week I will change the bottle that I skipped the last week, so that while one is going strong I change the one that is running low. That way you don't have them both dying out at the same time, causing pH fluctuations.

Also, about the recipe, the yeast multiplies so that if you use a lot of yeast it will burn through your sugar in 4-5 days - I have had best luck with relatively small amounts of yeast so the sugar lasts. If you find you are running low on CO2 soon after mixing it up, try adding more sugar to the mix and see if that helps get it going again.
 
ahh, okay, that makes sense. I just followed brendans recipe this time, I thought that sounded like alot of yeast... I have always used a quarter tablespoon or so.. and never baking soda... what is the significance of the soda?

Dave
 
Baking soda is a stabilizer and will buffer the acid (alcohol) produced by the production of CO2, thereby prolonging the life of the mixture. The alcohol is what kills the mixture in the end - that's why it smells like beer when you dump it out!
 
Ahh.. well in that case, maybe Ill leave out the soda next time and drink it when its done working! :pepsi:
 
I know it's been a while since anyone posted in this thread but I wanted to say thank you for TankGirl for that awsome link. You just answered so many of my questions and made life alot easier/cheaper fo rme :p Thanks TG! :)

Joe
 
I took a little different approach to building my own DIY CO2 reactor. Since I didn't want a bunch of plumbing hanging off the back of the tank and none of the reactors I could find on-line would fit into my 10 gallon low-light tank, I decided to get creative and ended up with the little gem in the picture.

The CO2 comes from the generator bottle (also DIY) via a seperator (Again DIY) and enters the bottom of the reractor tube which was made from scrap UGF riser tube. Water is pumped in by a small fountain pump I got at K-Mart (garden section) for all of $17.99 and enters through a button drip emmiter that I had removed the insides out of. The reactor is held in place by a couple of heater holders. It's small, easy to hide in the tank, and most of all it's effective. I used a straight pin to punch some small holes in the side of the body to keep it from overfilling with the CO2. Excess gas simply flows out of the reactor to the surface.
 

Attachments

  • img_0495.jpg
    img_0495.jpg
    32.4 KB · Views: 99
Well that is a little gem! Very nice, cheap, creative, and effective - doesn't get much better than that.
 
Well after finally tracking down a Kh test and combining the readings from it and the PH readings I was able to determine that I'm getting 11.4 ppm of Co2 into the tank which seems to be about a prefect level. I've had to trim the anachris several time already and the Java Ferns have been puting out new shoots like mad.
 

Attachments

  • seperator.jpg
    seperator.jpg
    24 KB · Views: 1,342
  • seperator.jpg
    seperator.jpg
    24 KB · Views: 1,339
  • img_0656.jpg
    img_0656.jpg
    67.5 KB · Views: 52
Back
Top Bottom