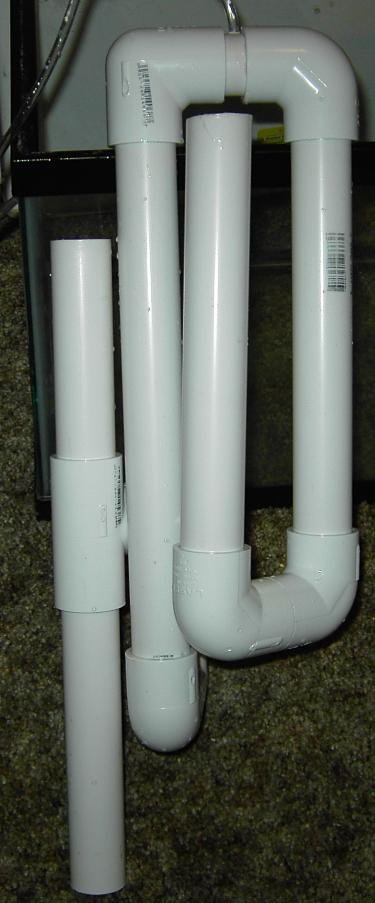
Diy Overflow (Z-Flow PVC Pipe Style)

The friendliest place on the web for anyone with an interest in aquariums or fish keeping!
If you have answers, please help by responding to the unanswered posts.

schulze

Aquarium Advice Regular
Joined
Aug 29, 2006
Messages
56
Location
Harrisonburg, VA & Montross, VA
I just build an overflow for my tank... after cuttign and rebuilding i how the following model

It runs about 155-175 gallons per hour. Is this enough for a 20 gallon tank with a 10 gallon sump?
 

Attachments

  • pict0362_152.jpg
    pict0362_152.jpg
    103.8 KB · Views: 1,372
  • pict0363_203.jpg
    pict0363_203.jpg
    54.4 KB · Views: 2,090
i dont know what an overflow box is, but what you constructed reminds me of the blueman group.
blue372.jpg
 
the capacity of your overflow should be greater than the return pump's flow capacity. if your return pump has a flowrate higher than 155-175 gph (after factoring in the head losses) then you are in trouble... your tank will overflow.

~mike
 
how exactly does that work? from the sounds of it you're trying to equate volume and volumetric flow rate which doesnt work (m^3 does not equal m^3/s). maybe theres something im forgetting from fluid mechanics? could you explain youre reasoning. as far as the sufficiency of the flow rate that should be fine since you should have 5 full turnovers every hour (30*5=150)
 
what mike is refering to is the rate at which water is returned to the main tank from sump. If the pump in the sump moves 200gph then the overflow isn't "big" enough. If the return is less than the ~155 he's getting out of the overflow then he's fine.

In terms of is 100gph enough turn over for a 20 gallon tank, I would say yes, plenty.
 
I use 1 & 1/4" pvc pipe for all of my overflows and they can handle 500 gph easily with the added feature of quiet operation. I place a small aquaponics planting pot over the return because it has slits all the way around and prevents any possible blockage, which could cause water to spill over the top of the aquarium. I use 1/2" pvc pipe for the feed line from the pump into the tank. I've found that a double elbow set up at the top of the tank works great for the 1/2" feed. I stuff two pieces of vinyl tubing inside of the 1/2" pvc to get an increase in water pressure. This way the water jet is enough to produce bubbles as the water shoots into the tank. I adjust the feed line at above 1/8" to 1/16" distance from the waters surface in order to get maximum air bubbles into the water. The jet shoots straight down. The pumps I use range from 950 gph to 500 gph. The 500 gph is outstanding for a single tank. I use the 950 gph pump with a tandem overflow for my twin 55 gallon tanks. It's really cool to watch. All of my overflows dump into a wet dry filter set up with bio balls in stacked plastic cages topped off with a mechanical fiber filter stuffed with charcoal inside of it. The water stays crystal clear. I use 1/2" pipe for the vertical priming vent pipe. So, by using a wet-dry vacuum I can easily prime the overflow. First I plug up the overflow exit with a pvc cap, fill the fish tank to the brim so the water is at least 1/2" to 3/4" over the overflow return in the tank, then using the vacuum I suck the water from the vertical vent until the overflow is primed. Once I have prime, I fill the sump over 1/2 full and start the pump. This set up is very cost effective and works great. Frank.
 
Hey guys....this thread is almost 4 yrs old. ;)
.........First I plug up the overflow exit with a pvc cap, fill the fish tank to the brim so the water is at least 1/2" to 3/4" over the overflow return in the tank, then using the vacuum I suck the water from the vertical vent until the overflow is primed. Once I have prime, I fill the sump over 1/2 full and start the pump. This set up is very cost effective and works great. Frank.
What happens if your not home and the power goes out for a few mins then comes back on. Will your "thing" keep it's siphon and start draining when the pump kicks on or will the pump only turn on and pump all the water from your sump into the tank and then onto the floor?
 
There is no issue of consideration when the power goes out. The overflow keeps its prime. When the power comes back on, the overflow will preform as it did before the power went out. Remember, the input jet that shoots water into the aquarium is 1/16" to 1/8" above the water. So if the power goes out there isn't a issue with water siphoning back down through the pump. If the feed line were submerged below the water line of the fish tank and the power went out it would drain the fish tank to the point of final insertion. This would overflow into the sump and spill water all over the floor. This can't happen when the feed line is situated above the water line. The diy pvc overflow works without any trouble and is quiet, because the pvc pipe used in its construction is 1 & 1/4". I don't have a camera but will try and explain its construction. The overflow is made up with three sets of two 1 & 1/4" pvc elbows, which are pre glue together by inserting a small piece of 1 & 1/4" pvc pipe with glue and setting the two elbows upright on a smooth surface to insure that both elbows, after butt-joining, are perfectly straight. I force the two elbows together using a small piece of pvc which I pre-cut, add the glue and quickly push both open ends of the elbows face down on a smooth surface. Dry time is fast. Once I have three sets of these completed I construct the inside tank overflow assembly. First I cut a piece of pvc pipe to roughly the size of the fish tank from the bottom to the top edge. This will be the return and will be trimmed to size later. I insert this piece into one opening of the elbows I just joined without glue. Next I cut another piece of pvc so its 2 inches longer than the top of the fish tank after its been inserted in the other end of the two elbows. Holding this up it looks like a large U with one end sticking up about 3 inches longer on one side. I place this into the fish tank in its final position. Next I determine the water line I want the tank to fill to then cut the return opening of the shorter upright 1/2" below that water level line. Make sure you make an even cut so that the top edge is the same all the way around and place the assembly back into the tank. Next place another one of the pre-assembled double elbow sets over the pipe that extends up and over the aquariums tope edge. It should be at a right angle to the bottom pair of elbows at the bottom of the tank. This is the upper overflow portion of the assembly where we trasisition from the inside of the tank to the outside of the tank. Next cut a piece of pvc pipe that will run from this top elbow set to the third elbow set which will receive it at the base where the aquarium sets. I place the double elbow set on this base with the open ends facing up and place the pvc pipe into the opening nearist the down pipe. Once I have done this I can see where I need to cut the top end of the pipe so it will fit into the top elbow set without changing the position of the assembly. I glue this down pipe into place top and bottom being careful to insure correct position. Once glued I cut another small piece of pvc so I can join another single elbow to the open end of the bottom outside double elbow set. Once in place this will bring the pipe assembly up above the base four or five inches. Next I connect another single elbow to the open end which faces up in order to divert water as it flows along the length of the aquarium towards the end I want it to exit. I want the open end of this elbow to join with a T fitting that has a 1/2" female top opening which will face up. Into this I'll insert a length of 1/2" pvc which will extend 4 inches above the top of the aquarium. This is the vent pipe, which is used to prime the overflow. I glue this as well as the elbow in place. I also glue the other end of the elbow to the other single elbow that connects to the bottom double elbow set making sure that all connections are straight and true. The 1 & 1/4" open end of the T will receive a length of pvc which will run to the end of the base of the aquarium and this pipe will be about 5 inches above the base of the aquarium due to the height we achieved by adding the last elbow the the third bottom elbow set. This will lead along the aquarium in the direction of the sump which I have on the floor below the aquarium. I connect another single elbow to this to divert the water straight down. Another length of pvc pipe is inserted and glued into this downward facing elbow and cut about 4 inches above the mechanical filter which is above the bio-filter in the sump. This is where the water enters the sump. This system works fantastic. It can be configured for tandem operation with two tanks. To prime this I use a wet-dry vac. I cap the exit end pipe where water would enter toe sump, fill the fish tank about 1 inch above the return pipe, turn on the vac and suck water up the vent pipe until prime is achieved. This takes about 3 or four seconds. I uncap the exit end of the down pipe and watch the water drain from the fish tank into the sump. I turn on the pump and watch the overflow drain water as it comes up to the return pipes top edge. I place a small aquaponics plastic grow pot on top of the return to insure even water drop without a whirlpool effect which is noisy. These pots have pre cut slits all the way around and are perfect when place over the top of the return. Also this prevents anything from falling into the return which could cause a blockage. A blockage would be of concern because it would cause malfunction and possible flooding. Once turned on the results speak for themselves and around and around we go. I'm including a link so you can see a lesser version of this and get a rough idea of what this looks like. http://www.youtube.com/watch?v=K6JLjPvN4jo&feature=related Frank.
 
Back
Top Bottom