DIY Plywood tank, with INLINE filtration?

The friendliest place on the web for anyone with an interest in aquariums or fish keeping!
If you have answers, please help by responding to the unanswered posts.
never heard the term filter sock. i'll get ta googlin! Ty for the input.

So you think the second idea is good? no need for baffles just to catch debris or anything?

My idea is to put a nice closed loop in this system to move the water, as I do not want ANY plumbing, tubing or anything really, to show inside the tank. No powerheads, etc.

anyway, my point was that I would try to move water in the direction of the OF spillways, however, I cannot really think of a way to do this.

Here's my next dilemma:
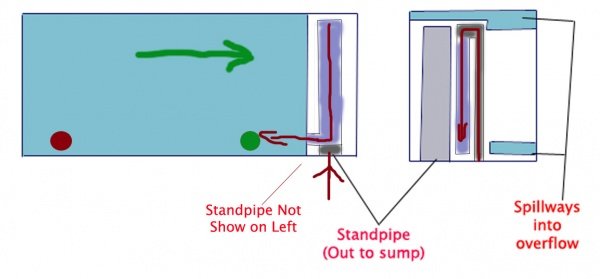
Can I return water from the Sump, back onto the same side as the OF spillways and still get enough circulation and flow to push debris into the spillways and thus, into the OF box? (The reason for wanting to return to the same side, is so i can hide the return pipe in the OF compartment.)

I am assuming no, and thus would need some more water movement, hence the closed loop. However to avoid the plumbing being viewable from anywhere I would have to install the closed loop on the back of the tank spraying in from the back. Will that generate enough water flow to move debris from left to right? I don't understand much about water movement and how it effects a tank, but I do know that I want the debris to be moved right to those spillways.

I guess I could put another compartment on the other side and just put powerheads behind that or something similar to blow directly across to the spillways, but that's awfully cumbersome and involved. I am hoping that a closed loop installed on the back will circulate enough current to push those nasties into the OF.
 
btw, here's a pic of what i'm babbling about. it's done like i'm mentally challenged, but you should be able to get my idea.

The circles on the back represent the intake (green) and output (red) of the closed loop and how i think would best move the current and get the debris off the bottom. Am i close?

Also, will this design work for what I want, but not provide the proper current for the fish? Will I need another intake/output higher up?

Would I be better simply making another compartment on the other side to handle all the inputs into the tank? and keep the OF as all the outputs from the tank?
 

Attachments

  • mysystem3.jpg
    mysystem3.jpg
    36.5 KB · Views: 97
thanks for the reply and time you put into the graphic. i appreciate it

I believe i have your point now. You think having the intake from the closed loop on the other side, away from the OF box and having the return pipes from the sump and CL on opposite sides will work best. I think you're right. Also, it allows me no over crowd the OF box with pipes.

Do you think the return line from the sump should be above water level or below it? I'm afraid of reverse siphoning in the event of a power outage but if it's not too far down it shouldn't be a problem. I would like to have it at the bottom to get even more flow across the bottom but would have to U it at the top to provide a siphon-break hole and that would be alot of pipe in my tank, or even more on the outside of the tank.

Now, real quick, will this design work for both fw and sw tanks? would you change anything if i was going with a SW tank? the reason i ask, is i believe i have the sw reef bug, and...well...you know how that goes.
 
A coast to coast overflow does not go to the bottom of the tank it is a chamber behind the tank that is maybe 4-6" deep and 4-6" wide that runs from one end of the tank to the other. The benefit of this design is it pulls water from the entire tank down into the sump. Since this is going to be a plywood tank you can easily modify the overflow with as many drain lines as you need based on the amount of flow you want. My understanding is with FW tanks you don't need the amount of flow as you do in a SW reef tank.

Here is a great link for information on building a plywood tank.

I still can't find the link I was talking about before. I have it somewhere. I'll keep looking.
hey thanks for the input ziggy!

i still like the idea of the overflow being on the side, but what if I ditched the 2 little spillways and instead extended them the entire length of the top and bottom of the OF divider? that would allow for some good pulling. Not as good as the full back of the tank, but with the closed loop and other such help, i should be able to nail the circulation just fine. I believe anyway. Thoughts?
 
So you are wanting to do a standard overflow that runs vertical top to bottom with slots on the bottom and then the main spill way at the top? I'm assuming you are going to mimic the standard RR tanks overflows?

The black part of the overflow that you see in the tank is a cover that has slots on the bottom and mid way up as well as the teethe of the overflow at the top. The idea behind the slots is the water rushing over the top of the overflow ill create flow and pull water through the slots at the bottom and middle. So for you to accomplish the same thing you will need to do something similar.

I have had a reef tank for almost 3 years now and if I had my choice I would have a coast to coast overflow rather then the top to bottom. FW is a different matter. What are you planning on having in a FW tank that is going to require you to move this kind of water?
 
I dont know what a RR tank overflow is. I'll try to gewgle and inform myself.

My overall goal is simplicity during the build. My overall goal for long term is to make sure as little waste sits on the flooring as possible. The more this waste gets blown out and sucked down to the sump, the better i'll be. I dont want to have to worry constantly about sucking the bottom with a siphon to get the uglies. That's all.

since I want to suck as much waste off the bottom as possible, with as little work on my end as possible, I thought the best way to achieve that would be to suck from the bottom. By suck, i mean output to the OF and thus to the sump.

Sucking from the top might be enough to get all the nasties from the bottom. I dont know. I was hoping you could help me with that.

Since I want as little plumbing visible as possible, and since I'm building it myself, I thought the best way was to just have a side compartment for the OF box. Would be easy to pop in a waterproof divider. Easier than constructoin another container to sit on the back of the tank. And since I want to suck water from the bottom, it just made sense my OF box to extend to the bottom. Path of least resistance, ya know?

As far as why do i need to move this much water, I dont know if i have to move this much water. I dont even know if this alot of water movement. I was just thinking of a way to blow the crap from the bottom, down to the sump.

You guys said a coast to coast would allow for alot of movement, so i just assumed what I wanted to do, needs alot of movement. I dont know man. I'm a lost cause. :scrambleup:

Let me start over and try to be less confusing. I'm making my own tank, and I think the best way to incorporate my OF box, is to give myself a 6" space on one side. I want to move the gunk off the bottom in a way is almost automatic, and I imagine I need alot of "suction" to move solids down to the sump automatically.

What is the best way to do this? should I incorporate a closed loop to move the gunk towards the standpipe, or should I just make sure my return pipe moves the gunk towards the standpipe, or is just an opening in the top of my OF box enough to do it. I was thinking that adding a slot in the bottom would help out too. Thoughts?

does that make sense? i'm sorry if i'm so dense. I'm so new to this, but have researched enough to know how things work, but just never seen them in action. it's all in theory, ya know?
 
I think more then how it is plumbed it is going to depend on what you have in the tank (animals) and how much flow you have in the tank. Let me give you an example of what I mean here. I have a 120g 4x2x2 tank. I have 2 overflows on on either side of the back glass. Together they can handle 2000gph. I have 3 return pumps that push 1800gph (at the top of the tank) of water into the tank. I also have 2 660gph power heads moving water around in the tank. So combined I have around 3120gph (26x turn over per hour) water flow in my system. Even with all that flow I still have dead spots and detritus builds up. No matter what you do it is going to happen especially in a FW tank with a large grain substrate. I have fine sand and it happens so I know it will in a gravel bed.

I think the best solution is to keep the waste in the water column as long as possible and that is going to require direct flow low in the tank so that the particles remain suspended long enough to get pulled out by the overflow.

No matter what you decide to do on this build you are going to have to do some cleaning, its just a fact of aquarium keeping. I'm not a FW buff so I can't say on the upkeep with a well established planted tank, I can however share what I have to do on a daily basis with a medium sized reef tank.

Again, personally, I would build a coast to coast overflow system with a closed loop. What ever you do and how ever you decide to create your overflows make sure that your plumbing in the overflow (your stand pipe) goes all the way to the highest point you want the water in the tank. If you have a short pipe that is hooked to your sump as a drain line you will end up with a flood I promise.

I hope that makes a little more sense. I'm just trying to get a full picture of what you are wanting to do and I am not a lot of help with FW. If you were going SW I could tell you exactly what to do and how to do it, or at least how I would do it.
 
at the risk of sounding demanding, do you mind telling me what you would do if it was a SW?

A SW setup will work just fine for a FW i believe. Or at least it would be adapted on the fly to support FW fish/plants. Like I said before though, i believe I'm getting the SW bug and this might turn into a 8 bagillion gallon reef tank suspended over my bed and a body modification to add a mermaid type fin to myself. You know how that goes. I think i'm getting obsessede with reef tanks

LOL!!

I have looked into building a plywood tank that is why I was so interested in your thread. If it were me this is what I would do.

I would build the basic box (8' long 4' wide and 30" tall about 600g) I would then build on the back of the tank all the way across the coast to coast overflow. It would be 8' x 6" x 12". I would have a minimum of 8 drain lines (via bulkheads) I would also have a closed loop system with 4 returns and 1 intake. The pump would have an Oceansmotions 4way on the CL pump. This directs the water flow through 2 returns at a time and alternates between each pair creating random flow. I would probably have my return pump plumbed with 4 returns as well on at each corner of the tank (at the top of the tank pointed towards the center of the tank).

With the multiple drain lines you can direct the water flow to different areas of your sump or other equipment needed. One line can be dedicated to the skimmer, another to the refugium (this would probably be at least 100g on a system I would build) the others could be directed to other parts of the sump as needed.

That is in a nutshell what I would do. Obviously I would have to draw up some plans and work out the detail but in general that is what I would do.
 
I know a little about water wells, and at the bottom there is what is called a "Foot Valve" this lets water flow only one way. For a well this keeps the prime on the pump. You could use this in reverse maybe. Just a thought. They are available at any big name hardware store.
 
I know a little about water wells, and at the bottom there is what is called a "Foot Valve" this lets water flow only one way. For a well this keeps the prime on the pump. You could use this in reverse maybe. Just a thought. They are available at any big name hardware store.

A check valve?

This is an option for the FW tank but I would not use it if you decide to go with a reef.

Do some searches on google for reef ready tanks (RR) and see how they are setup. Pictures speak 1000 words.
 
Gotta love DIY tanks. Best thing to so is keep things as simple as possible. Here is my 600G Plywood tank I built last year thats been up and running for 11 months now.
 
Gotta love DIY tanks. Best thing to so is keep things as simple as possible. Here is my 600G Plywood tank I built last year thats been up and running for 11 months now.
i've actually read your thread extensively and believe that your setup is the closest to the one that I want. I've talked with you about in the other thread. On a diff forum anyway. Never saw the website. I'll cruise through it today. Thank you.

btw, lemme ask you while i got you here, what are the dimensions of the viewing pane? do you feel you could've gone with a taller piece of glass acceptably?

The reason I ask, if that I love the look of tall tanks. I want to build one close to 4ft tall, however the strength of the glass with that much water pressure quickly becomes an issue.

80"x25" Viewable and yes I probably could have gone taller even with .5" tempered glass, probably at least 30" viewable with no concern. Just as an example I once walked across some doors in my truck at work that were covered in cardboard sheets that keep the dust off to move some stuff around in the front of the truck, well when I got to the delivery site when we were unloading the doors one of the doors I stood on was half glass and only .25" tempered and my 200+ lbs rear end stood right on it and I never knew it. Plate/float glass is a different story it would have shattered immediately. But with a 4' height your looking at 3/4" glass minimum. Acrylic I'm not sure of though.
 
80"x25" Viewable and yes I probably could have gone taller even with .5" tempered glass, probably at least 30" viewable with no concern. Just as an example I once walked across some doors in my truck at work that were covered in cardboard sheets that keep the dust off to move some stuff around in the front of the truck, well when I got to the delivery site when we were unloading the doors one of the doors I stood on was half glass and only .25" tempered and my 200+ lbs rear end stood right on it and I never knew it. Plate/float glass is a different story it would have shattered immediately. But with a 4' height your looking at 3/4" glass minimum. Acrylic I'm not sure of though.
well, i was thinking it's be .5" tempered. The viewing area would be about 5' x 3'. with 3 inches on either side for sealing. the braces would be 2"x6"s. So total glass would be 66" x 42". Too high?
 
Thats a tough one. Might be ok because there will only be 60x36 area of the glass with no support from the water pressure. It also depends on how much water is behind it.
 
Thats a tough one. Might be ok because there will only be 60x36 area of the glass with no support from the water pressure. It also depends on how much water is behind it.

ok, i guess i should elaborate. I was thinking a 6' x 3' x 4'(height) tank. The inside dimensions being only slightly smaller due to size of 3/4" ply. I know it's big and iffy, but I have some theories. I certainly dont want to build something that is destined to fail.

I also dont want to go 3/4" glass if i can help it. Mainly due to cost...
 
To ensure better filtering of the tank, couldn't you have the return line pour into a painted/hidden vertical pipe or compartment so that the return water actually enters the tank near the bottom. Just have the return line pour into the standing pipe, etc. to preven the dreaded siphon.

I put a pipe with a tee at the bottom in a DIY pond filter. The top of the pipe extends above the water level in the tank so that water filling the filter enters the bottom and flows upward (through 25 lbs of large river gravel, layers of floss and sand) to the outlet (DIY bulkhead draining back to the pool) at the top. (the filter is upstream of the pond).
 
Back
Top Bottom