Laird-and-Dad
Aquarium Advice Freak
Hi everyone! I've seen a couple articles and videos online for DIY screen covers, but all the ones I've seen involve special screen frames and the like. I figured out a way to make a simple, cheap screen cover, and I figure I'd post it here. All you need is:
• 4 Pre-cut pieces of wood(more on this later) ~$7
• A miter saw
• A measuring tape
• Window screen (most types should work fine) ~$10
• Stapler
• Wood glue
• 2 Drawer handles ~$2 each
• Appropriately sized bolts for the handles (more on this later)
• Spray paint (optional) ~$10
• Drill
• Scissors
I had most of the stuff on hand, that's why I don't have some of the prices. I can't imagine it would come to more than $70 tops if you had to buy all the tools and stuff, but chances are you have at least some of the stuff at home.
A couple notes before beginning:
1. This only really applies to rectangular aquariums. You could probably pull it off with a hexagonal, or anything that has straight edges and sharp corners.* It'll be a little harder if you have round edges or a bowed front tank, but if you have a really good sander, you could probably pull it off.
* If your tank is not a rectangle, but has straight edges, instead of mitering at 45 degrees, make sure to miter at half of the angle you want. With a rectangle, each corner is 90 degrees, so I miter at 45. For a hexagon (assuming it is regular) each corner is 120 degrees, so you would miter at 60.
2. Also, this is easiest done when your tank has a lip on the inside to rest a lid. Many tanks require hoods that go over the side of the tank. With a bit of ingenuity, one could probably figure out a way to extend this to that type of tank, but I will not be explaining that here.
Let's begin:
Step 1: Take the measurements of the inner lip of the tank. Make sure that the measurements are made so that a piece of wood cut to the dimensions that you measure will fit perfectly. Then, go to your local hardware store, and have them cut narrow, thin strips (I used 1.5"x.25") to those dimensions.
View attachment 250511
(Only two pieces are shown)
Step 2: Take one of the long pieces, and one of the short ones, and miter them.
View attachment 250512
Step 3: If you have a HOB filter, or if you want to leave space for wires, measure how big the space you need is. I would recommend making this hole in the corner, so you don't need more wood. If you place it in the corner, saw off the amount of space you need along the back, and the side.
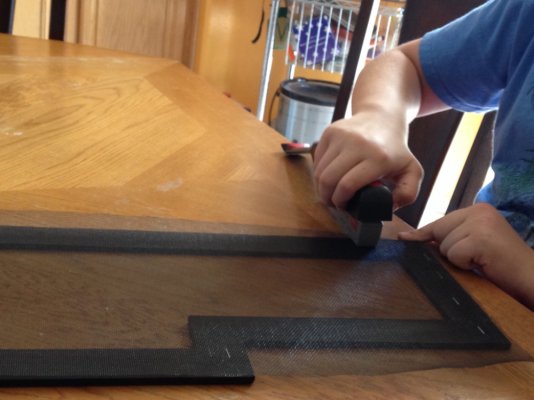
Step 4: Miter the pieces that you just cut, and assemble them into a frame. Use wood glue and staples to keep it together.
View attachment 250513
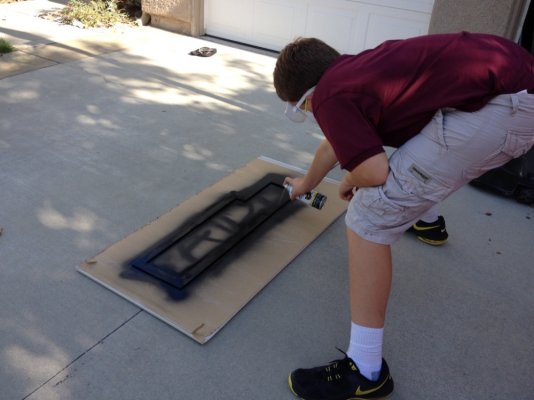
Step 5: Spray paint the frame whatever color you like. I chose black because it matches my tank.

Step 6: Staple the screen onto the underside of the frame. Apply another coat of spray paint to cover up the staples.

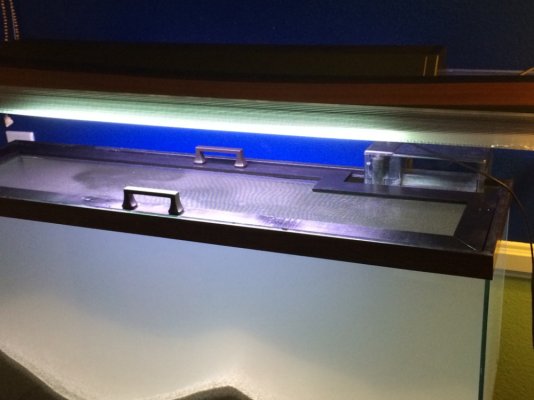
Step 7: The handles usually come with bolts. They will typically be to long for the wood, so you will have to use some that are the same thickness but shorter. Drill the holes into the frame where you want the handles and attach them.
Here is the finished product on my tank:

Hope this helps! Feel free to leave commentary and feedback.
• 4 Pre-cut pieces of wood(more on this later) ~$7
• A miter saw
• A measuring tape
• Window screen (most types should work fine) ~$10
• Stapler
• Wood glue
• 2 Drawer handles ~$2 each
• Appropriately sized bolts for the handles (more on this later)
• Spray paint (optional) ~$10
• Drill
• Scissors
I had most of the stuff on hand, that's why I don't have some of the prices. I can't imagine it would come to more than $70 tops if you had to buy all the tools and stuff, but chances are you have at least some of the stuff at home.
A couple notes before beginning:
1. This only really applies to rectangular aquariums. You could probably pull it off with a hexagonal, or anything that has straight edges and sharp corners.* It'll be a little harder if you have round edges or a bowed front tank, but if you have a really good sander, you could probably pull it off.
* If your tank is not a rectangle, but has straight edges, instead of mitering at 45 degrees, make sure to miter at half of the angle you want. With a rectangle, each corner is 90 degrees, so I miter at 45. For a hexagon (assuming it is regular) each corner is 120 degrees, so you would miter at 60.
2. Also, this is easiest done when your tank has a lip on the inside to rest a lid. Many tanks require hoods that go over the side of the tank. With a bit of ingenuity, one could probably figure out a way to extend this to that type of tank, but I will not be explaining that here.
Let's begin:
Step 1: Take the measurements of the inner lip of the tank. Make sure that the measurements are made so that a piece of wood cut to the dimensions that you measure will fit perfectly. Then, go to your local hardware store, and have them cut narrow, thin strips (I used 1.5"x.25") to those dimensions.
View attachment 250511
(Only two pieces are shown)
Step 2: Take one of the long pieces, and one of the short ones, and miter them.
View attachment 250512
Step 3: If you have a HOB filter, or if you want to leave space for wires, measure how big the space you need is. I would recommend making this hole in the corner, so you don't need more wood. If you place it in the corner, saw off the amount of space you need along the back, and the side.
Step 4: Miter the pieces that you just cut, and assemble them into a frame. Use wood glue and staples to keep it together.
View attachment 250513
Step 5: Spray paint the frame whatever color you like. I chose black because it matches my tank.

Step 6: Staple the screen onto the underside of the frame. Apply another coat of spray paint to cover up the staples.

Step 7: The handles usually come with bolts. They will typically be to long for the wood, so you will have to use some that are the same thickness but shorter. Drill the holes into the frame where you want the handles and attach them.
Here is the finished product on my tank:

Hope this helps! Feel free to leave commentary and feedback.
