DIY small acrylic aquarium with stand - a Fluval Edge copy

The friendliest place on the web for anyone with an interest in aquariums or fish keeping!
If you have answers, please help by responding to the unanswered posts.

corrado33

Aquarium Advice Freak
Joined
Feb 25, 2010
Messages
478
UPDATED: See below!!

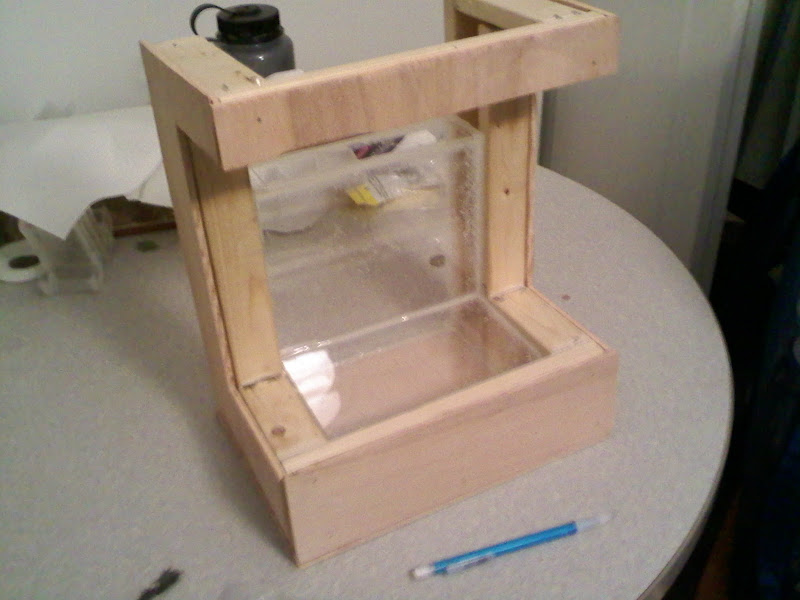
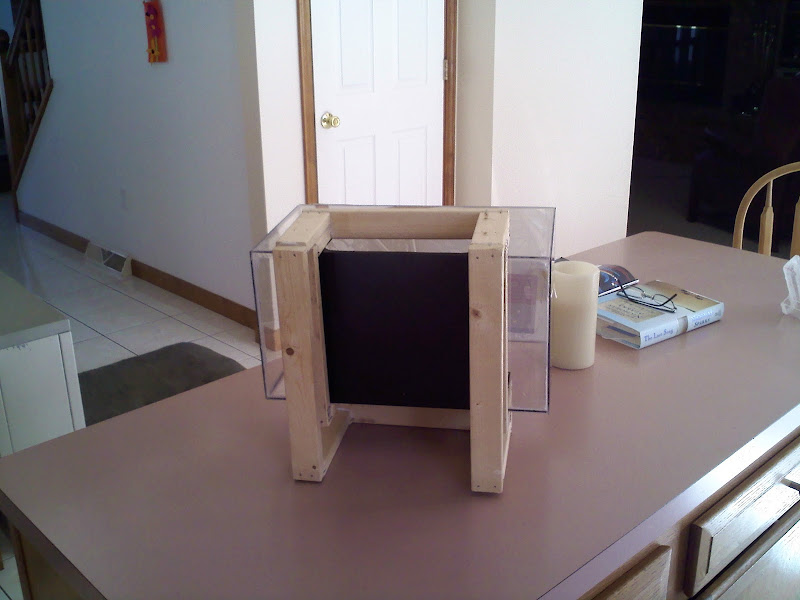
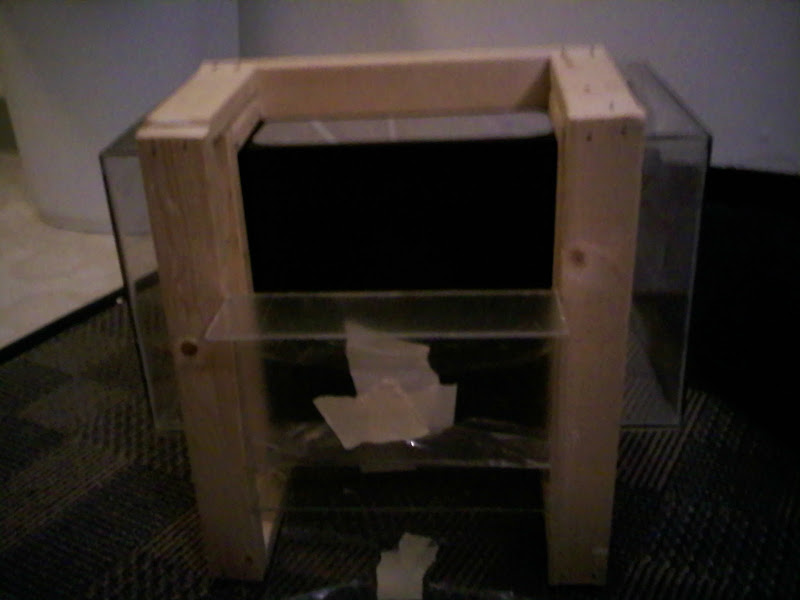
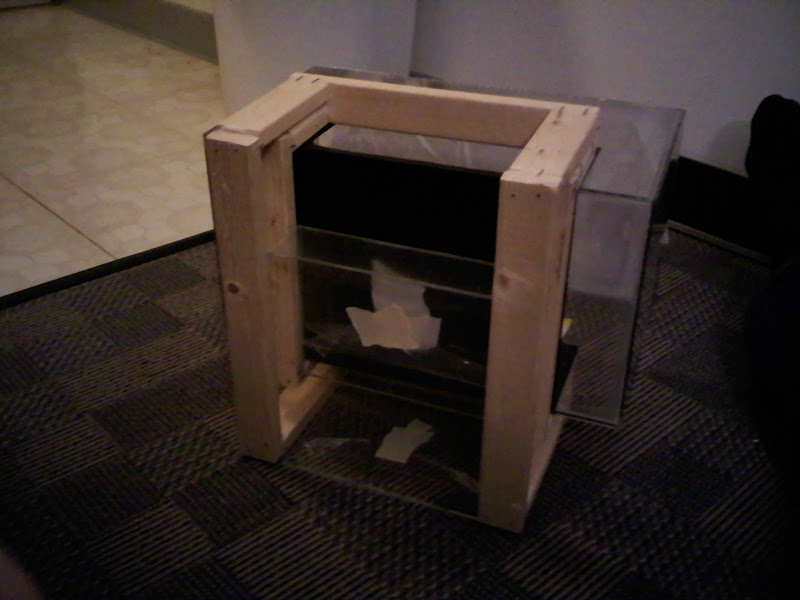
Hey guys, I'm building a small betta tank, because the one I had originally bought is too small. (It's about 1.8 Gal and the new one will be about 3.5 with a mini "sump" that's about 1 or 2 Gal.)

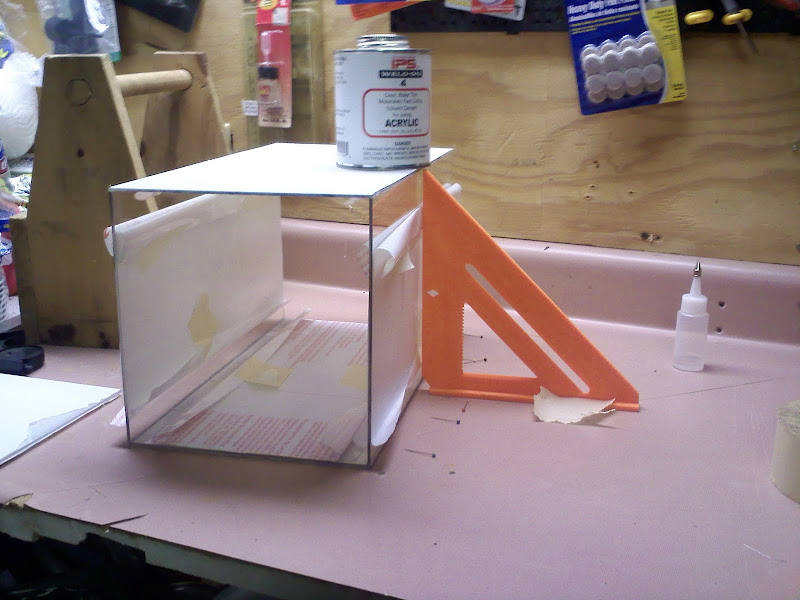
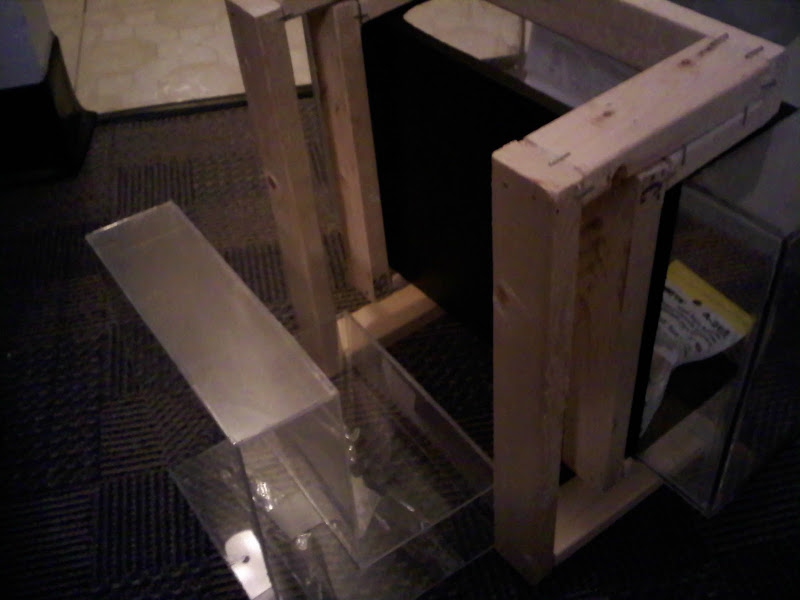
So far I've build the sides of the tank. I'm using weld on #4 and since I don't really trust my seams, some 100% pure silicon to seal the edges. (Yes I know silicon alone isn't enough, but the combination of the two should be good)

0305001119.jpg


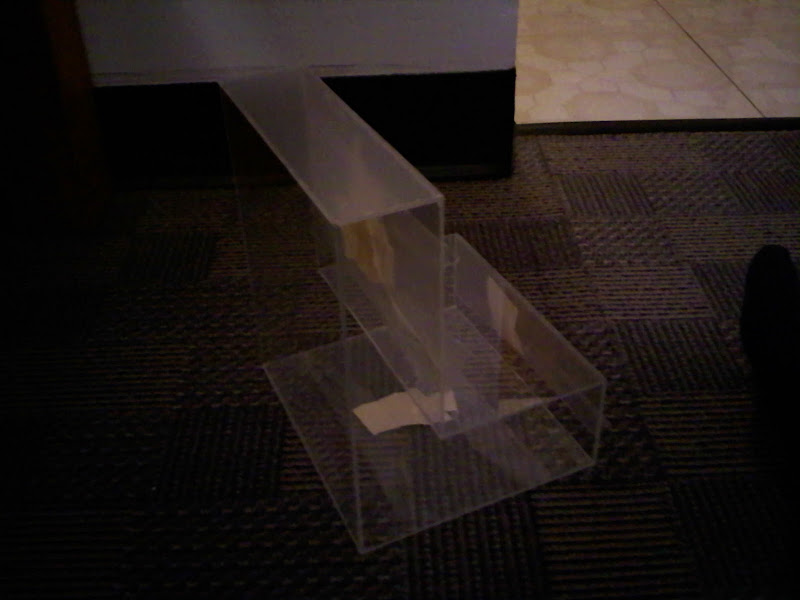
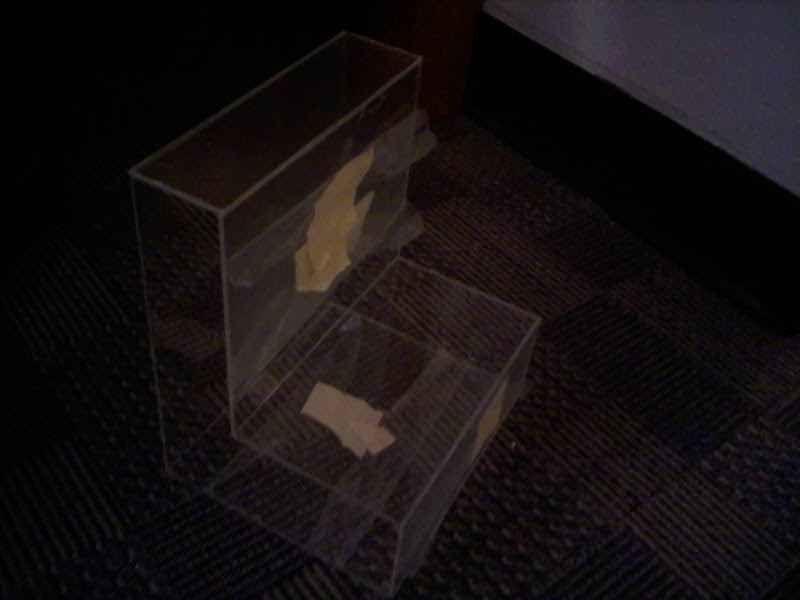
Here's the design of what I'm building.
0305001302.jpg


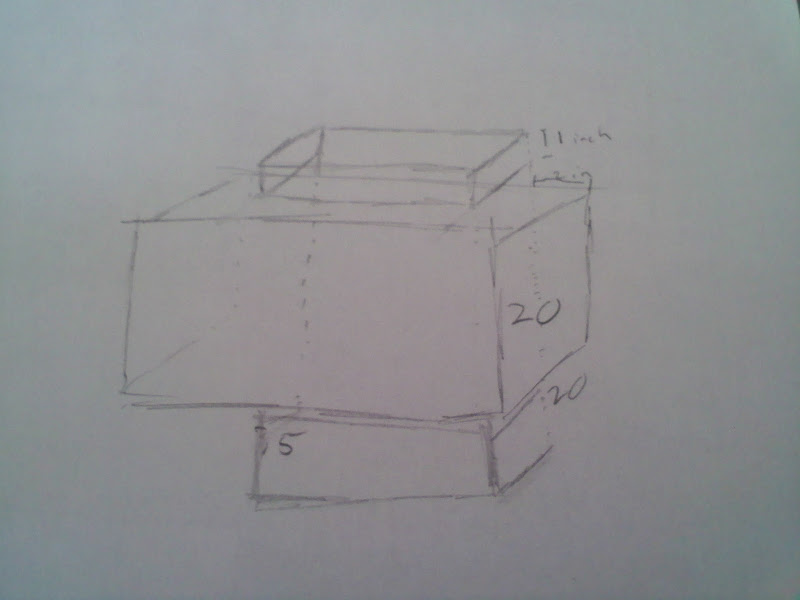
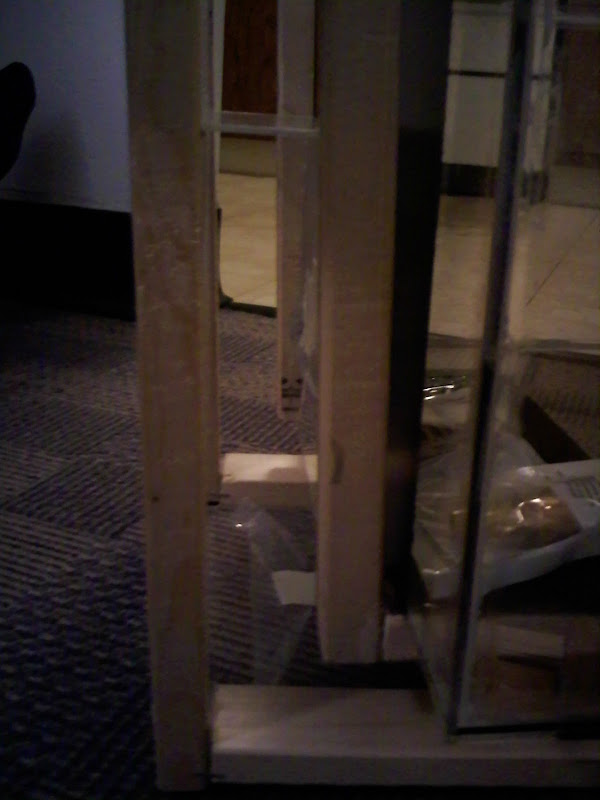
Basically the tank is in the middle, and there is a wood frame supporting it. What I can't seem to figure out is, how should I attach the tank to the wood? I've debated some kind of carpenters glue, and screws. Honestly I'm leaning toward glue for two reasons. If the frame is built tight enough around the tank, the tank shouldn't slip out and the glue should just be extra support. And, I really don't want to drill holes in the acrylic. It was hard enough cutting the dang stuff without cracking it.

Any suggestions?

Secondly, yes this thing will be very front heavy. That's why I'm putting a mini "sump" in the back and bottom. This'll bring the center of gravity down and toward the middle more, making it more balanced. Plus, I'm going for a very modern, sleek look, and it'll be a good place to hide my heater and pump. Also, the bottom frame extends further than the top frame, so it'll support it better.

Thirdly, I'm going to have to paint the back, bottom, and top of the tank where the wood meets the tank, simply so someone can't see the wood. The wood will be painted black, to follow with the modern theme, so I was thinking black. Will that look ok?

Fourthly, following the modern theme, I'll be getting black substrate. I know there are a couple of choices out there, so what is the best (and hopefully most cost effective/easiest) route I can take?

Fifthly, I MIGHT put a small plant in the tank. The green contrast would look good against the black. Now I have done ZERO research on plants, so can you guys suggest a small, low maintenance plant that I could use?
 
This looks very interesting and I figured I'd chime in on the plant situation. A good small, slow growing, low-maintenance plant that would probably look pretty nice in your tank would be Anubias Nana.

You can read up about it here:

Dwarf Anubias - Anubias nana
 
looks like a DIY Fluval Edge aquarium... cant wait to see it finished :) BTW, i have no clue how you can attach it, but seems like if you make the wood frame the right size, you could have the tank removable from the "stand"...
 
looks like a DIY Fluval Edge aquarium... cant wait to see it finished :) BTW, i have no clue how you can attach it, but seems like if you make the wood frame the right size, you could have the tank removable from the "stand"...

Yeah there was one that I saw that I was basing it off of, but, for the life of me, couldn't find what it was called. I'm guessing it's the one you mentioned. Plus I wanted to make one a little bigger than the one I saw anyway. And as of right now, the tank fits very tight in the frame, so it might just be removable (which would be awesome for water changes etc.)

EDIT: That fluval edge thing is cool! However the I one saw was a mini one, probably two gallons or so. Hopefully mine will turn out as well as these look. Here's a pic..

normal_fluval-edge-black.jpg


Also, this is pretty much the theme I was aiming for. It seems like sand would make a nice substrate (although not great for plants)
 
You underestimate what plants can do in sand. Many an aquarist maintain beautiful, heavily planted tanks with sand as their substrate.
 
Hey guys, I have a lot of it built, so here are some updated pics. Note the tank is not all of the way into the frame because it's quite tight, and hard to get in and out. Also the frame looks a little screwy because I built some pieces slightly slanted so it'd hold the tank better.

0306000950.jpg

0306000950a.jpg

0306000950b.jpg


Let me know what you think. Note: I haven't build the mini "sump yet", so it's a bit front heavy. Oh and the tank holds water just fine. Also, I might end up building the frame again. I don't like how it turned out, and the wood for it was only $1 anyway, and I used the wrong glue...
 
So, I'm 3/4 of the way through building the sump, and I thought I'd share some pics. It fits PERFECTLY. It's lookin quite good. Here are the pics.

0306001936.jpg

0306001936a.jpg

0306001936b.jpg

0306001936c.jpg

0306001937.jpg

0306001937a.jpg
 
Getting to this thread a bit late ... but I think you will have an awesome tank when finished.

I am going to suggest you don't glue the tank to the stand. It would be easier for maintenance if the tank is removable. For ease of removal, you might make the frame a bit loose & rely on slots or screw stops to hold the tank in place.

There are many ways you can do this. Some ideas - A slot in the back of the frame & a fin on the back of the tank to fit, or perhaps some slots & fins in the bottom. You can then use set screws in the wood to lock the tank in place at the fins.

You can just leave your frame tight & go for a friction fit like you have now. However, you must be sure to seal the wood very well after it has stabilized to your room moisture. <Furniture making rule is to leave the wood in your shop for at least a couple weeks before working on it.> Moisture from the tank (or seasonal change) will alter the wood dimension. Shifting wood can throw your alignment out & may bind the tank (or might even crack it) .... or it can get loose over time. When you join wood with a dissimilar material, you must make allowance for wood movement. <This is true also for cross grain glue joints.> It is generally better practice to slot in your material & leave a bit of a gap so things don't go bad when wood shifts. <This is the principle of the frame & panel door.>
 
Getting to this thread a bit late ... but I think you will have an awesome tank when finished.

I am going to suggest you don't glue the tank to the stand. It would be easier for maintenance if the tank is removable. For ease of removal, you might make the frame a bit loose & rely on slots or screw stops to hold the tank in place.

There are many ways you can do this. Some ideas - A slot in the back of the frame & a fin on the back of the tank to fit, or perhaps some slots & fins in the bottom. You can then use set screws in the wood to lock the tank in place at the fins.

<Other great woodworking advice>

Thanks! And thanks for the advice. I only wish I had to tools to do this correctly. Every time I do a project I feel like I'm not doing the best because I'm working with shoddy tools (aka I have a router and a wood hand saw). Also, I love the idea of "slots". They're a great thought.

One thing different about my tank from the Edge one is the fact that while I COULD fill mine to the top, I didn't build it to (didn't think of it). So putting the slots in should be fine because the water line should be well below any slots I cut into it.

Also, what do you guys think of sealing the wood with some kind of deck sealant or something? I know anything like that and fish tanks usually are bad together, but separately they should be fine. I mean, I COULD simply be really careful, and not ever drip any water on the wood, but... I don't know. What are your thoughts? I am going to be painting everything, so maybe the paint will be enough? I mean it's not like I'm going to be drenching the wood or anything. (At least I hope not)

Also, the funny thing is that the tighter I push the tank in, the better the frame stands, and the more square everything gets. It sat kinda funny by itself, but once the tank is in, it sits perfect. It makes me happy.

Oh and after I started actually building everything, I decided to not glue the tank to the stand, so I guess the thread title is kinda pointless. Eh... too bad maybe I'll make another build thread once I finish everything. Or the mods could change the title to something like "My mini copy of the Fluval Edge aquarium". :p
 
Also, the funny thing is that the tighter I push the tank in, the better the frame stands, and the more square everything gets. It sat kinda funny by itself, but once the tank is in, it sits perfect. It makes me happy.

That would mean your frame is loose or bowed (loose joint, crooked wood?) & the tank is structurally straightening it. That does not make me happy .... since that is putting stress on the tank. the idea is to have your stand support the tank, not the other way around. <OK - if you overbuild the tank so it is structurally strong, you can use that to support the frame.>

Even if you never spill water on the stand, the water vapor around the tank will still get into the wood & cause problems. Paint is no protection. The wood needs to be sealed after painting. A marine spar finish is best. <That is meant for boats exposed to salt water, so you know it will do the job.> 5-7 coats of polyurathane will do the trick as well. <That is what I have on my stand.>

Yes, it is a joy to do wood working with good tool .... but you can do good work with basic hand tools. <Takes a lot more time & skill.> you can do a lot with just a router. The trick is to build jigs to guide the router in all the cuts, and take shallow cuts with good quality bits. The most important wood working "tool" is actually a good sturdy table or other surface to work on, and lots of clamps to hold down your work & jigs.

I'll change your title to something more appropriate.
 
That would mean your frame is loose or bowed (loose joint, crooked wood?) & the tank is structurally straightening it.

5-7 coats of polyurathane will do the trick as well. <That is what I have on my stand.>

Yes, it is a joy to do wood working with good tool .... but you can do good work with basic hand tools. <Takes a lot more time & skill.> you can do a lot with just a router. The trick is to build jigs to guide the router in all the cuts, and take shallow cuts with good quality bits. The most important wood working "tool" is actually a good sturdy table or other surface to work on, and lots of clamps to hold down your work & jigs.

I ended up rebuilding the frame. I also didn't like it at all. It's now all square and good, and the tank fits in just right, not too tight, not too loose. I don't know why, but I have a weird "cheap" mentality when I'm working with cheap materials. For example, the wood to build the frame was $1.37. The acrylic for the tank was $30. So I spent about a day and a half on the acrylic, and half a day on the frame. So, I slowed down and built the frame right this time.

I'm also going to use polyurethane on the frame. I knew, in my mind, that I had to seal it, I was just hoping someone would tell me otherwise... :rolleyes:.

And I thought I had a router at home (I'm in college) but apparently my dad broke it. I wasn't too happy... :taped: 
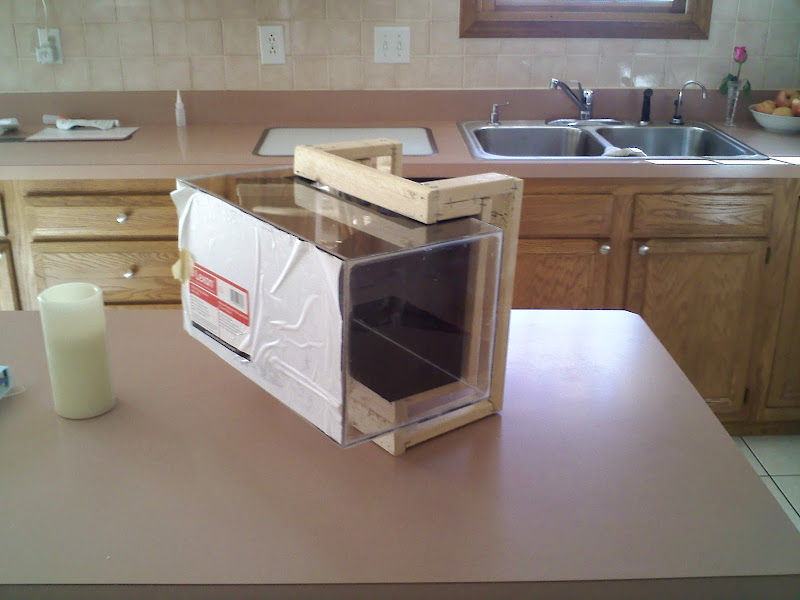
I do have nice bits, and was planning on using them, but of course I couldn't. Also, apparently we don't have one level surface in my house (besides the kitchen counter.) Also makes me angry... :taped:

Whenever I eventually build my house, I'm going to have a nice workshop for woodworking, metalworking, and just about any other working you can think of. Maybe I'll make a garage with a basement... garage for workin on the cars, basement for fabricating everything else. Wow I'm off topic. :rocol:

Anyway, thanks for the support.

Here's a pic of the mini "sump" that fits in the back. (most of everything here is mocked in, so the fit is a little off)
0307001818.jpg


EDIT: Forgot the pic.
 
Hey guys, just thought I'd give you an update. I'm done building for now, and I'm sealing and painting the wood. I should have pics up.... probably tomorrow if everything goes well.

I really like this smiley ->:smilecolros:
 
Eh... scratch the pics tomorrow. The polyurethane I'm using has a 4 hour turnover time. Annoying, but I generally follow directions on the cans for recoating times. So, even with the best of times, it'll probably take me to the day after tomorrow.
 
how exactly is the sump going to work? like how are you dividing it?

I'm using the "sump" simply as a counterweight, and volume extension. It simply holds water because as we know, more water in a tank is always better. And it hides the pump and heater. It's not going to act as a refuge or mechanical or chemical filter at all.

EDIT: The "pump" I'm using is the sponge filter that came with the betta tank I had bought. I simply attach some tubing to the output, and I have myself a pump. I've successfully used this to pump water through my DIY water distiller, so I know this will work.
alright i get it now, its a good idea. just make sure to some how have a divider so your fish dont go into it lol
 
alright i get it now, its a good idea. just make sure to some how have a divider so your fish dont go into it lol

Ah I gotcha! Yeah I'm probably going to use a custom made overflow, or I'll simply drill the tank. Then put some mesh or somethin in front of the hole or in the intake of the overflow.
 
Back
Top Bottom