FH's DIY 29g aquarium stand

The friendliest place on the web for anyone with an interest in aquariums or fish keeping!
If you have answers, please help by responding to the unanswered posts.

feralhound

Aquarium Advice Apprentice
Joined
May 31, 2013
Messages
20
Location
Florida
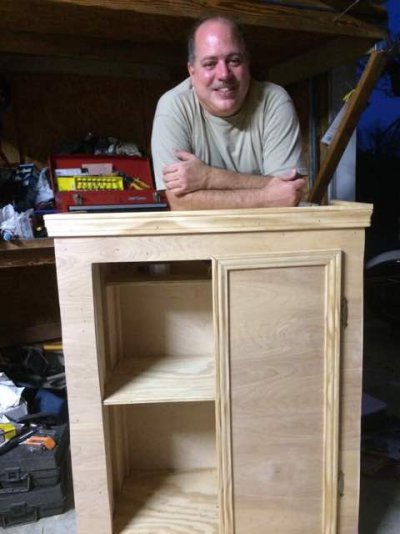
My first big diy project that is aquarium-based. I realized the utility shelving may have held the 20L with no problem but didn't want to risk it with a 29g saltwater. It just made me nervous. Plus I could make it look much nicer and I could customize it the way I want. The stand is 39"T x 13"D x 31"W.
I do not have a sump on this tank so I'm not worried about putting another tank under it. I have three shelves- the bottom to hold my salt/a bucket of RO/DI water, middle for equipment/test kit, bottles, meds, ect; and I have a small top half shelf that will serve as a resting place for my air pump, excess cords, my current ramp, ext.

Ran into a lot of problems, even cuts being the most problematic. I had my dad help me since he has all the tools, which was a circular saw- I thought he had a table saw for some reason. I think that created the most problems. When we had the main "skeleton" together it rocked, did a lot of sanding/rescrewing. Turns out parts of his garage wasn't level either which added even more of a headache- it would rock on part of the garage and felt stable if we moved it two feet over. Ended up using shims as well.

Basic stand "skeleton". Used 2x4's (which after planning I found out were actually 1 1/2" x 3 1/2"). Placed a 1/2inch plywood on the top and bottom. For almost the whole project I used wood screws I had left over from building my "catio", which were I believe 3" or 3 1/2" long.

My dad and I sat on the top to make sure it could hold, Rin ended up jumping on my lap as well- no cracks and it didn't wiggle. I originally wanted to add four more 2x4's but my dad convinced me that would be overkill.

ImageUploadedByAquarium Advice1455571500.548554.jpg
ImageUploadedByAquarium Advice1455571542.913147.jpg
ImageUploadedByAquarium Advice1455571582.099623.jpg


Sent from my iPad using Aquarium Advice
 
Adding the sides/shelving:

ImageUploadedByAquarium Advice1455573840.127871.jpg
View attachment 284824

Building the doors. We've never done anything like this so it was a huge learning curve. Used baseboard to make a picture frame like structure. My dad was overthinking and wanted to somehow stabilize them with some sort of metal staple or something. I just picked up some metal "elbows", pre-drilled holes before screwing them into the door frame. We glued the door panels to the inside of the door frame lip (panels cut from the same 1/4" piece of birch used to wrap around the sides of the stand). Of course we didn't really have enough clamps, so we ended up putting 2/4's on top of them and sitting on them for like an hour until the glue dried.

View attachment 284825
View attachment 284826
ImageUploadedByAquarium Advice1455573860.313092.jpg


Sent from my iPad using Aquarium Advice
 
Next was adding the baseboard to the top and bottom of the stand. Note all baseboard, including the frame for the doors, had to be cut by hand to ensure an even cut. It was a pima.

I don't have any picks of that process, but I have the final result after we screwed the doors on to see how they looked. We nailed the baseboards on with finishing nails, it held really well.

Also cut three holes in the back of the birch wood (using a doorknob hole cutting piece for the drill) for tubes/wires to come through. No photos of that either, I swear I almost broke my wrist the first go around.
I plan on attaching my outlet to the upper portion of the base on the inside, right above the top shelf.

ImageUploadedByAquarium Advice1455574336.308319.jpg
ImageUploadedByAquarium Advice1455574455.713549.jpg

Finally we sanded the whole thing, and started with the first coat of stain.

ImageUploadedByAquarium Advice1455574895.610214.jpg
ImageUploadedByAquarium Advice1455574929.410525.jpg


Sent from my iPad using Aquarium Advice
 

Attachments

  • ImageUploadedByAquarium Advice1455574312.521896.jpg
    ImageUploadedByAquarium Advice1455574312.521896.jpg
    28.6 KB · Views: 77
Decided one coat of stain was sufficient, is was as dark as I wanted. sanded again and started with the varnish. Applied three coats of varnish, sanding and drying I between, and finally added on the doors/door knobs and magnets on the inside to hold the doors closed (pesky cats). I wanted to add the knobs to the panels of the doors than the actual frame, but ended up sleeping in and my dad decided he couldn't wait and added them before I got there. He felt it was a better idea because the frame was more stable, so I didn't argue.

ImageUploadedByAquarium Advice1455575119.659373.jpg
ImageUploadedByAquarium Advice1455575140.707573.jpg
ImageUploadedByAquarium Advice1455575156.656564.jpg

Got it home, placed the tank on top- it wobbled a little so had to add a shim under the top peice of plywood. filled it with water for a test, no cracks/leaks! Yes I like my tank background, that's another reason why I wanted that dark color of stain, I felt like it matched the sunken ship theme.

ImageUploadedByAquarium Advice1455575205.377953.jpg
ImageUploadedByAquarium Advice1455575252.832386.jpg


Sent from my iPad using Aquarium Advice
 
This is a very nice stand. Did you use the template from Rocketengineer on Reefcentral ?
 
Thank you all!


This is a very nice stand. Did you use the template from Rocketengineer on Reefcentral ?


Thank you!

I actually didn't but the designs look very similar.
I cut my wood on the top a little differently and didn't use quite as many 2x4's for the legs.
I mixed and matched some ideas, got the main support/"skeleton" idea from a thread on here a couple threads down by Fish Wrangler, and the baseboard idea from a post on Pinterest- I think it was from a thread on The Planted Aquarium. Saw a lot of good ideas on Pinterest, I think I got the starfish handles idea from there too- I'm a bit of a Pinterest addict haha. But threw together my own "blueprint" based on all those ideas. And by blueprint I mean a page of illiterate scribbled on drawings and several rewritten dementions that would give you a headache if you stared at it for too long lol.


Sent from my iPad using Aquarium Advice
 
Back
Top Bottom