Finished my DIY Sump/Refugium. Need some feedback

The friendliest place on the web for anyone with an interest in aquariums or fish keeping!
If you have answers, please help by responding to the unanswered posts.

InfernoST

Aquarium Advice Addict
Joined
May 14, 2009
Messages
1,866
Location
New York
Hi Guys
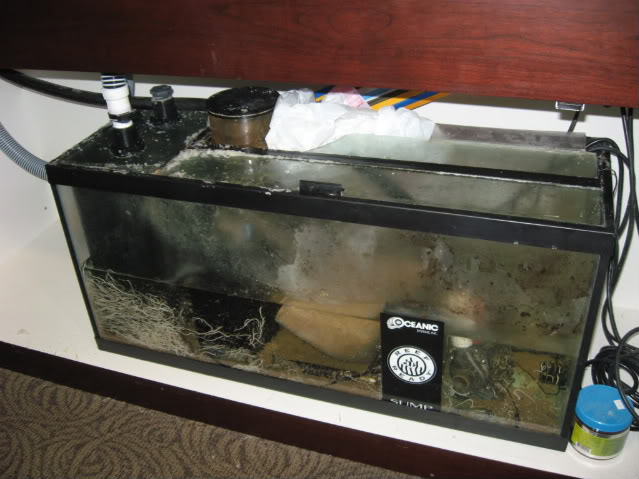
I've decided to install a sump/refugium for my 120 and just finished building it and would like your opinions on where it could be improved if needed. I used a 30 gallon tank because it is the only thing that will fit in the stand, the left compartment is the refugium, the middle is the return with a media shelf and the right side is the feed with enough room for an in sump skimmer. Here are two pics let me know what you all think. Thanks

img_1042914_0_d78516717b7f1ec5d41509ac29a2b819.jpg

img_1042914_1_b2a8d6b5a38e7a2abb6e193d0fda2b1b.jpg
 
OK Keith it looks pretty darn good. If mine ever goes bad I know who to build me one now. Great Job.
One question, Which side will the water come in or will it be both sides?
 
OK Keith it looks pretty darn good. If mine ever goes bad I know who to build me one now. Great Job.
One question, Which side will the water come in or will it be both sides?
Thanks Mike. It's going to come in on both sides via 1" PVC with a T and a valve on each side so I can regulate the flow rates into each side. I'm thinking a slower rate in the fuge and a higher rate on the skimmer side. I plan on using a Quiet one 2200 pump which will give me about 375 gph at 4.5' head.
 
I was thinking the same as Mike. If the water only came in on one side it would never be able to reach the other side. ;)
If you end up doing a chiller you would have to go bigger on the return pump.
 
I'm planning on running both my canister and sump thingy then running the return from the canister through the chiller when I get one, it's output is about 450gph.
 
with the pump in the middle, and the baffles being at different heights, the flow from each side to the pump will not be even, rendering whatever you put on the (left) side much less effective than if you went with the regular design. with the water flowing in only one direction, you are guranteed a proper cycle through the sump w/o deadspots.
 
with the pump in the middle, and the baffles being at different heights, the flow from each side to the pump will not be even, rendering whatever you put on the (left) side much less effective than if you went with the regular design. with the water flowing in only one direction, you are guranteed a proper cycle through the sump w/o deadspots.
That was the whole idea, I want a slower flow rate thru the refugium where the microalgae is going to reside while the flow rate is going to be faster through the skimmer section. Note, the flow rates will be fully adjustable via each valve, one on the skimmer side and the other on the fuge side.
 
I'm planning on running both my canister and sump thingy then running the return from the canister through the chiller when I get one, it's output is about 450gph.
I read on another site of a guy running his chiller off his canister and when he had to clean the canister he could not stop the back flow and flooded his livingroom. So you would need to have a checkvalve to stop the syphonning action. When it comes to plumbing a chiller simple is best.
 
I read on another site of a guy running his chiller off his canister and when he had to clean the canister he could not stop the back flow and flooded his livingroom. So you would need to have a checkvalve to stop the syphonning action. When it comes to plumbing a chiller simple is best.
Good info TC. My canister has 2 intakes and 1 return connected through a manifold that closes off all 3 hoses before it can be removed from the canister so I'm not quite sure how how a back flow would start, the sump and canister are going to run independently from one another. Definitely some food for thought though, I'll have to draw it out later and see if I can find this potential back flow problem.
 
It holds water and doesn't leak

Here are a few pics of it filled with water. Thank god, all chambers are water tight. I know it's not to exciting but it sure did amuse me with all of the different water levels. I'm hoping to have it up and running by the weekend, i need to get to lowes for some PVC.

img_1043226_0_bd5af721d6f9f8b4c9f471484945c8d1.jpg
img_1043226_1_ee280bc2a1d2ea2f502735f033a4237f.jpg
 
Just make sure when it`s running that it leaves you enough room for the back flow if the power goes off. Or dreill a small hole in the return line at the top. I dont have hole drilled in mine but my refuge handles the backflow.
 
Just make sure when it`s running that it leaves you enough room for the back flow if the power goes off. Or dreill a small hole in the return line at the top. I dont have hole drilled in mine but my refuge handles the backflow.
I'm going to put several siphon breaks just in case a snail happens to be at the wrong place at the wrong time. I know I'm going to get water on the floor the first time I simulate a power failure, it's just my luck. I'm stubborn and am going to go strictly with my calculations for the first shot then manually tweak it after I clean up the water. LOL :lol!:. If it works the first shot I'm going to crack open a brew then take the family out for din din.
 
This looks like a great design. If you don't mind, I'd like to get some specs from you so I could build a similar one at some point in the future?
The specs changed from my original drawing so I altered them on the fly so I'll give to you off the top of my head. The tank is 30 gallons with the following dimensions 36x12x16. I used 1/8 " glass for all of the baffles except where return chamber is where I used 3/16" glass in case the pump decides to do something nutty. All baffles on the left side (fuge) are spaced about 1/2 inch apart with the 1st baffle (From left to right) from the bottom up is 14" high and 14 inches from the left side of the tank. 2nd baffle from the top down is 14" high 1/2 inch away from the 1st and roughly about 1-1/2 inches above the bottom of the tank and the third is 9" high from the bottom up and 1/2" away from the 2nd baffle. Now the baffles on the right/skimmer side (From right to left), the 1st baffle is 10" high (this size was picked because most in sump skimmers need anywhere from 8 to 10 inches of water to operate properly so I picked the higher end and figured I could alway raise the skimmer in the sump if the 10 inch height is to high if I made it 8" and that was to low I would be screwed)from the bottom up. 2nd baffle is 14" high from the top down with 1-1/2 inches above the bottom of the tank and spaced 1/2 " from the first baffle with the 3rd is 9 inches high from the bottom up and spaces far enough away from the second baffle for the egg crate shelf which I think is about 2 inches wide. I calculated the reserve capacity after test filling to be about 8 gallons of volume for back flow from the DT in case of a power failure. Good luck with yours.
 
Are you going to use an ATO? The reason I ask is that center section is where the water level will drop from evaporation and it doesn't look like it hold very much water.
 
Are you going to use an ATO? The reason I ask is that center section is where the water level will drop from evaporation and it doesn't look like it hold very much water.
I do plan on putting in an ATO, I also completed the plumbing in the wall behind the tank and installed my RO/DI unit right next to the tank which I plan on using directly for the ATO supply water. I think as of now the volume in the center is approximately 5 gallons, this is the change I made when I was building it (Made the return chamber larger and shrunk the fuge area).
 
Thanks for the specs. What I am considering this for is a friend/customer's tank that I have a thread running on, it's a 120 acrylic in a recessed cabinet, but the space beneath it is the same dimensions as the tank, so it could even house a 55 or 75g sump. Right now he's running it on a 30g Oceanic sump here

img_1043291_0_de1fd4fd26fda3645b3c93122d7c4ab5.jpg


and him and I talked about setting up a refugium to help keep his Nitrates under control and supply pods. If I had to guess, the bigger sump the better, more volume, stability, and margin for error (power outage, etc) since it's in an office.

I guess I have a few questions about how you installed the panes inside. How do you go about sealing up the edges of the interior glass panes when they're so close? I've re-done seals on a tank, but not interior panes so if you could maybe explain it quick so I get the general idea.
 
Looks like you're getting good levels out of it. Good luck on the install.
 
Thanks for the specs. What I am considering this for is a friend/customer's tank that I have a thread running on, it's a 120 acrylic in a recessed cabinet, but the space beneath it is the same dimensions as the tank, so it could even house a 55 or 75g sump. Right now he's running it on a 30g Oceanic sump here

img_1043510_0_de1fd4fd26fda3645b3c93122d7c4ab5.jpg


and him and I talked about setting up a refugium to help keep his Nitrates under control and supply pods. If I had to guess, the bigger sump the better, more volume, stability, and margin for error (power outage, etc) since it's in an office.

I guess I have a few questions about how you installed the panes inside. How do you go about sealing up the edges of the interior glass panes when they're so close? I've re-done seals on a tank, but not interior panes so if you could maybe explain it quick so I get the general idea.
If you do take on this project you better get your calculations nailed down because a 1" pipe gravity fed will allow a flow rate of 16gpm or 996gph, this will make a mess in hurry. As far as the caulking goes the only baffles that are siliconed 100% on both sides are first ones on each side the other baffles I pressed the silicone in with my finger on the side that was accessible so it would go thru to the other side just a tiny bit because trying to get in there to smooth it out is not happening.

BTW, that sump is in nasty shape.
 
Back
Top Bottom