MY DIY project Stand/sump/etc.....

The friendliest place on the web for anyone with an interest in aquariums or fish keeping!
If you have answers, please help by responding to the unanswered posts.

john73738

Aquarium Advice Apprentice
Joined
Oct 11, 2009
Messages
33
Location
Las Vegas
Hi All,

Looking for advice on my sump design. Just in the planning stage of my project until my Wife to be (11/02) get moved into our house in Dec.

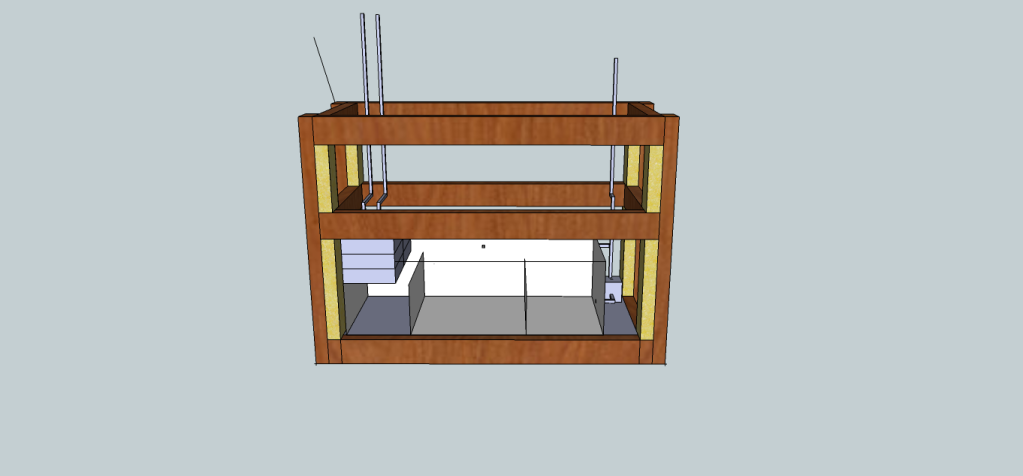
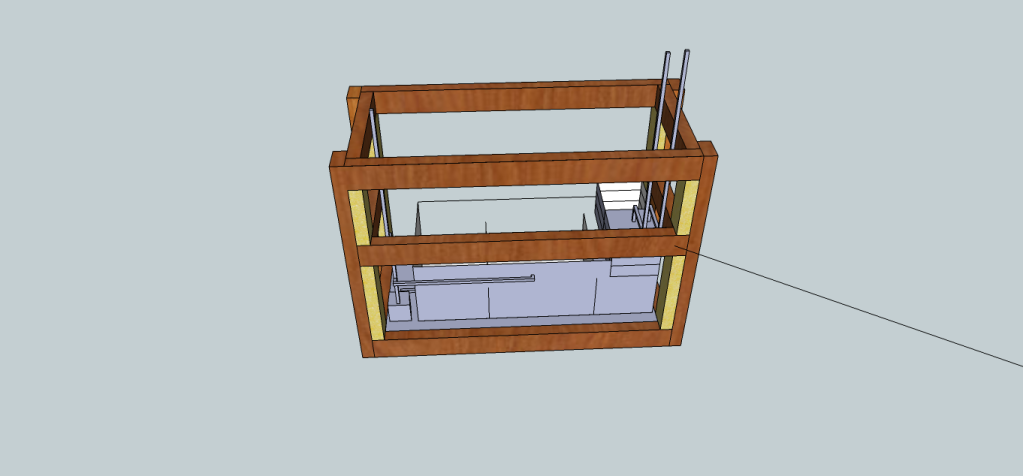
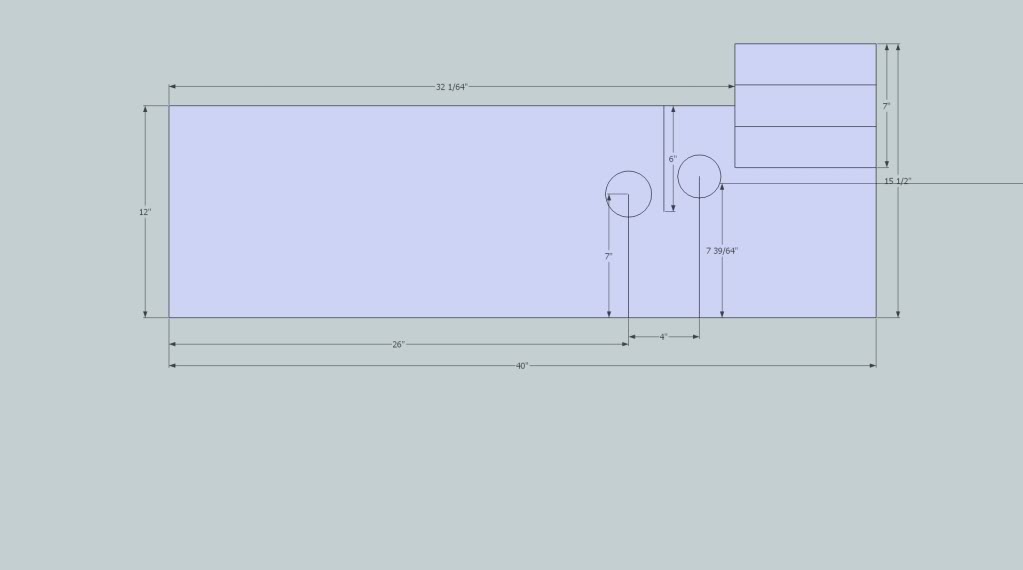
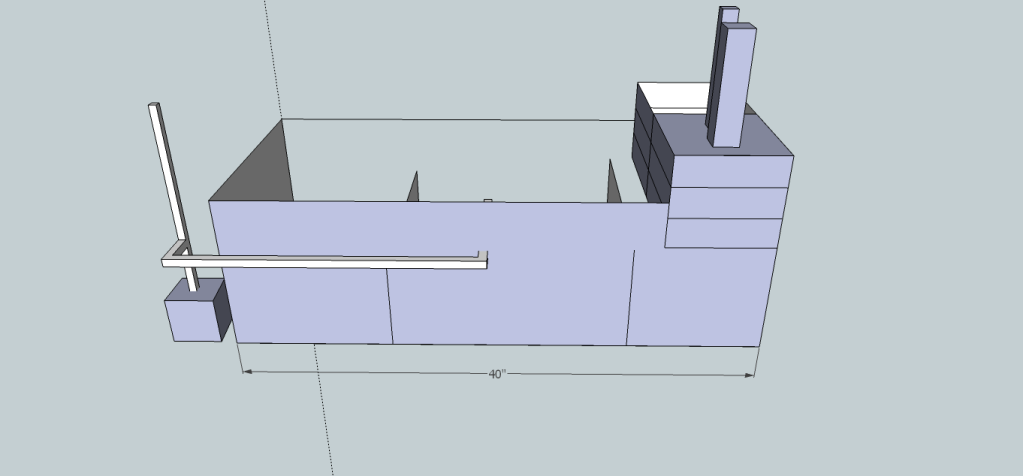
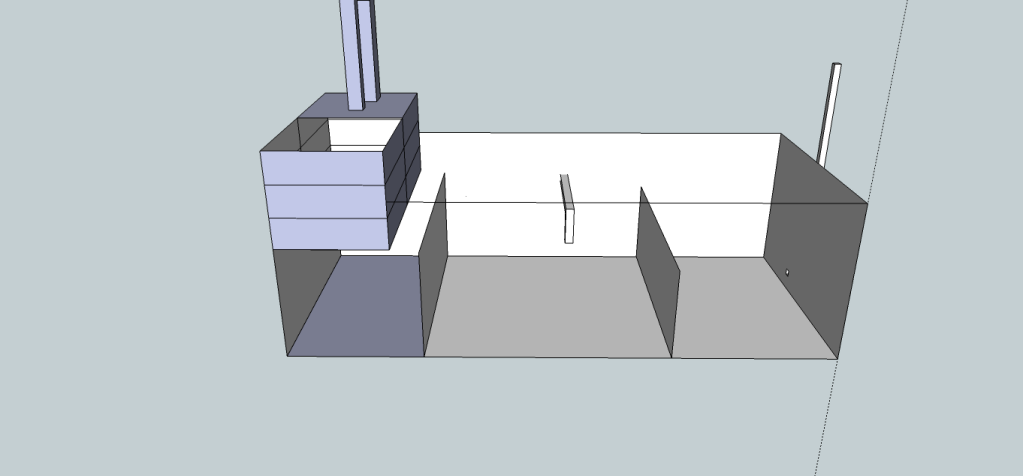
So here is the initial rough design. revisions are in the works to edit dimensions, and add the plumbing.
img_1041210_0_b79e586643067f9489fef0f7a0d99865.jpg


Here is the method behind my maddness...:bandit:

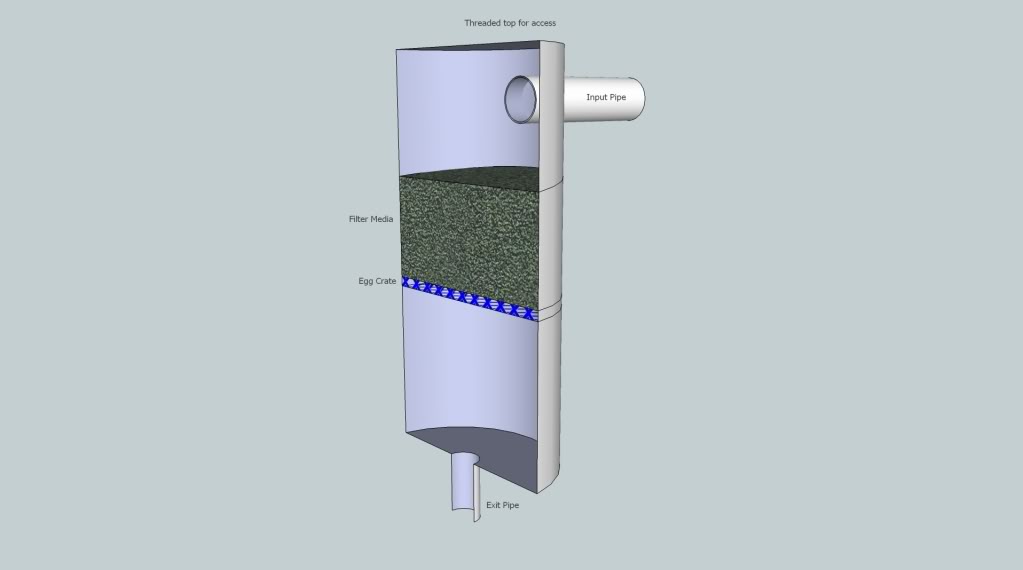
1. Water enters through the sterlite drawers on the right. Each will have:
1st drawer Pot scrubbers
2nd Drawer Filter Media
3rd Drawer Carbon in bio bag

2. After mechanical. filtering water will flow to second chamber via 3 bio wheels.

3. Water will then flow to return chamber via 3 more bio wheels.

Return pump will be bulkheaded to sump rather than submerged.

make second chamber larger, then plant removing 3 bio wheels, and adding light to stand.

will have heater in return chamber

Return will be plumbed to have excess water re-enter return chamber to adjust flow rate, and help oxygenate water.

I understand that this is serious overkill for a 75 gallon cichlid tank. My reasoning is that I can be on the road a lot for work, and this will help my Wife to be, and her 3 sons be able to better take care of the tanks. Also I am setting up a 55 gallon planted tank as soon as I set up those inhabitants a new home and I heard that this is the way to go for planted tanks. Also SW is in the future.

Any questions please ask, and I would love feedback on my design.

Tanks

Bear
 
I don't understand your drawing, but from your explanation there are a few things I would change.
First, you want your first drawer to hold the mech media. You don't want your scrubbies to get clogged with debris and detritus. So definitely switch the media in drawers 1 and 2.
Next, unless you are removing meds, there is no need for the carbon. You're better off using the third drawer for more bio media (scrubbies).
Also, I would get rid of the bio wheels all together. With the wet/dry action of the drawers, and the volume of the media, you won't need the wheels
Beyond that, your return plumbing sounds right on.

Best of luck.
 
Thanks, I did some revamping of the design after the post getting rid of three of the bio wheels. Please explain not needing carbon. All the store bought filters use it so I am confused why it would not be needed in a sump pump.
 
Thanks, I did some revamping of the design after the post getting rid of three of the bio wheels. Please explain not needing carbon. All the store bought filters use it so I am confused why it would not be needed in a sump pump.

They're not necessary in those filter cartridges either. Carbon is only needed to pull chemicals out of the water. If you are not dosing meds, you don't need it. Not "all" storebought filters use it. Most give you the option (canisters Qualiyu HOB filters), and the ones that make you use it (poor quality HOB filters that use cartridges) are crap to begin with.
Also, the carbon is only active for 5-7 days. After that its just taking up space in your filter
Not only that, but its potentially harmful, as after the carbon is spent, it becomes a nitrate factory, and may leach toxins into the system.
 
Yes I am planning on planting it. Still researching.

Thanks for the help, Trying to break the whole store bought mentality and going outside the box and turning this into a hobby rather than just having pet fish.

More to come soon plans on the stand are coming nicely.
 
I am with you, getting a Shop Smith in dec from my father :D:D:D:D

Here are the plans including the stand with sump.

Stand idea is not original, got it from another forum I visit, look forward to starting...days are counting til we are moved in to our rental home and I can get cracking... BTW a few support braces are removed to get a view of the sump..


Bear


img_1041790_0_f16f32d16be37d4a36a0ce466697ba64.png


img_1041790_1_1d20863c8f68592f915a13aba24f8a17.png
 
looks good.
couple of questions.

1) you have 2 sections in the midde. i assume the larger of the two will be your FW refugium area. what is the other section for?

2) did you leave space and/or make some kind of bracket to account for the light that will be needed for your refugium? keeping in mind the WPG section will only be relative to the amount of water in that one section of the sump, you can probably get away with a smaller fixture, but you will still need to mount it somewhere.

3) i see you have your plumbing running to the inside wall of the stand, and up to the tank. are you drilling the bottom of the tank and going with a durso style overflow?
 
looks good.
couple of questions.

1) you have 2 sections in the midde. i assume the larger of the two will be your FW refugium area. what is the other section for?

from left to right (top pic) (L) intake (M) refugium (R) return

2) did you leave space and/or make some kind of bracket to account for the light that will be needed for your refugium? keeping in mind the WPG section will only be relative to the amount of water in that one section of the sump, you can probably get away with a smaller fixture, but you will still need to mount it somewhere.

yes removed braces to make it easier to veiw

3) i see you have your plumbing running to the inside wall of the stand, and up to the tank. are you drilling the bottom of the tank and going with a durso style overflow?

not drilling, I am using a DIY overflow. I have a couple ideas, and going to do some experimenting.


Bear
 
sounds good. cant wait to see what you come up with.
i have been wourking on a couple of different bottom siphon style overflows myself. cant wait to get them in action.

best of luck.
keep us posted
 
Here is a little idea to replace the drawer filters. It is made of 3" or 4" pvc. It would have a screw on top for access and a cap in the bottom. The intake and exit pipes are drilled and cemented into the filter. Then filter media is added. Could also be used for bio filtering just fill with pot scrubbers or bio balls.

Thinking of using 2 on my sump design.

Only thought is that the intake may be loud without an elbow in which case I would just put one on without cementing so it can be removed for filter repolacement.

Thoughts???????

A couple other changes I have made, Made the refugium larger by making the return section smaller (just a little larger than the pump) may use the these filters and pull them above the sump and the intake will spray over bio media via spray bars. More pics to come soon

Bear

img_1042234_0_ad530fe309518b172cdc829693eabe86.jpg
 
even a 6" dia PVC wont offer you the same volume for your media due to the shape.
i have made filters out of these 4" pvc similar to your image (but it was a stand alone unit), but with a sump, youre better off going with the traditional wet/dry section.
 
For my application I am just using for mechanical filtering then adding the wet/dry section. I see where you are going for the Bio filtering.

Or am I just getting tooooooo elaborate


Bear
 
in the end, youre just making it harder on yourself, as far as maintenance and all that jazz. the stackable drawer method, and the single section wet/dry system are tried and true. a layer of bio media over a drip tray, will easily handle your mechanical filtration, and will be hassle free when it comes time to clean or change media.

you know what they say. "if it aint broke, dont fix it"
 
Ok, you are right. I am just trying to out smart myself and get too technical. Will stay with the 3 drawer organizer.

I work for the feds, we love to break it just so we can fix it

;)

Thanks again for the honest feedback,

will keep you informed on my progress.


Bear
 
I work for the feds, we love to break it just so we can fix it

;)

i know exactly how you feel man. i sometimes catch myself building ridiculous things just for the sake of doing it. complete overkill. (ex: my 1g tank w/ 5g wet/dry filter @ 60x turnover/hr)

by all means, if youre feeling froggy... leap
but for something functional and practical, its best to stick with the ol' tried and true.

cant wait to see how this one turns out. the drawings look great.
 
Back
Top Bottom