Need some input on DIY plumbing

The friendliest place on the web for anyone with an interest in aquariums or fish keeping!
If you have answers, please help by responding to the unanswered posts.
na..they come in assorted colors from the locline company. btw, just bring the pvc adapter with you to the lfs and check that way.
 
Afterthe pvc has been primed and cemented what is the proper process to be sure it's safe for the tank? 24 hours to cure then thouroughly rinse?
 
Well everything is now cut and pre-assembled. Finished it all up on lunch break. Cut the pipe to size and made sure everything fit together nicely. That loc-line adapter ended up going into the elbow I bought. Not as easily as the other PVC pieces but it'll work fine.

I have another home project to work on when I get home (repairing tiles in the bathroom, yay) but after that it'll be time to plumb the tank! I should have about 30g of RO/DI water brewed so I can get that into the tank and start circulating it as well.

Updated the drawing on the Drain system to how I ended up cutting it.
 

Attachments

  • Plumbing-D1-R1.jpg
    Plumbing-D1-R1.jpg
    88.8 KB · Views: 88
Hopefully I'll have some photos to post tonight of some real progress!
 
The only reason I put the ball valve in was so that I had a way of reducing return water from the Mag 9.5 if need be? The drain is capable of 600gph correct? The Mag 9.5 should be pushing that much plus some?

A ball valve in line is not the ideal way to chock down the flow from a pump. Yes, it will work, but the increased resistance will shorten the life of the pump.

The better way is to run a T from the pump, one arm goes to the display, the other arm diverts water back into the sump. You put the valve in the return arm to control the diverted flow.

This is a pic of how Melevsreef did it:
http://www.melevsreef.com/return.jpg
 
actually, it's the opposite. putting a ball valve at the exhaust port of a pump will lengthen it's life and use less electricity.
 
actually, it's the opposite. putting a ball valve at the exhaust port of a pump will lengthen it's life and use less electricity.

That makes more sense to me. On the flow chart for the 9.5 it will pump a 13' head height which takes it down to 100gph. If I restrict it to 500-600gph that's no worse than the pressure from an 8' head height right?
 
correct. it's not going to hurt it. now, if you were to restrict it from the intake end of the pump, then you are causing damage.
 
Posted these in my tank build but this is probably appropriate as well.

Here's what I came up with the stand pipe and the loc-line for the return. There's a 1/16' hole in the end cap of the stand pipe. I read to start there and drill out larger if needed.

img_1187895_0_9610f8177bb8282678da9753940b7ba6.jpg


I have the loc-line directing the return down the back wall and then the second output coming back and pointed towards the left wall of the tank. For the time being I'm going to use 3 or 4 Maxi-Jet 1200s to stir things up. I plan on upgrading to a couple Koralia 750s.

img_1187895_1_37883bbd3590841322f6cbd64f716408.jpg


Over all shot from behind with components in place. Drain tube is 1.5" and after the sump is in place will basically go straight down into the first chamber. Vinyl return line is just sitting there. It's 1"" ID vinyl tubing which will go right onto the Mag 9.5" output then to the barb fitting. I still need to find an adapter for my Mag 7 output so that I can hook up my 3/4" ID tube to that for the skimmer.

img_1187895_2_5047cfe479f46cd52d815c2d4b9b1c66.jpg


img_1187895_3_9a9107321cb4a710433950338b4da865.jpg
 
How large of a hole would you guys needs to be in the end cap of the stand pipe?

I have the tank up and running and have my Mag9.5 reduced to maybe %75 or so and everything is running pretty smooth. I figured the stand pipe would be able to flow more water than this and the water exiting into the sump (under water) is very bubbly.

The water line in the over flow is up over the elbow of the durso stand pipe and the stand pipe gurgles as it's draining. Is this because the hole in the end cap is still too small? I started with a 1/16" hole and have moved up to what looks like about 3/16". It hasn't seemed to do a whole lot.

What do you guys think? I just didn't want to drill out too large of a hole and mess something up.
 
When increased the pump rate it would fill up then drop. I think it was because my return pump was losing suction though. I haven't figured out how much water i need total just yet either. I will give that a read!
 
Ok just read through that write up. It looks like my end cap hole might be a bit too large. If I increase the flow rate the water level in the overflow chamber increases but stays stable. Right now it's just to the top of the elbow. If I increase the flow more it rises and the stand pipe will make more noise. What should I do? It said I might need to redo the end cap with a smaller hole? I glued mine in place. I might just fill the hole with silicone and drill a new hole.

Also I made my stand pipe from 1" PVC and not the 1.25". Is that ok or wpuld that make a big difference?
 
I've been battling this thing since day one. It seems like it will randomly drop water level in the overflow and suck air then go back up and stay there for a while. The water level will not stay level. If I cut back flow on the pump it will stay level but I feel like it's not draining anywhere near what it should be.

I read that the 1.25" standpipe works better than 1" so I think I'm going to drain the overflow tonight and pull the standpipe back out (which will require removing the bulkhead) and cutting it off then gluing on a 1.25" adapter so I can make the stand pipe out of 1.25".
 
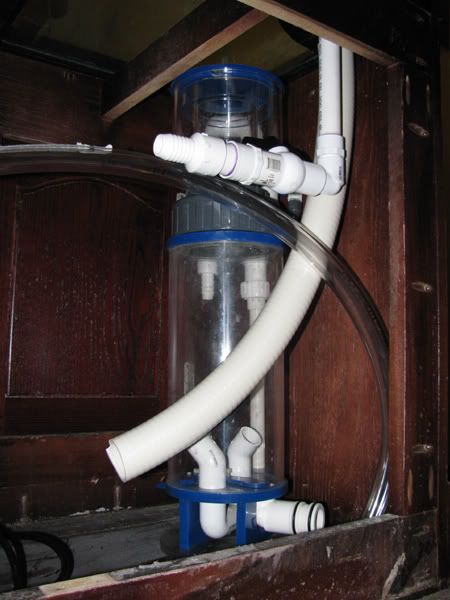
Also, never glue the end cap.

Learned that the hard way. Looks like you're not supposed to glue the bottom of the tee fitting either. I came up with this idea which seems to work well for adjustment but I have a feeling the 1" standpipe is what is really restricting my setup. I'm going to pick up parts at lunch and try to get it done tonight. Won't be gluing the end cap or the tee fitting this time around!

img_1190128_0_7e47069730cab8dcba8e959474e4cea6.jpg


Here's a shot of how the sump turned out. Works great. My only complaint is the return chamber is really small and it looks like evaporation is going to be a bit annoying.... Not bad for fitting all this in a 36" x 18" space if you ask me though!

img_1190128_1_112b6b1e8cffe7eb847ab2df2c1d1bf8.jpg
 
buy an auto top-off. i like the JBJ ATO. you can DIY it cheaper, but i use one of those on the gym tank and it behaves pretty well so far.

btw, are you sure that using a larger piece of pipe, running into the same size bulkhead is going to make a difference?
 
I personally am not sure it will make a difference but on the durso site he states the following....

PVC Size to Use

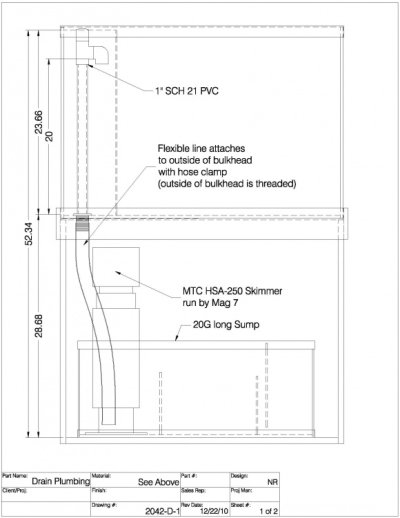
My tank has a 1 inch bulkhead on the bottom glass where the water drains out. For this size hole, I recommend you use 1¼ inch Schedule 26 PVC for the standpipe. I do not recommend 1½ inch PVC as the larger fittings are much harder to fit inside overflow chamber (also called a weir). Secondly, there is no advantage in 1½ inch over 1¼ inch PVC when dealing with a 1 inch bulkhead — the bulkhead is the limiting factor for the amount of water that can drain out.
These instructions assume you will be constructing a standpipe for a 1 inch threaded bulkhead.

To Oversize or Not to Oversize

With 1 inch and smaller bulkheads the standpipe's PVC diameter needs to be larger than the bulkhead to work correctly. I get a lot of e-mail questions on why this is. Honestly, I’m not sure. Typically if you use 1 inch PVC pipe on a 1 inch bulkhead you get poor results. (Some exceptions with smaller low flow tanks.) Take my word on it and use 1¼ inch PVC pipe. For large tanks with 1.5 inch bulkheads and large return pumps however, there does not seem to be any need to oversize the standpipe for larger bulkheads. Bulkheads 1.5 inches and larger can use PVC pipe & fittings that match the size of the bulkhead. (I consider tanks in the 350 gallon and up good candidates for 1.5 inch bulkheads).

I picked up all the parts at lunch time and the 1.25" stuff is pretty massive. I really hope it fits! The inside diameter is nearly 3/8" bigger since it's thinner wall pipe.
 
Back
Top Bottom