automatic water changer description & questions

The friendliest place on the web for anyone with an interest in aquariums or fish keeping!
If you have answers, please help by responding to the unanswered posts.

perle

Aquarium Advice Apprentice
Joined
May 4, 2006
Messages
21
Location
East Coast US
Hi all,

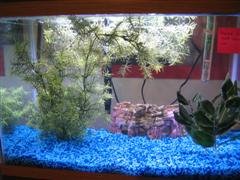
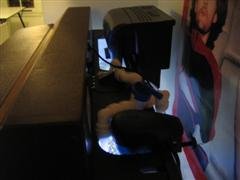
I have constructed a devilish mechanism to automatically filter/change the water in my new 20 gallon (little small but all I have room for right now) tank. Basically I am sick of having to deal with awful city water so I overengineered this device.

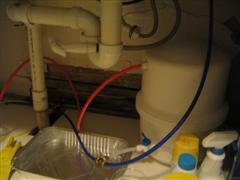
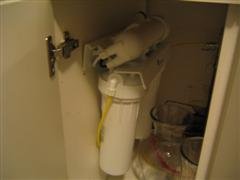
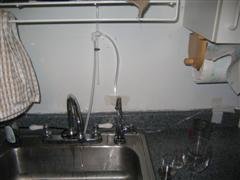
So now I have a reverse osmosis filter (consumer grade, from home depot) installed under my kitchen sink, and have tapped the output line and can run it to the fishtank where it trickles in by the filter. This way the fish and the people both get nice water, and the low output is fine since I have a small tank. I plan to cycle 5 gallons a day.

Incidentally the whole filter project has cost me less than $200.

Filter: $160 - $40 rebate
Tubes, fittings, etc.: $30
New high-powered heater: $20
R/O Right aquarium replenishment minerals: $16 for 500g
----
$186

Not so bad really and it will have the pleasant effect of cooling the tank somewhat in the summer, too.

The outtake from the tank works by the power of gravity, the tube makes a loop over the sink and at the tip of the loop, which equals the level of water I want in the tank, there is an airhole. As long as the tube never empties of water it will work fine. At least that is my plan. :roll:

Update: my plan totally worked! :)

Ok, two questions:

1. My incoming tap is hardness 120-140ish ppm. My output from the RO unit is hardness 50ppm. I was disappointed that it was still that high, I was hoping for more like 5ppm. Will this diminish over time? Is this normal? I am going to call GE but I thought maybe you guys could help too. Admittedly my dip-strip test kit is not precise.

2. Also, where should I position the intake/outtake within the tank? I was thinking I would put the intake by the filter I guess to encourage even distribution, and the outtake down under the gravel in the diagonally opposite corner. Maybe you have a better idea?

I realize that having the outtake low in the tank leaves a possibility of draining the tank entirely if the opposite end somehow gets ripped down, so I might not do that after all.


Anyway right now there is one zebra danio in there to help it cycle. We will see.

Everyone let me know what you think.

~perle

------------------
Bring me some luck, little junebug...
 

Attachments

  • fish_006__wince__206.jpg
    fish_006__wince__206.jpg
    19.8 KB · Views: 503
  • fish_007__wince__145.jpg
    fish_007__wince__145.jpg
    12.4 KB · Views: 503
  • fish_008__wince__810.jpg
    fish_008__wince__810.jpg
    8.9 KB · Views: 511
I don't understand how your outtake works. You have a small hose with one end...

I just read your post 4 times, drew myself a picture, and now I finally understand. - Its simplicity is brilliant!!!!

An RO system should remove nearly all of the hardness. I would guess that your test kit is inaccurate. RO systems will get worse with time, not better (darnit). Verify your results somehow and if your RO unit is in fact giving off 50ppm, call the manufacturer.

The level of the intake hose is not importand. You may want to actually put it in the filter, if convenient. Close to the filter is also a good idea.

The level of input of the outtake hose could be very important if the outlet of the outtake gets lowered accidentally. I would suggest putting the inlet of the outtake hose above the heater and filter intake. This will prevent either of them being ruined if your water level drops.

Your outtake system will work the way you have it, but I worry that it may be prone to problems like getting clogged or bumped out of place. So be careful!

You have a very cool idea. Let us know how it turns out.

Are you planning to put in RO Right every day?
 
For now I am planning to add R/O right every day. I will have to do some careful experiments and figure out how much is necessary (hopefully little).

Everything works awesomely, and I probably don't even really need that new heater which is in the mail (although it gets hella cold in the winter here in my poorly insulated apt, so it will be good to have).

Ideally I would add a baffle to the sink drain and run the filter and tank output pipes into that, underneath--I would rather not drip the tank water into the sink itself. But I have a rickety sink drain and it would be some work to rebuild it. I am trying to think of a more robust scheme that would avoid that.

You are right about the clogging, I am gonna leave the outtake tube about 3 inches from the top of the tank. That limits spillage and would save my fish in the event of an accident that drained the tank too quickly. I think I should maybe get an overflow monitor. Since this has no electric parts (not even in the filter system) I have no way to make an automated shut off, though. I have seen other people do complicated things with microchips and pumps and I am glad I avoided all that. Water pressure is all you need, really....

Note that after the exit tube loops out of the tank, it should at no other point rise above the level of the desired waterline. Also, you have to prime the tube by sucking on it.

Question: how, uh, "diffusory" is the circulation in a tank like mine? I have a Penguin 150 splashing into it. Do I need to worry about dead spots that would miss getting the new water, or having wide variations of chemical concentrations that would harm the fish?

Ok, here are some more pictures, below.

~perle
 

Attachments

  • fish2_002__wince__211.jpg
    fish2_002__wince__211.jpg
    11.9 KB · Views: 474
  • fish2_004__wince__465.jpg
    fish2_004__wince__465.jpg
    11.5 KB · Views: 469
I would worry more about "cold water" spots building up, than "soft water" spots. This really should not be a large concern - especially the way you have the inlet next to your filter.

If I understand, Perle's outtake system is just like the siphon on a gravel vac. Stick one end in the aquarium and point the outlet of the vac towards the ceiling. Water will come out of your gravel vac until the water height in the aquarium is the same height as the outlet to the gravel vac.

Water will stay in the "U" shaped portion of the hose, keeping the "siphon." Then when you raise the water level in the tank, water will siphon out.

If I am seeing the pic correctly, after the end of the siphon hose, there is another hose to take the water down to the drain.

Perle, can you control how fast RO water goes into the tank? RO systems typically are 30 to 100 gal per day. I would think you would want more like 5 gal per day.
 
Ok, yeah I figured the input rate is so low and the turbulence of the tank is high enough that the temperature would stay even throughout--even though it could be significantly lower than room temperature. A high-powered heater should take care of that.

I have a little valve/knob on the input (both ends actually, one under the sink, too). This lets me limit the pressure in the tube at the sink end, and shut it on and off or make finer adjusts right at the tank. Incidentally those valves are only like $3 at Home Depot.

You are right about the U shape. I have discovered a small issue with the outtake. The point of the airhole in the exit end of the tube is to collapse the suction of the hose at that point. However it is not a big enough air gap for the fill rate I think I would like; surface tension in the water limits how much air it can take in, so the outtake is slow.

I have some plans for solutions to this but I haven't decided which is best yet.

Anyway the ability to change the water in your tank simply by turning a knob continues to amaze me. :cool:
 
The activated carbon prefilter completely dechlorinates it. I empirically tested this fact with a dip stick.

Incoming tap reads at about 1.6 ppm chlorine, no chloramine, which matches the city's published results. Post-filter water has 0 ppm chlorine, no chloramine.

~perle
 
perle said:
The activated carbon prefilter completely dechlorinates it. I empirically tested this fact with a dip stick.

Incoming tap reads at about 1.6 ppm chlorine, no chloramine, which matches the city's published results. Post-filter water has 0 ppm chlorine, no chloramine.

~perle
very cool
 
I don't expect that the size of the air hole would be a problem. Air flows much easier than water, and the air flow should be minimal anyway. Air does not need to flow through the air hole because it just a pressure relief.

A few hints (which you probably already know) to increasing the outtake flow :
- Lower the height of the suction break / airhole
- Increase the size of the outtake tube

Did the tank overfill when you turned on the water? It is normal for the water to rise as it builds enough height difference to drive the siphon.
 
I don't see how you are going to prevent a siphon break on the water out tube, therefore I predict a tank flood if RO input is greater than tank evaporation? Or perhaps I do not unterstand your system? Unless it is designed like an overflow box or with an overflow box in it ,how does it work?

Otherwise, you could just send the RO output to a holding tank. Then use pumps to get water out of the aquarium, and back into the aquarium with the flip of a switch. Sure, its not a gradual, continual thing, and it will require you to flip the switches, but it works.

image102.jpg


http://home.comcast.net/~tomstank/tomstank_files/page0015.htm
 
hashbaz said:
It is normal for the water to rise as it builds enough height difference to drive the siphon.

Alright I had figured that the differential would be negligible but perhaps it is not. I will lower the output height and use post-its to track the rise and fall; perhaps it is working as intended.

In regards to the next post, there is no siphon break because the amount of water below the tank level is greater than the small amount of water above the tank level at the beginning of the siphon. For a break to occur all the water below the tank level (and also below the output level) would have to flow out, and that will never happen, because that would mean that the waterline in the tank is below the waterline at the output. After the tube leaves the tank it never rises above the waterline until the exit point.

In regards to tbone's post, there is a siphon. It is not merely an overflow.

Code:
drain     tank            
.__        --
|  |      |  |
   |      |   
   |______|


. = airhole

The waterline is equal to the height of the airhole.

That explanation is not very good. But I can say: it does not happen in my tank. And I refuse to use pumps, only physics. 8)

~perle
 
What I can't understand, is that if there is a siphon hole to stop the outflow of water once the water level drops, then the siphon will be "broken." Then, when the water level rises again, the outflow will not start back up unless someone goes and sucks on the end of the tubing. There lies the risk of tank flood. If it is not noticed that the outflow has ceases, yet the RO water continues to go in, you can overfill your tank.

Take a look at how a HOB overflow box is constructed. There is not one continuous enclosed path the water takes, this is in order to prevent the sipohon from being broken by a drop in water level and/or a reduction or stopage of water flow. With HOB overflow boxes, there is always the risk of air entry into the inverted "J" tube that goes over the tank rim with loss of siphon, but this is rare. I believe it is rare because the water flow through the J tube is brisk, tending to flush bubbles out. Built in corner overflows have no risk of siphon loss, and can only cease outflow if clogged.

So I guess I just don't understand how your set-up works. But, I like your idea of slow continuous water exchange, and commend you on your dedication to improve your fish's environment.
 
TomK2 said:
What I can't understand, is that if there is a siphon hole to stop the outflow of water once the water level drops, then the siphon will be "broken."

This is not true. The left loop of the "m" shape of the siphon is the key. It is the same principle that lets you temporarily pause the use of a gravel vac by raising the exit end just above the waterline of the tank, and then resume it when you lower it to your bucket again.

hashbaz, would I get more output pressure if the intake of the exit tube was lower in the tank? Since there would be more water pushing down above it?

~perle
 
No, lowering the inlet to the outtake tube will not increase the flow :? . But it might make it less likely for bubbles to into your system, and ruin the siphon :) .

If it helps, Perle's tube works just the same as an overflow box. - it keeps water in the "" over the side of the tank. Water will stay in the "U" outside the tank, keeping air from getting into the "."
 
Hmmm. I see tbones diagram, and I understand it and see how it would work. With no airholes, water only comes out of the sink end when the tank level rises above the sink end, and the tank level is determined by the height of the sink end. But what is the purpose of the airhole? I would assume it is to allow air in to break siphon when the water drops below the desired level in the tank, thus preventing too much water from going out. Everything works fine as long as the water stays above the airhole, and air doesn't enter the tubing. But like you say, if the tube empties of water, like would happen when the water level drops below the airhole and air is let in, then no more siphon?

Ah well, I guess I just won't get it. But I would test my theory, and drop the tank water level below the airhole and see what happens. And please forgive my lack of understanding !

edit: uh, so you saying that since only a small amount of air gets into the tubing on the tank and sink side when water drops below the airhole, compared to the larger volume of water in the loop below the water line, the siphon will restart with just a rise in water level and no other intervention? Well toast my buns.
 
tbonem91 said:
I guess the issue with the syphon breaking all depends on how low the input tube for the exiting water is in the tank.

No, that is unrelated. As long as the tip of the input tube is underwater the siphon will not break.

In other news I am running the system 24/7 now with no problems. Still waiting for my R/O Right salts (should be any minute now!). According to my quick and dirty measurement attempt I am cycling ~6 gallons a day.

~perle
 
perle said:
tbonem91 said:
I guess the issue with the syphon breaking all depends on how low the input tube for the exiting water is in the tank.

No, that is unrelated. As long as the tip of the input tube is underwater the siphon will not break.

yeah - thats what I mean - all this hypothetical talk of overflowing deals with IF your input stops, the water level drops below the input, then it starts back up again. I guess that could really only happen in a situation where you were gone for a while, the power went out, water evaporated like crazy to the point where it fell below the inlet, then the power came back on and your RODI overflowed.

I think that is the only real hypothetical situation where this would fail - and could be remedied (unless you already have this) by an inside overflow box that always keeps the inlet submerged regardless of the tank water level... then the tank level would flow into the interior box, etc.

This is actually a really good idea as a water turnover system - so long as your tank has a place for the water to go on the same level as it and the outlet tube has no way of ever being displaced as that would either drain the tank to the level of the inlet (outlet fell/dropped/etc), eventually causing an overflow of the tank via broken syphon or directly cause an overflow of the tank (outlet was somehow raised)

when and if I ever move into my own place and set up my planned big tanks, I might utilize this method depending where I put them... it could also work in a sump setup - the drain hose would just have to be much lower... and would work really well in a basement :)
 
Back
Top Bottom