Rena Filstar xp4 setup question

The friendliest place on the web for anyone with an interest in aquariums or fish keeping!
If you have answers, please help by responding to the unanswered posts.
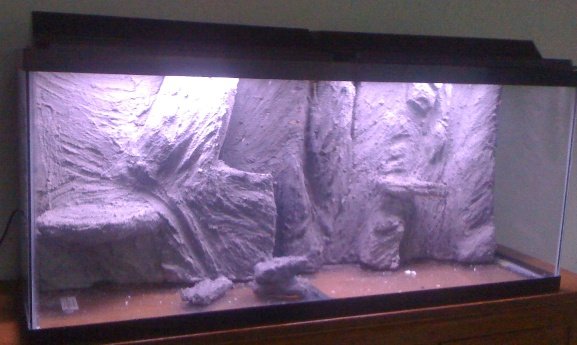
Thanks! I was starting to despair until I got the first coat of cement on. I broke two heat tools and several knives in the process. At one point I took a creme brulee torch to it. *giggle* The last carving session had me on the verge of tears, hacking at it violently with kitchen knives. The mess was incredible. I probably would have given up before now but I've got too much money invested to allow myself to chicken out. But it was really a delight to see my vision start to come to life last night, and now I'm re-energized. I made the gouges very exaggerated because I expect (plan?) on the final thick coat of cement softening those up significantly. Here's a question - the uptake tube for the filstar sits in an almost fully enclosed space. Behind slight indentations on either side of the protrusion that will be in front of it, right against the back 'wall', are two long slits about 1/4" wide and maybe 5" long to allow the water to flow in. Does anyone think I should put some kind of screen there to prevent any fish from getting back in that area?
 
I'm thinking that your background should have no openings ( except for the equipment ) not to just keep out fish but any fish food, poop that may find it's way behind it. Does that make sense? Lol
 
Yes, it is designed with openings only to accommodate the mechanicals. The area where the heater and the filstar output is a wall that the inhabitants could easily pass through. Behind that is a space in the background so that the heater and output will be suction cupped to the glass as normal. I am hoping having those two in the same area will prevent my concern about the heat not being circulated appropriately. The HOB is accommodated by having that area carved way back so the part that hangs over the lip will just do so normally. It's the only equipment that will really be visible but I don't think that little hangover will bother me. Its intake is behind a little wall set at an angle that's open at the bottom and one side, so I don't think that will present a problem for the critters. All the rest of the decorations will be firmly siliconed in with gaps and edges sealed. I will upload a couple more pix. In the final design you can see the hideout I have constructed for the ghost knife I will be getting. I'm going to position that right at the front of the tank so when it is in there it can be easily viewed. I am really excited about the idea of having all of the rocks and caves and things look uniform, as though it all came from the same place. I have cement color in black and tan. I haven't decided exactly how I will color it. I'll do some color

alyssaBackground_initialDesign.jpg


alyssaBackground_CrimeScene.jpg


alyssaBackground_finalDesign.jpg

experimenting with cement coat 2, so I can either duplicate it or change it when I do the final coat.
 
I see what you mean, I had one of those moments where what you were explaining didn't sink in! Lol love that last picture, will be looking forward to see the background finished. :)
 
2nd cement

2nd Cementing, charcoal color added. It looked really dark, almost black when I put it on, but now it looks light gray. I would like it to be somewhere inbetween. I am going to do one more cement pass, more a painting pass with a lot of dark and then stippling some tan on top. This is a dry fit. The silly looking ledge has a little shelf behind it that will hold several plants and an airstone.
 

Attachments

  • alyssaBackground_2ndCement.jpg
    alyssaBackground_2ndCement.jpg
    87.6 KB · Views: 56
Thanks! It's so hard to wait to start stocking. I wish the cure time was shorter. How long does the silicone need to cure before putting water in? I was planning to silicone it in, wait whatever amount of cure time, then possibly put water in (no substrate) and let everything cure in the water a bit too. Then take all the water out, put in the substrate, fill, and start cycling. Any comments on that plan and suggestions on the lengths of time? The final step of the process I am using is to coat the background (and assorted rocks) with marine resin. The instructions claim this means you don't need to cure it at all - any idea about that?
 
I think silicone takes 48 hours to cure, not 100% sure on that. Then I would fill tank up with water and check pH for a couple days to see if pH is stable. Then drain, add your substrate, ect. I have never used marine resin, is there a number you can call to make sure there is no curing time, and it's 100% fish safe?
 
Back
Top Bottom