For many, shipping fish and invertebrates seems like a daunting task. It certainly was for me, at first. Once you try it a few times, though, your comfort level with shipping is sure to improve. Occasional losses are unavoidable; circumstances arise from time to time that are completely out of your control. However, there are steps you can take to greatly minimize losses in shipping. My methods are by no means the only way to ship fish and invertebrates, but what I do works for me. With a little practice, you will develop your own methods that work for you.
First, choose the box size that best fits the size of the order that you are shipping out. I ship using Priority Mail and Express Mail. You can order Priority Mail boxes in several different sizes from the US Postal Service website, www.usps.com. Your mail carrier will drop the boxes off at your house for free. Before you choose your boxes, consider whether you want to use flat rate boxes or whether you would like to ship by weight. The advantage to shipping by weight is that it is often cheaper than shipping with the flat rate boxes, although this depends on the distance your package will travel. You will need a postal scale if you want to ship by weight, unless you don’t mind standing in line at your post office. The advantage to a flat rate box is, of course, that you will know ahead of time exactly what it will cost. This makes printing your own shipping labels very easy. You cannot use flat rate boxes to ship by weight. You can use the flat rate, or any other Priority Mail box, to ship via Express Mail. Pictured here are a medium flat rate box, and a 7”x7”x6” and 12”x12”x8” that you would use to ship based on weight.

For this article, I have chosen the 12”x12”x8” box. It’s a great size for shipping multiple bags at a time. To get started, I tape the bottom of the box up and then cut my Styrofoam with a utility knife. You can buy a package of Styrofoam insulation at your local home improvement store. You’ll get 6 sheets in a package for just under $10. I use .75” insulation, but .5” and 1” thickness are also available. When you cut your foam, you may want to use a ruler or T square to help with cutting straight edges. I just eye it out, but the ruler or T square can be helpful until you’ve gotten some practice.When you finish cutting place your Styrofoam lining inside the box. You should have a piece of insulation on all sides of the box, plus top and bottom. This step is extremely important to help ensure that the temperature inside the box stays within a range that your fish and invertebrates can survive.

When you finish cutting place your Styrofoam lining inside the box. You should have a piece of insulation on all sides of the box, plus top and bottom. This step is extremely important to help ensure that the temperature inside the box stays within a range that your fish and invertebrates can survive.

Next, catch your fish and invertebrates. For the purpose of this article, I caught 6 Emperor tetras, 6 Gertrudae rainbows, 6 tiger shrimp, and 3 nerite snails.

If you are using Priority Mail, your fish will likely be bagged for 2-3 days. I like to add a drop of Prime to their shipping water. Given that invertebrates (with some exceptions) have a lighter bioload than fish, I do not use Prime in their bags.

It’s time to get your fish bags ready. If you do not have fish bags, you can purchase them online. Some good sites for buying fish bags include www.kensfish.com, www.jehmco.com, and www.aquabid.com. Ken’s and Jehmco are great if you want to buy bags in quantity. If you don’t need a ton of bags, you can buy smaller quantities through Aquabid (be sure to check the seller’s feedback before bidding). Never use Ziploc bags or any other bags that are not designed to transport fish. Ziploc bags are great for food storage, but I can’t tell you how many times I have seen leaky Ziplocs at fish auctions. Please, avoid them!
The 6 Emperor tetras pictured below are bagged in an 8”x15” 2 mil fish bag. They are large and bulky as far as tetras go, so they get a bigger bag than smaller, slim-bodied fish like the Gertrudae rainbows. The Gertrudaes will go into a 6”x12” fish bag. If you have access to an oxygen tank, great! Adding oxygen to your fish bags is really helpful. Most folks don’t, and if you’re one of them, just bag your fish so that there is approximately 1 part water to 2 parts air. When shipping fish, you are far more likely to run into problems due to a lack of oxygen than due to poor water quality so take care not to pack too many fish in each bag. You can use an air pump and airline tubing to help fill your bag with air if you do not have access to an oxygen tank. Just fill your bag up with air, then quickly grab the top shut and twist to keep the air in. I twist the top of the bag tightly to make a loop, then use a rubber band to close it. You don’t have to make the loop at the top, that’s just the way that I learned how to do it. Do not blow into the fish bags to fill them. Your fish do not need your CO2 on the way to their new destination.

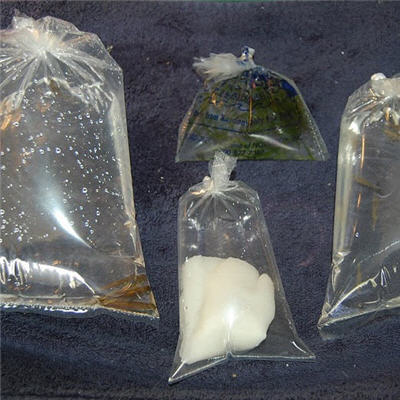
Now let’s bag some nerite snails. If you want to, you can simply put the snails into a fish bag with a little bit of water and they will probably be ok. I use a paper towel to minimize shell damage while the snails are in transit and this method has not failed me yet. To do this, first place your snails onto a paper towel.

Next, roll them up in the paper towel. This will keep them from bouncing around and hitting each other’s shells. Place your rolled up paper towel into a fish bag. To pack these nerites, I have chosen the 4”x12” 2 mil bag. You don’t need a big bag for a few snails.

Pour enough tank water into the bag to saturate the paper towel. You don’t need any more than that. As long as the paper towel is completely saturated, your snails will do just fine. Fill your bag with air and close it with a rubber band.

Next in line are these tiger shrimp. For shrimp, I use a Kordon Breather Bag. The reason for the Breather Bag is that small shrimp like these tigers can easily get stuck in the folds of a fish bag. As you can imagine, that’s not good. Breather Bags allow gas exchange through the bag material.

Pour your shrimp into the Breather Bag along with their shipping water. Your shrimp will appreciate something to hang onto while they are bagged. Java moss, hornwort, and other plants are good choices for this purpose. I have seen rubber bands used in a pinch, but I prefer to use plants. Once you have your shrimp and plant in the Breather Bag, twist it shut. You do not need to leave air in the bag since it allows gas exchange. Use a rubber band to secure it or just tie a knot in the bag.

Now your fish and snails are ready to be double-bagged. Breather Bags can also be double-bagged but I don’t do this because I only use these to ship small bags of shrimp and nano-fish.

Slip the first fish bag into a second inverted bag, as shown.

Twist the top of the second bag tightly and secure with a rubber band. The end result will look something like a balloon.

Here are the double-bagged Emperor tetras, Gertrudae rainbows, and nerite snails. The breather bag with the tiger shrimp is not double bagged.

Next, wrap your bags in sheets of newspaper.

Now, you’re ready to pack that box!

Don’t throw away those Styrofoam scraps! That’s money down the drain. Pieces like these are great for breaking apart as packaging material- DIY peanuts!

Cushion the box with some newspaper.

Arrange your wrapped up bags on top of the newspaper.

Stuff some newspaper and/or DIY peanuts on top of the fish bags wherever there is room. You don’t want your critters bouncing around in the box too much.

If it’s cold outside, use a heat pack. If it’s warm outside, SKIP THIS STEP! The general guideline that I use is that if the low temperatures on the way to the destination reach 50F or below, I will use a heat pack. During certain times of the year, there will always be some guesswork involved when you are deciding whether or not to use a heat pack and that is why I consider it a loose guideline. For example, if you are shipping to a buyer where they have a low of 48F but a high of 75F, I would skip the heat pack. I generally go with the 72 hour variety when I’m shipping Priority. There are several types of heat packs available in addition to this 72 hour, including 24, 40, and 60 hour.

Remove your heat pack from the plastic wrap, and wrap it loosely in newspaper. You don’t want the heat pack to come into direct contact with your bags.

Tape the wrapped heat pack loosely to the inside of your Styrofoam “lid”. Too tight, and it won’t heat up properly- you just want to keep it from moving around much. If you are shipping in very cold weather, open up the heat pack a little while before you pack the box. This will allow it to heat up before it goes into the box.

The side with the heat pack faces the inside of the box.

If you are shipping by weight, weigh your package. As you can see here, mine comes out to 4 pounds, 13.8 ounces. I round up to 4 pounds, 14 ounces. If you are using a flat rate box, you can skip this step.

Tape your box shut, and apply the label. You can print labels directly out of Paypal, as shown below, or you can create an account at www.usps.com and print your label through Click N Ship. Pricing is the same either way. You save a little money by printing your own label versus buying it in person at your post office. You also get a free Delivery Confirmation number, which costs an additional 70 cents for each package if you buy the service in person. Your recipient will no doubt appreciate a tracking number. USPS requests that you do not tape over the barcode when you affix your label. I recommend that you tape all parts of your label except for the barcode, especially your recipient’s address, as your printed label will smear if it gets wet. You can also print Express Mail labels using Paypal or Click N Ship. The price of Express Mail labels is significantly lower for online purchase versus an in-person purchase at your post office. Be sure to follow the instructions carefully; they are different for Express Mail labels. You will need to present your Express Mail packages to your post office in person, since there are a few lines on the label that must be filled out by an employee. If you print your own Express Mail label, wait until an employee fills that information out before you tape it onto the package. They won’t be happy if they have to try to write over your tape. The USPS offers a guaranteed date and time of arrival for all Express Mail packages. Most often, your package will be guaranteed to arrive by 12PM or 3PM the next day, although in some instances it will be 2 days. Always keep your receipt until the package is delivered when you purchase Express Mail service. You are entitled to a refund of shipping cost if your package does not arrive by the guaranteed date and time; however, you cannot receive your refund without your receipt.

Congratulations! You are ready to ship.