New pico tank...With leds!

The friendliest place on the web for anyone with an interest in aquariums or fish keeping!
If you have answers, please help by responding to the unanswered posts.

mrg02d

Aquarium Advice FINatic
Joined
May 30, 2009
Messages
990
Location
tallahassee, florida
Hello all,
So I recently set up a 2.5g pico to store extra coral in. Well, you know how that goes...:)

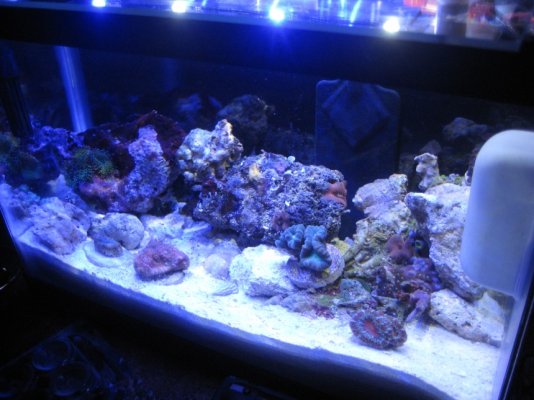
Now I decided to go all out and move up to a 7.5g Mr Aqua cube. Lighting is going to be all LEDs!

Thought I would kinda document this for others to follow as well as to get tips along the way. My 20g is getting ratty with all the scratches. This is to look sleek! And a Mr Aqua rimless glass cube is sleek!:cool::cool:

Details for the light:
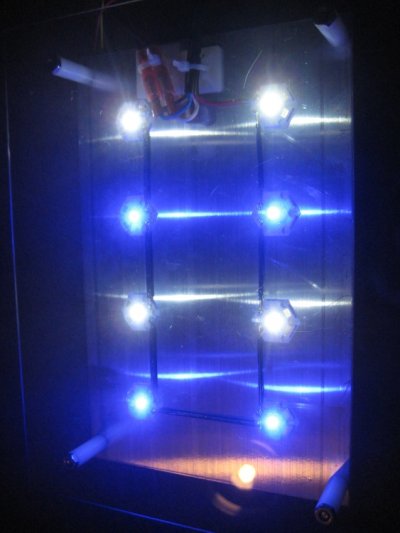
8 CREE 3W XR-E leds to cover a 12in cube.
4-CREE 3W XR-E cool white Q5
4-CREE 3W XR-E RB
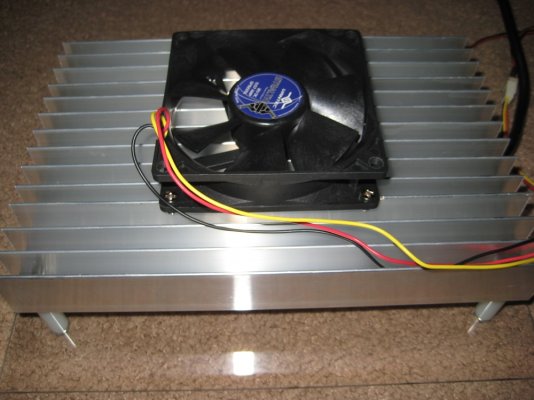
These will be mounted without optics (tank is only 12in deep before adding a sandbed) on an 8in by 2.375in aluminum heatsink. Driven by one Meanwell 30-27D driver.

The other stuff to go into this tank is a 50W RENA Smart Heater, a Koralia Nano powerhead, and an AquaClear 20 HOB filter (for running chemicals and some extra flow).

I plan to paint the back of the tank black. Any suggestions of a good paint to use?

I am not decided on the sandbed yet. Should I go deep or shallow? Im set on it being dry aragonite sand.

I will be adding 10lbs of dry florida reef rock from reefcleaners.org as well as live rock from my 20g to get things going much quicker.

I plan to load this down with coral such as Acans, chalice, and zoanthids. I also plan for Acroporas and other SPS. (All from the 20g tank). All the stuff from the 2.5g pico will be moved over. Live rocks, sexy shrimp, snails, and my yellow watchman goby. (Looks retarded in a 2.5g tank).

No other fish will go into this tank due to size, unless someone here wants to talk me into a clown goby or such. ;-)

Most the stuff is ordered and on its way. Pics to come as things come in!

Sound good?
And yes, I was inspired by ZER0!
Matt
 
Very cool! That sounds like a sweet set up.

Krylon Fusion has never done me wrong. In a tank that size, I'd go with a shallow sand bed to keep things "proportional" looking since you really don't have room for any diggers and SPS frags wouldn't be very happy with sandstorms amyway.

The only Clown gobies that I would personally purchase would be ORA or other tank raised. They're just too prone to wasting away.

P.S. I'll try not to hold the ZER0 thing against ya. ;)
 
Document it well! I want to see how the LEDs work out. I'm close behind, ordering tomorrow!
 
Okay, Krylon Fusion...Check.
Shallow sandbed, check. (How does 1in sound?).
ORA gobys...Check! (If any more fish get added)

Document everything...Check!

Maybe I should name this tank the SUBZER0?:turn-l:

Just got to 1up Zer0 with the LED light over his MH.:wave:
EDIT: To really make it elite, I will plan to use an Arduino controller in the near future to control the lights! (engineering major ;-))

Matt
 
Awesome. Another Mr. Aqua build. Will certainly be tagging along.

I also strongly agree with HN1 on the clown gobies. Mine right now is definitely wasting away, and all the other gobies at the LFS look just like him so yeah.. I tried rescuing him and so far he's doing alright, but he looks terrible lol.

I would also go with Krylon Fusion for the spray paint, and definitely a shallow sandbed, 1" sounds fine. I like sugar-sized, but as others said it sometimes could produce a sand storm, but with proper placement of the powerheads you could definitely eliminate that. I did...

Can't wait to see pictures.
 
Yeap, the Mr Aqua tanks sound great and $36.00 for a 12in cube built as well as they say they are built just begs for a pico tank to be built!

This should hold me over until I can upgrade the 20g tank. I HATE it so much! (The actual tank that is, its COVERED in scratches from sand and the mag-float) I am shocked at how bad an acrylic mag-float scratches acrylic! There are the sand scratches and then there are the who knows how they got there scratches. Its so distracting to look at. I go to bed crying each night.:(

I figured I would settle with it being the main tank and this new 7.5g as the snazzy eye candy tank. ;-)

Hopefully it cycles quickly. It shouldnt take long at all as I am adding several fist sized rocks from my main tank. Cant wait to transfer the pico critters over. The new yellow watchman goby came larger than expected (2in long and thick). Hes been peeping out at me and giving me that "this tank aint gonna cut it" look.

Some concerns...
This will be the first thing I try to light with LEDs. Does my current LED plan sound good enough to keep anything I want? It will no doubt flood the tank, as well as my room, with light but will it be enough? Id figure 2in above the water is where they will be placed. SPS will go on top rocks so as to leave the middle and bottom open for zoanthids, Acans, and chalice.

Matt
 
SO my new goby died...Done with that place!

Now I am on the hunt for a fish that can go into a 7.5g tank and is aquacultured. Any ideas? Gobys come to mind, but I cant find any aquacultured ones. Bummer...

Anyways, decided to change the heatsink for the light to a 9in by 5.9in heatsink for a little bit better coverage. I am going to make a stand to hold the light over the tank. I will make this from aluminum bar stock from Lowes. Not sure if I will polish it nice and shiny or paint it black. Ideas?


Matt
 
shine it. it reflects back into your tank and improves the thermal properties.

Also we should sit down and talk about Arduino, I need to be brought up to speed on the capabilities and such. Its something I have been interested in for awhile. and i am ordering my LEDs as we speak :D
 
Change of plans...I may go acrylic for the light stand. I just spent 1.5hours with some aluminum bar stock, a hacksaw, and a hand drill...NOPE!

Too much work trying to cut by hand, then drill holes for the angles and whatnot, and then find I am off by 2mm (which cause misalignment).

Jeeze!

I can buy acrylic on ebay and have the seller make up to 5 cuts for free. A base that will fit the 7.5g cube made of 0.5in acrylic plus some 0.5in supports glued together ought to hold the light.

Man, just wasted $30.00! on screws and aluminum...:eating: At least now I know! Hand tools just dont cut the mustard! At least I can use some of it to fix the fan to the heatsink when that junk comes. Thank GOD for those thermal adhesive pads from nano! Theres NO WAY Id do this if I had to drill and tap 16 holes! I hate not having tools...Hand tools...Pshhh!

One day when i am a successful engineer, I will have an advanced tool shop!

As for arduino, I will have to learn it as well. I just see that its a promising thing to get involved with. Should be a fun side project after the light is up and running!

Matt
 
You know I think gobies are not that great. i have tried and failed three times. I did not quarantine the first one and he lived the longest. But dies after 6 months. Then I got a shark nose and he died after a month. Then got another neon and he died after a month. The last 2 I quarantined and did everything your suppose to. I dont know what the deal with them is but I have had no luck.
 
I spent over 20 hours for my EOH project (little science fair thing at U of I) using a dinky drill and one of those "drill press attachments" trying to drill perpendicular holes into conduit piping.. That said, when I get enough money, and save enough (need to stop buying fish for awhile) the first thing I will buy is a nice dewalt cordless drill, then I will buy a drill press. My gosh do those things make life easy.. Then the router, chop saw, rip saw, scroll saw, router table.. the works :p
 
I spent over 20 hours for my EOH project (little science fair thing at U of I) using a dinky drill and one of those "drill press attachments" trying to drill perpendicular holes into conduit piping.. That said, when I get enough money, and save enough (need to stop buying fish for awhile) the first thing I will buy is a nice dewalt cordless drill, then I will buy a drill press. My gosh do those things make life easy.. Then the router, chop saw, rip saw, scroll saw, router table.. the works :p


Word...

Matt
 
Where did this project go? I just got my heatsink in today. I'm gonna beat you if you dont hustle.
 
Haha, I ALSO got my heatsink in today and just got done drilling it for the splash guard. I have the fan installed on it as well. Just need to put the LEDs on via the thermal adhesive pads, connect the meanwell and a battery to dim the leds (wont power up without some voltage across the dimming wires)

First light tonight!
Pics to come soon...
Matt
 
Noice! This heatsink is a lot taller then i thought. I'm going to have to cut it down to get it to fit in the stock hood.
 
Seems Im just a few days behind. Ordered 6 white 6 rb cree's 2 buckpucks and a supply for my 10gal. hopefully be here by the end of the week. Ill post a log aswell and compare to you guys
 
DONE!

Man is this thing bright! I have it sitting over my poor lil 2.5g pico at 30% power and its bright. I need to move it up some though as the colors dont mix that well sitting just 1.5in from the surface. Oh well, I designed it for my soon to be 7.5g rimless cube. Should be much better. I will be building a stand for the light soon.

I went all out with this one. I even bought a drill press to drill holes in things! (I have been needing one very badly for some time though).

Here are the pics! Hard to get a good pic of the tank with light...Still a work in progess. No moon lights as of yet, but that may change later. Got to optimize this for my new tank (when it arrives).
 

Attachments

  • 007.jpg
    007.jpg
    208.5 KB · Views: 86
  • 012.jpg
    012.jpg
    115.4 KB · Views: 73
  • 010.jpg
    010.jpg
    194.6 KB · Views: 65
Back
Top Bottom