Steelcrystal
Aquarium Advice Apprentice
(Originally posted to the freshwater "getting started" section because the initial goal of the setup is to be a freshwater tank, but some readers thought the emphasis on sump construction might be more relevant to you, the saltwater crowd. Also, I'd prefer to design the system with an eye towards ultimately turning the tank into a reef aquarium some day.)
This is my first post to the forum, though I’ve been an occasional visitor to aquariumadvice for a few years now (since first getting into the aquarium hobby). Started out with a leaky 30 gallon Hex tank from my parents basement, quickly upgraded to a 55 gallon standard tank (due to aforementioned leaks), added a 30 gallon bowfront to another room in the house about a year later, and now we’ve purchased a 125 gallon tank, planning to move the inhabitants of the other two tanks up a step (the guys in the 30 gallon will get the 55 gallon, the denizens of the 55 will move to the 125, 30 will likely be taken down or turned into a vivarium). All we’ve worked with so far is freshwater, and for now, are happy to continue to do so. The new 125 came with a 55 gallon sump tank, and while I pride myself on being a pretty handy guy, I’ve never done plumbing work of any sort, so setting this thing up is a little intimidating. I fully intend to plumb it myself, and I’ve been doing all I can to research the topic, but I’m hoping that some of you who have the accumulated wisdom of years in the hobby might be able to give me some suggestions, advice, and pointers.
A little background, in case it should prove relevant. I am a professional model maker by trade (specializing in consumer electronic mockups and prototypes), so part of my job is being well-versed in the use of all manner of hand and power tools. Aside from that, I’ve been building things as a hobby ever since I was a child, and enjoy learning new techniques and methods for doing so. My point is, I’m comfortable doing the work myself in almost all cases, and have most of the tools I could possibly need to execute the work (I think?). With all that said, I AM NOT versed in the engineering aspects that might be relevant to advanced aquarium setup (flow dynamics relating to pumps and pipes, the minutiae of electricity, etc.)
We’ve previously worked with various power filters, but our two current tanks are set up with canister filters. Doing a lot of reading online, I had long since decided that if we ever got a larger tank, there was no question that I wanted to include a sump in the design. It sounds like there really is no good substitute for them, even on a freshwater setup. I purchased the 125, stand, and 55 sump tank on Craigslist, from a female version of Ace Ventura. Seriously, the lady was a professional equestrian dressage trainer, had several birds, dogs, and more fish tanks than I have rooms in my house. This tank, supposedly, was brand new when she got it, though the stand and sump tank were previously used. She purchased it, never had time to get it properly set up, and it sat in her living room for two years before she decided to get rid of it. I believe the stand is a scratch-built, home carpenter sort of setup, but it’s extremely sturdy. While she could have been lying about the tank being brand new, I honestly don’t think so. This thing is immaculate. Even the overflow bulkheads are spotless (You know that region between the inner and outer walls of plastic? No residue of any sort between them).
A Note on Weight:
I am well aware that this setup will weigh significantly more than any of our current tanks, and unfortunately I have no choice but to situate it parallel to the floor joists (and it only sits astride two joists at that). I have done some reading on the hazards this presents. Before getting this tank up and running, I will be adding at least two additional joists directly underneath the tank, spanning from the relevant load-bearing wall to the steel support beam running the length of the home. Our home is a very standard ranch-style setup. The joists in question are only about 16 feet in length, so I’m not overly worried about the difficulty of this task. I had considered placing jack stands directly underneath the tank (our basement is unfinished, so I don’t really care about the aesthetics), but doing so would put a jack stand directly in front of one of my basement doors, in addition to the annoyance of having multiple immovable pillars sticking out two feet from the wall in my home gym area.
The Basic Setup:
-Attached are a photo of the basic setup, as well as a plan view I drew up that eliminates all the unnecessary stuff in the way, giving a section view of the tank and stand, along with dimensions I thought might be useful.
(Refer to image Front View (Small) and image Aquarium Plan (small))
-The tank came pre-drilled with the holes illustrated in the section view provided. I presume that the people who built the tank and pre-drilled it would know what the ideal sizes of holes for the system would be, but I’m curious anyway. Do you, who know the hobby well, feel that when bulkhead flanges and everything are accounted for, that these stand pipe and water return holes are sufficiently large to allow for quiet operation, efficient flow from the pump, and ideal aeration of falling water into the stand pipes? I understand that it’s hard to get holes drilled in this thick glass, but I’d rather take the trouble and time to get it done now than live with less than ideal filtration on down the road.
-Is there a good rule of thumb to determine how tall the stand pipes should be in a setup like this? I don’t really understand (and haven’t seen any real references to) whether the overflow chambers should be mostly empty, mostly full, or what difference it would make either way? What’s quietest? What’s most efficient? Is there an agreed upon middle ground somewhere?
-Do most people, when installing the bulkheads between the overflow chambers and the outside world below the tank, utilize rubber gaskets on the PVC bulkhead, or permanently bond the threads with PVC cement? My only concern is that rubber gaskets are likely to dry out eventually, and I can’t even imagine what a nightmare it would be to disassemble those bulkheads on a live tank to replace the gasket in the event that it starts to crack and leak. I suppose, depending on the setup, turning off the pump and pulling the standpipes out of the bulkhead would leave the overflow chambers essentially empty of water, in an ideal situation. If this were the case, disassembling those bulkheads would actually not be much of a hassle, would it? I’m thinking out loud here, because my understanding of how the plumbing of this system works is still far from complete.
-What do most of you utilize in terms of a standpipe design? I’ve read about this “Richard Durso” standpipe, which appears to have a capped top, a gooseneck, and a small hole drilled in the pipe somewhere. Supposedly, this design is very quiet and doesn’t drain during a power outage. Are any of you familiar with this design? Are there other layouts I should consider?
-I read in a few places about standpipe and water return layouts that placed the entire tank/sump into a “closed loop” situation, making it extremely quiet and immune to draining problems in case of a power outage. Is anyone familiar with this sort of setup? The claims for the Durso standpipe sound similar, but I don’t think that was what they were referring to when I was reading on this “closed loop” scenario.
Sump Placement – Under Tank or In Basement?:
-I’m curious about the advantages of having the sump in the basement? I’m not averse to drilling holes in the floor (I used to install and sand hardwood floors, so if I ever need to move the tank, I can fix the holes), and the basement is unfinished, so having a sump down there doesn’t bother me. Aside from moving the noise of the pump to the basement, does this layout really gain me anything? If the tank and sump are set up correctly, a power outage is simply going to drain the pipes into the sump, which should bear the extra water without flooding anyway, right? Obviously it would be easier to access everything downstairs, but are there other benefits I’m not considering? I imagine a pump that’s up to the challenge of this is going to cost a lot more, right?
Sump Design/Accessories:
(refer to image Aquarium Sump Plan (small))
-Will this sump setup work as-is? Do those glass bulkheads look like an efficient layout? I’m thinking in terms of the sump holding all the necessary water in the event of a power outage, as well as overall efficiency. I don’t mind stripping out the bulkheads and re-doing them if there’s a superior layout that would be worth the extra time and effort, but I haven’t seen much nitty-gritty detail as to why a sump’s bulkheads are laid out in some specific way vs. another.
-I know basically nothing about the ideal contents of a sump, in terms of media, etc. I’ve seen bio bags, bio balls, “berlin filters”, media baskets, all sorts of things. I really don’t know what sort of setup is best for a freshwater aquarium like this.
-How does the plant refugium thing work? I’ve heard it’s useful as an additional filtration process. What sort of media is best to “pot” said plants in a sump? Do we need to vacuum this media like we would the show tank media?
-Which region of the sump would be the best place for the drains to drop into? Where would be the best location for filtration media? Does the refugium go in between the filtration area and the pump return, or does the filtration area rest between the two?
-Is it ok to just put heaters in the sump? I’ve seen many people do this, but I wondered if it’s as efficient as placing the heaters directly in the show tank? I’d obviously prefer them in the sump for cosmetic reasons, but I also don’t want the fish to suffer for my aesthetic sensibilities. Is it more efficient to use one big heater, or multiple smaller ones? If the sump is placed in the basement, and the water is going to travel through 10+ feet of PVC pipe exposed to open air between, is that going to affect the temperature in the show tank upstairs?
Pump/Plumbing:
-So the pump that came with the setup is an AquaEuro EU-1340. I haven’t been able to find any details about this pump online at all. It's a submersible, 120V pump that operates at 60Hz and draws 1.6 Amps (125 Watts). It has an Hmax of 13.5 Ft, and a maximum throughput of 1340 Gallons per Hour (supposedly). Any estimations as to whether or not this thing would be sufficient for this aquarium? I assume the situation changes if I move the sump downstairs, as it has all that extra height to push the water? This pump says it has a maximum height of 13.5 feet, but I’m sure splitting the output to two separate outfeed pipes would hinder that somewhat. If I have to buy a new pump, does anybody have a recommendation? What are the advantages (or disadvantages) of using a submersible pump as opposed to an external one?
-I’m a little confused on what the “dual overflow” design of this tank means for the plumbing layout. Do we require two separate pumps, plumbed independently? Can one big pump handle everything? Doesn’t adding a “T” junction to the plumbing drastically affect the performance of the pump? Is there some sort of symmetry required in the plumbing design to assure that both outfeeds are replenishing the same amount of water to the tank? Does that even matter?
-I’ve seen some sump layouts that involved an auxiliary water outfeed that immediately fed back into the sump, used as a relief system for an extra powerful pump so that the pump can run at full power. Is it bad on the pump to be throttled back? I think the designs I saw involved a ball valve so that the amount of “extra” water could be controlled. Does anyone have a good explanation as to what purpose this serves? I have ideas, but would like to hear it explained by someone who really knows the systems.
-I’ve seen many people mention a device called a “chiller.” I assume this has something to do with mitigating the heat generated by a large pump system, but I’m not entirely sure how it fits into the overall picture. If the pump is generating heat, wouldn’t that just take some of the load off of the tank heaters? I have no idea how much heat we’re talking about these pumps generating, so pardon my ignorance. How do you know if you need a chiller or not?
Miscellaneous:
-Are there other considerations I should be thinking about when designing this system? Common pitfalls I’ve not addressed yet? Keep in mind, the largest tank I’ve used so far is a 55 gallon with a canister filter. Anything beyond that (regarding larger tanks or anything to do with a sump) I am completely ignorant of, excepting the things I’ve read online (which I’ve covered most of above).
-Does anybody have recommendations as to good books on these topics, additional web resources that might be of value to me, etc.? I poked around on Amazon for awhile and couldn’t find a single book that seemed to discuss the matter of sump systems at length.
(refer to image Power Housing (small)
-It seems that the previous owners were plugging all their accessories into this home-made outlet box, which appears to be ganged into a single extension cord. I’m no electrician, but is this safe? Nevermind the fact that they have electrical wiring and multiple non-GFI outlets directly underneath a tank full of water, but they’re ganging ALL of the outlets to a single plug. My brother-in-law tells me he used to run all the electrical systems in his 110 gallon tank off of a single outlet, but I’m not usually a fan of trusting in a single anecdote for a matter that could burn my house down. I guess in theory if everything on the circuit comes in under the amperage of the breaker, it COULD all go through a single outlet, but as I said earlier, I’m not well-versed in residential electricity. Obviously if I moved the sump to the basement most of this stuff is going to be plugged in down there, but if I were to leave it in the stand, does this setup as shown seem like something any of you would use?
In Conclusion:
Yeah, I realize how sad it is that I actually felt the need to write closing statements to a forum post, but this thing has become rather epic in length. First off, if you’ve read this far, thank you. If you can chime in on any of the thousand questions I asked, it would be greatly appreciated. Not just by my girlfriend and I, but by our bevy of very large, very cramped angels who are looking at me more harshly by the day, as if to say “you know, we’re not getting any smaller, and this 55 gallon house just isn’t cutting it anymore!”
Attached Thumbnails
Rotate Image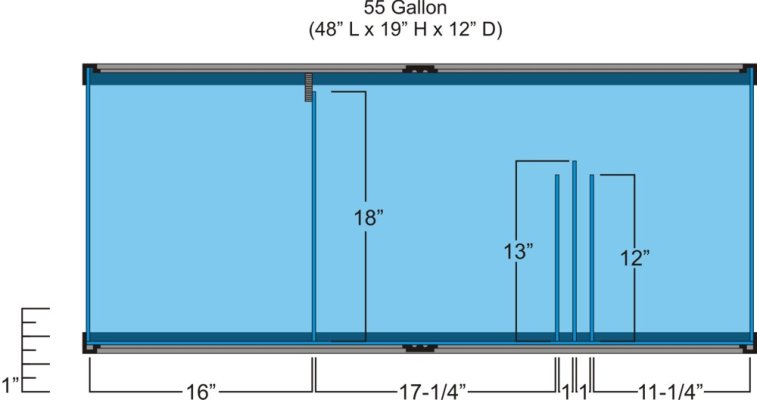
Rotate Image
Rotate Image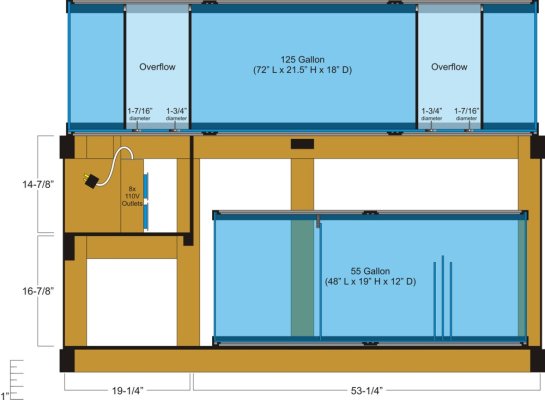
Rotate Image
")