Tank build - newbie again... need thoughts

The friendliest place on the web for anyone with an interest in aquariums or fish keeping!
If you have answers, please help by responding to the unanswered posts.
Jimbo7,

Since you are at work... Here is what I hope to copy.. ambitious I know...
sump_j_angle.jpg

sump_j_top.jpg
 
I'm pretty sure that the weld-on that melevsreef used is sold any where that acrylic is sold. If that's the cement that you're talking about :)
 
BTW...love your retaining wall by your driveway :) That's a whole other project that I should be doing this year. Maybe next year, lol
 
It's a sweet looking sump, I need to get back to melevs to check out all his new stuff. Not completely sure how it works though.. where does the tank overflow drain to? if its that overflow box there..how does water get out of the skimmer compartment?
 
I just don't want to spend that kind of money on lighting for a FO tank. I may decide to go reef in the future so getting some fixtures I could add to would be ideal. I like the idea of a nice clean fixture like this since it can just lay on the tank and be concealed with the hood I will build. Any recommendations on fixtures?
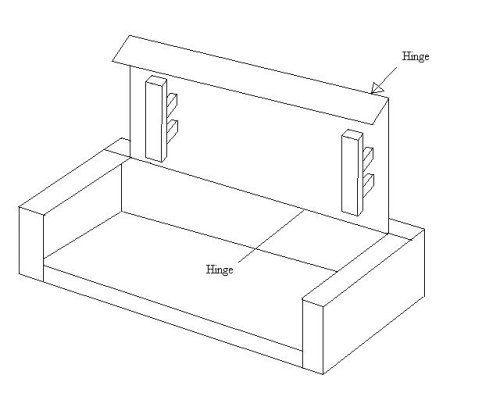
If you are going to build a canopy for your tank anyway i would skip the fixture and go for retrofit lights. As for your canopy and idea so it isn't a pain i drew up a picture because it will be better then trying to explain.

canopy.JPG

If you up a lid on the canopy like that you should be able to do most of the work you need to in the tank with out removing the lid. Then just attach a couple of T-5s to the brackets hanging down from the lid like these...

48" 2 x 54w T5 HO Retrofit Kit - 48254

Then if you want to add later for when (yes when we all see the signs on a fellow addict. "hi my name is pat and i am a SW addict") you add coral you can just buy another 2 or 4 bulb T-5 retro kit and put them in there as well.
 
Pat, thanks a lot for the comments and idea! I sent you a PM.


I'm pretty sure that the weld-on that melevsreef used is sold any where that acrylic is sold. If that's the cement that you're talking about :)

I picked up the acrylic today.. they also gave me a few extra pieces to practice with... The salesman recommended using the #16 cement and didn't think I would need the #3 or #4 cement. I think I should have bought both however but for now I only have the #16.
 
It's a sweet looking sump, I need to get back to melevs to check out all his new stuff. Not completely sure how it works though.. where does the tank overflow drain to? if its that overflow box there..how does water get out of the skimmer compartment?

Yeah, I really like the layout for this sump. It also seems like a great size for my tank. I have sent a couple questions to Marc as there are a couple things I am wondering too. From what I can see it looks like the water from the display tank goes through the overflow and dumps into a small 2.5"x2.5" chamber which I guess traps some bubbles. From there the water overflows into the first main chamber which includes the skimmer. From there the water overflows into a second chamber - an area with live rock. I believe that the water from the skimmer is dumped into the refugium chamber which will also overflow into the second chamber having the live rock. From there the water will go through the bubble trap baffles and into the 3rd chamber - the return area.

sump_j_top.jpg


Im curious what others think of this design...
 
T5HO does have more intensity. You should be OK on that set up for LPS, soft corals and some moderate light SPS.
 
Hi, I'm new (March 2010) and started fish only but after learning a little about the corals...well you know.

I looked at your stand, are you sure you have enough support on the corners to keep it from swaying under the weight of your tank? I can't tell from the pictures but it looks like you might have your back 2x4's going through the shelf. If it is, that'll give you some support.

Sorry, I know just enough about construction to make me an idiot :)

I think the 2x4 thing in the stands is overrated. has anyone EVER bought a stand that was make for there tank that had ANY 2x4's in it. the compression failure force on 1 2x4 at 3 feet is around 1440 lbs I just set up my 120 on a comercial stand buitl out of nothing but 1x
 
I think the 2x4 thing in the stands is overrated. has anyone EVER bought a stand that was make for there tank that had ANY 2x4's in it. the compression failure force on 1 2x4 at 3 feet is around 1440 lbs I just set up my 120 on a comercial stand buitl out of nothing but 1x

I agree that these stands could be built out of material smaller than 2x4s... I considered ripping them down to 2x2s just to make the stand lighter but then decided not to.. cause its so easy just to use the 2x4s. Even though most commercial stands are built of 1x I don't think I would personally try to build one for myself using only 1x material. Perhaps if I wanted a stand that was painted, laminate or thin veneer I would have tried building it all from 1x, but I am wanting a wire brushed fir finish so I needed a frame to attach the fir to.

I think capj64 was more concerned with lateral support (shear) not compressive strength - which in my opinion was a valid concern based on my design.
 
I think the 2x4 thing in the stands is overrated. has anyone EVER bought a stand that was make for there tank that had ANY 2x4's in it. the compression failure force on 1 2x4 at 3 feet is around 1440 lbs I just set up my 120 on a comercial stand buitl out of nothing but 1x

HA! That's funny :) Last night I was actually questioning the ability of my stand that I bought with my 29g. It is built with a shelf above the tank (pics in my album). Yesterday I decided to turn one of my 10g tanks into a nano reef. I set it on top of my 29g, on the stand's shelf (this is also how the LFS had it displayed) and when I was almost finished filling it, my thoughts were, "God, I hope this holds". So I looked at how it was constructed and you're right! Other than it being made out of nice wood, it's pretty much nothing :eek:. It does have a good bit of horizontal support because of the cabinets underneath and since I'm going to have to move the whole thing later in the year, I'm pretty sure that I'm ok....I think :confused:

But personally, when building the support under my larger tank, I will be using 2 x because I don't want to tank any chance that 150g of tank life end up on my floor.
 
That's the skimmer that was recommended to me. I just bought a mini for the sump I'm putting together for my 29g. Guess I'll find out ;)
 
I was only able to work on the tank project today so I didn't get a lot done but did make progress.

The stand:
I realized that the top shelf could not go all the way across as it would make accessing the skimmer to difficult (it will be on the far right). I decided to cut the shelf back - I still wanted a shelf for test kits, hydrometer etc.. I also put a panel in the back - I will mount two power strips to this panel which will help keep power cords organized and tidy.

I am still waiting for my 1x fir that is being wire brushed - should have it this week. I forgot to order a 4x4 for the corner trim detail I wanted do so I bought one and wire brushed it myself. I cut the corner so it tapers in two directions and has the look of legs. I cut a dato notch into the back corner so it will fit over the corner of the frame. The 1x finish material will butt into these corners. This stand is going to weigh as much as the 100 gallon tank... lol.

Wire brush technique - before sanding.
img_1135379_0_d2715308f448c22ec083d0efd19d9cb1.jpg


Stand with corners, back panel and modified shelf. I also applied a couple coats of polyurethane to all MDF.

img_1135379_1_3d6a192ffc2847718ce3050251e01ef3.jpg
 
After a couple hours of working on the stand I decided to start on my sump. I have been anxious to start this part of the project since I decided to build my own last week. I purchased a full 4x8 sheet of 1/4" cast acrylic (cast is supposed to be better for cutting than is extruded acrylic). I was a little nervous about cutting the acrylic as I have read more than one guy talk about how difficult it can be.

I bought a 60 tooth 10" blade for my table saw (the 80 tooth I wanted was to expensive). I also have a chop saw with a 60 tooth blade. I found cutting the acrylic to be really easy and not near as difficult as I had anticipated. I did not use any water spray or anything like that (a couple guys had recommended doing that to prevent melting). I found that the table saw was the easiest way to get good square cuts. I did use my chop saw as well.

The only difficult part was making the very first cut - my little table saw is not really set up for cutting full sheets.

IMG_3767.jpg


After the first cut was made it was easier. I had to create a makeshift fence.

IMG_3769.jpg


Slow and steady worked great.. no melting, no chipping....

IMG_3770.jpg


After I had most of the pieces cut I decided to try the teeth for the overflow from the refugium. This also went smoothly and was no problem... I used a dovetail template which worked great. I hope the glueing goes as smoothly but I am guessing that is the hardest part...

IMG_3781.jpg


After that I decided to tape it all together and see how it looked.

IMG_3784.jpg

IMG_3790.jpg


I would appreciate some advice here. The Melevsreef website does not list how tall the interior panels are so I am just guessing. The sump walls are 16" high, the Refugium walls are 14.5" high. The baffle between the first chamber and the second (flow is right to left) is 11". The first bubble trap baffle is 10" high. The second is 1.5" off the bottom and has a height of 11.5" and the third is 10" like the first. See any problems here?

IMG_3788.jpg


I am also starting to think about my plumbing... I can supply water to the refugium from the skimmer or add a pipe with a valve and feed the refugium with water directly from the tank... Thoughts?
 
Back
Top Bottom