Starting New Tank: The Candy Bin

The friendliest place on the web for anyone with an interest in aquariums or fish keeping!
If you have answers, please help by responding to the unanswered posts.

LemurLad

Aquarium Advice Freak
Joined
Jan 12, 2010
Messages
491
Location
Encinitas, CA
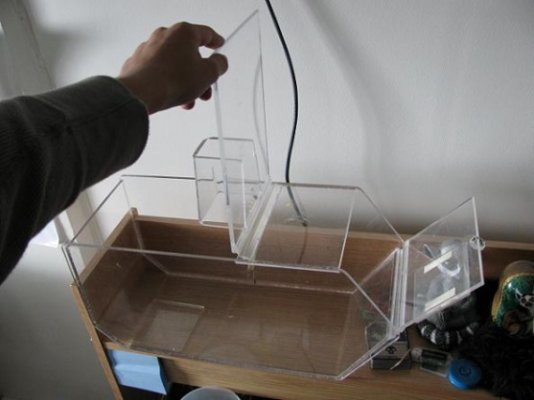
I found this great acrylic candy bin at the thrift store the other day. Looks like it could make a really neat nano tank.

After a bit of testing, I found it to be watertight everywhere that it was sealed, so it only needs a bit of silicone around the front door.

Inside, it's got a cord for a scoop and a scoop holder. I don't really want to remove either as they add a cool aesthetic touch.

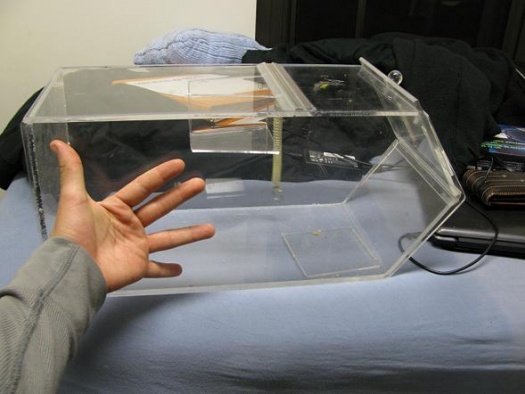
Oh, it's also about 5.5 gallons.

Now with the questions:

Would 2 Amazon puffers be okay in here?
If I'm going to plant it well, would this filter work: Red Sea Deco Art Nano Filter at PETCO It matches the tank well and seems to have gotten fair reviews.
Small Medium-high lightsource for my tank?
Plant Suggestions?

Otherwise, I'm pretty sure I've got everything else figured out.
CO2's gonna be DIY, picked out a good substrate(name escapes me atm), and I'd like to grow some dwarf baby tears (Hemianthus callitrichoides) in as a carpet, not sure on other plants.

Thanks very much,
LL
 

Attachments

  • IMG_0344.jpg
    IMG_0344.jpg
    62.1 KB · Views: 122
please keep us updated with this project, i think it is a great idea, and would love to see its progress, especially when it's complete!
 
Glad to see people interested in this tank. :)

There is another door on top of the box, so I think I'll cut off a portion of it to fit the filter. Would it be bad idea to not have an open top?

I guess the light would be a little refracted and the humidity would go up a bit, but otherwise?

Oh and the goofy pose of my hand is just so you can get an idea of the size of the bin.
 
If you've got a door on top, there's no need to cut any holes. I thought the box had one door that you were going to seal.
 
Ah, see here's the problem, the scoop holder is attached to the top door. :/

If it wasn't there, I'd take it right out, but I'd like to attach some plants to it. Maybe a picture from another angle is in order. Doors are open so you can see what I mean.

The front one is really the only thing that needs sealing.

As for humidity, was thinking water would condense and... Well... Yeah I dunno what I was thinking. :-|
 

Attachments

  • IMG_0346.jpg
    IMG_0346.jpg
    60.3 KB · Views: 108
I thought you where going to stand it up to make a deeper tank?
 
Thought about that, but I prefer the longer look.

Would I be able to stick 3 Dwarf puffers in here?

The inchfish/gallon rule is fine since they only get to be an inch long, but I've also read that puffers like a bit more room.
 
I think puffers are one of the nearly infinite exceptions to the inch per gallon rule. I'm not familiar with dwarf puffers, but I know the spotted and figure-eights are pretty aggressive and would tear each other apart in a 5g tank. Inch per gallon doesn't apply very well to smal tanks anyways.
 
As far as progress goes, I've got everything but the substrate and a good piece of driftwood.:eek: I'll probably pick those up tomorrow, busy school week for me. :neutral: I'm gonna finish sealing the tank tonight though! Will post pics!

~LL
 
Sorry I haven't put up any pictures. The sculpture room has been closed up the past few days and I really wouldn't like to cut acrylic in my dorm room.
 
So I buckled down and decided to just cut the acrylic and seal it in my room. Yeah, it smelled a little for a few hours and was kinda messy, but no harm done to my roomie.

Tested it for leaks yesterday, only two fairly small ones. Should be on the road to cycling today! :D
 
Can't wait for pics!!!! Make sure you let the silicone cure. I made that mistake a week ago, and almost lost my 2 favorite fish.
 
Yikes! Will do! Would be posting pics, but it just keeps leaking, only a small bit though. I think I'll redo the whole silicone job, rather than pile more on it to seal it up.
Anyone have any tips?
 
I think you would be able to use a wet Q-Tip to smooth the joints after you put the silicone on. That what we used to do at work. :) Well, bigger joints, and a sponge, but you get the idea lol.
 
Back
Top Bottom