Badfishofbabylon
Aquarium Advice Freak
- Joined
- Jan 11, 2011
- Messages
- 362
After reading all the hype about LEDs on many of the different online forums, I decided I wanted to try out LEDs for myself. I had an extra 2 gal Fluval spec laying around from a LFS sale, so I built this little LED hood for it. I wanted to get into LEDs for better color, lower power consumption, longer life and better control. I wasn’t sure if I was going to do a DIY thread for it because there are many out there, but I have been asked a few times to do one so here it is. This is going to be a very basic DIY I’m not going in to the Volts or amp conversion, pretty much just the materials and how I wired it up. There are many different web sites to buy LEDs from and different ways to wired up LEDS, power supplies, and drivers, this worked for me. Be sure to do your own research on what will be the best for your tank setup!
Here is a website to help with some wiring questions
http://en.wikipedia.org/wiki/Electrical_wiring
If you are not comfortable with electrical wiring get someone to help you!!
Material-
5 LEDs from Superbrightleds.com
-2x Cree 3w XPE Royal Blue
-2x Cree 3w XPG Cool White
-1x ProLight High Power 1w UV
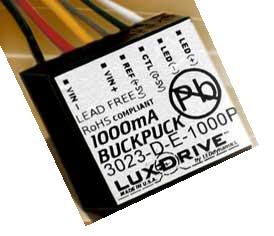
Drivers from Ledsupply.com
I bought the buckpucks (Drivers) with the dimming option and pots wired in so I could have total control over the color and intensity of the lights.
1x 1000mA Constant Current Output, External Dimming w/ pot.
Power supply from MPJA.com
1x 24v 6.5A Potrans
Heatsink from Heatsinkusa.com
7.280" Wide x 6" Long Heatsink
*Anything not listed can be bought from Radio Shack
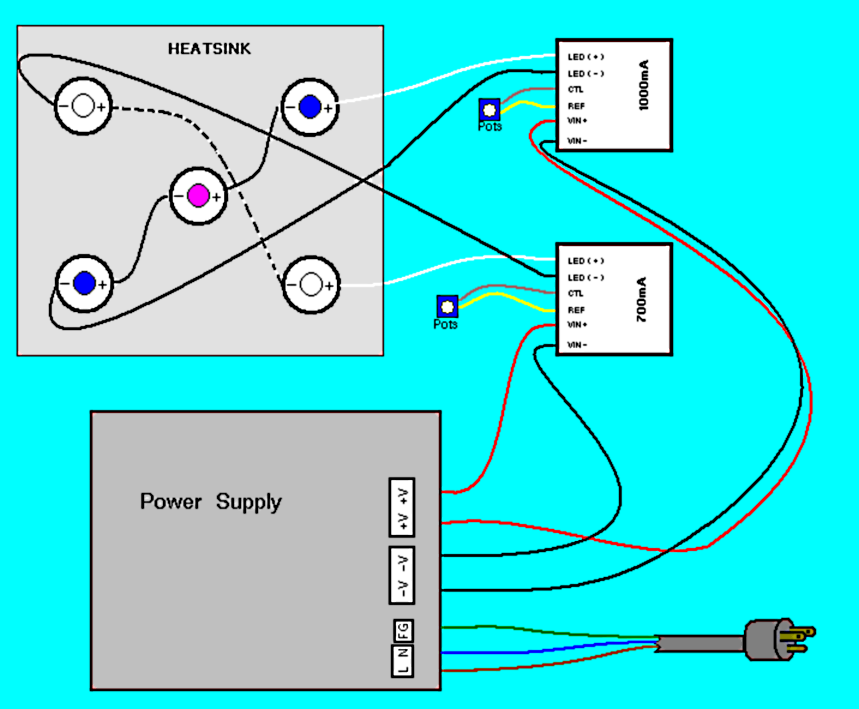
I started my by using thermal paste to glue the LEDs to the heatsink with 2” spacing between them. Then I wired the LEDs into 2 series circuit with each series having their own buckpuck, but on the same power supply.
The Buckpuck has 6 wires coming out of it. Labeled LED(+), LED(-), CTL, REF, VIN+, and VIN-.

So first you need to connect the wire labeled “LED(+)” on each buckpuck to the (+) of the first LED of each color(one buckpuck for the whites and one for the R.Blue/UV). Then wire the (-) of that LED to the (+) of the next LED of the same color and so on, until you get to the last LED where you connect the LED (-) to the buckpuck wired labeled “LED(-)”.
The wires coming off the buckpuck are short so you will have to splice wires to make them longer, and you will need to solder the wires to the LEDs connection pads. (Soldering is very easy, before this I had never solder electronics. All you need is a cheap solder iron and solder.)
Your LEDs are now wired to the buckpucks.
The Next two wires on the buckpuck are CTL and REF, these come pre-wired to the pots. The pots are the knobs that control the dimming of the lights. You can mount them how you want, and even buy covers to make them look nice. (http://ledsupply.com/03021hep-knob.php)
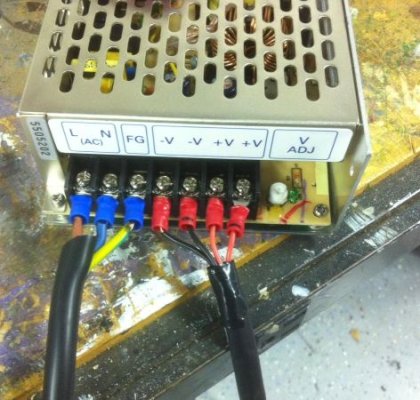
The last two wires on the buckpucks are VIN+ and VIN-. These are wired to your 24v Power supply with the same labels. These wires are short as well so you will have to splice them too.
The Last wiring you need to do is to wire a plug to the power supply, you can just cut an old electrical cord and use that plug. Then wire up the plug's phase wire (usually brown or black wire) to the L terminal on the power supply, the neutral wire (usually blue or white wire) to the N terminal, and the ground wire (usually the green/yellow wire) to the FG terminal.

You can also buy a little computer fan from radio shack wire to a 12v plug (I used an old phone plug) for cooling on you heatsink
That’s it for wiring. Not as hard as it seems huh?
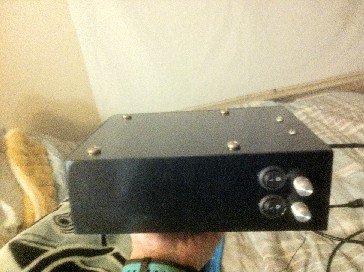
After that you can mount it how you like. I welded a box out of sheet metal, then painted it and hot glued the buckpucks in a project box from radio shack. I also add on/off switches (optional) to the V (-) wires and made a Plexiglas splash guard (recommended).
It’s up to you for this part!
I hope this Helps everyone who was asking about it, Let me know you have any questions or comments.
Here is a website to help with some wiring questions
http://en.wikipedia.org/wiki/Electrical_wiring
If you are not comfortable with electrical wiring get someone to help you!!
Material-
5 LEDs from Superbrightleds.com
-2x Cree 3w XPE Royal Blue
-2x Cree 3w XPG Cool White
-1x ProLight High Power 1w UV
Drivers from Ledsupply.com
I bought the buckpucks (Drivers) with the dimming option and pots wired in so I could have total control over the color and intensity of the lights.
1x 1000mA Constant Current Output, External Dimming w/ pot.
Power supply from MPJA.com
1x 24v 6.5A Potrans
Heatsink from Heatsinkusa.com
7.280" Wide x 6" Long Heatsink
*Anything not listed can be bought from Radio Shack
I started my by using thermal paste to glue the LEDs to the heatsink with 2” spacing between them. Then I wired the LEDs into 2 series circuit with each series having their own buckpuck, but on the same power supply.
The Buckpuck has 6 wires coming out of it. Labeled LED(+), LED(-), CTL, REF, VIN+, and VIN-.
So first you need to connect the wire labeled “LED(+)” on each buckpuck to the (+) of the first LED of each color(one buckpuck for the whites and one for the R.Blue/UV). Then wire the (-) of that LED to the (+) of the next LED of the same color and so on, until you get to the last LED where you connect the LED (-) to the buckpuck wired labeled “LED(-)”.
The wires coming off the buckpuck are short so you will have to splice wires to make them longer, and you will need to solder the wires to the LEDs connection pads. (Soldering is very easy, before this I had never solder electronics. All you need is a cheap solder iron and solder.)
Your LEDs are now wired to the buckpucks.
The Next two wires on the buckpuck are CTL and REF, these come pre-wired to the pots. The pots are the knobs that control the dimming of the lights. You can mount them how you want, and even buy covers to make them look nice. (http://ledsupply.com/03021hep-knob.php)
The last two wires on the buckpucks are VIN+ and VIN-. These are wired to your 24v Power supply with the same labels. These wires are short as well so you will have to splice them too.
The Last wiring you need to do is to wire a plug to the power supply, you can just cut an old electrical cord and use that plug. Then wire up the plug's phase wire (usually brown or black wire) to the L terminal on the power supply, the neutral wire (usually blue or white wire) to the N terminal, and the ground wire (usually the green/yellow wire) to the FG terminal.
You can also buy a little computer fan from radio shack wire to a 12v plug (I used an old phone plug) for cooling on you heatsink
That’s it for wiring. Not as hard as it seems huh?
After that you can mount it how you like. I welded a box out of sheet metal, then painted it and hot glued the buckpucks in a project box from radio shack. I also add on/off switches (optional) to the V (-) wires and made a Plexiglas splash guard (recommended).
It’s up to you for this part!
I hope this Helps everyone who was asking about it, Let me know you have any questions or comments.