Cool filter plumbing idea, makes PWC easier

The friendliest place on the web for anyone with an interest in aquariums or fish keeping!
If you have answers, please help by responding to the unanswered posts.

helicopter

Aquarium Advice Activist
Joined
Feb 8, 2007
Messages
153
Location
Princeton NJ
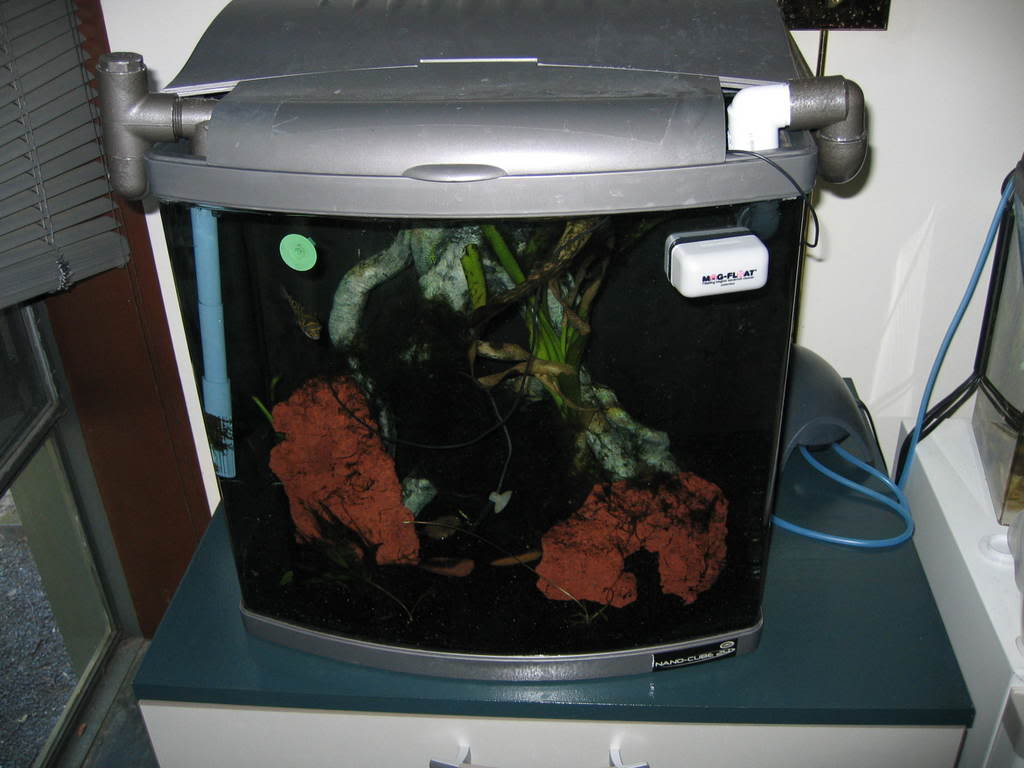
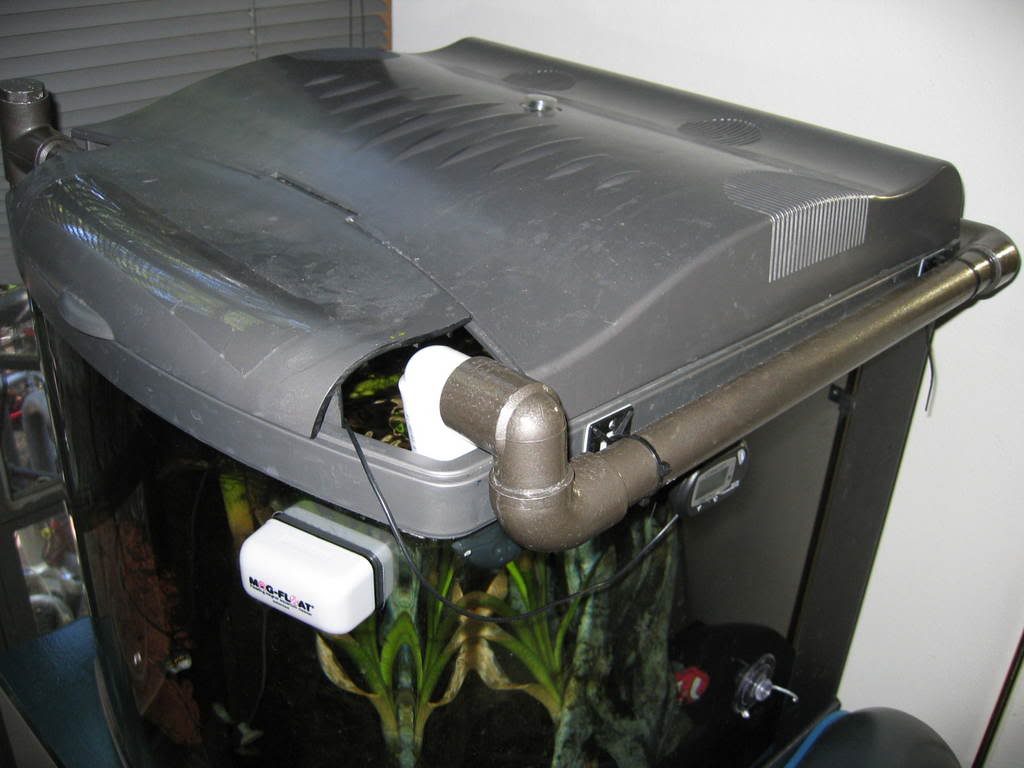
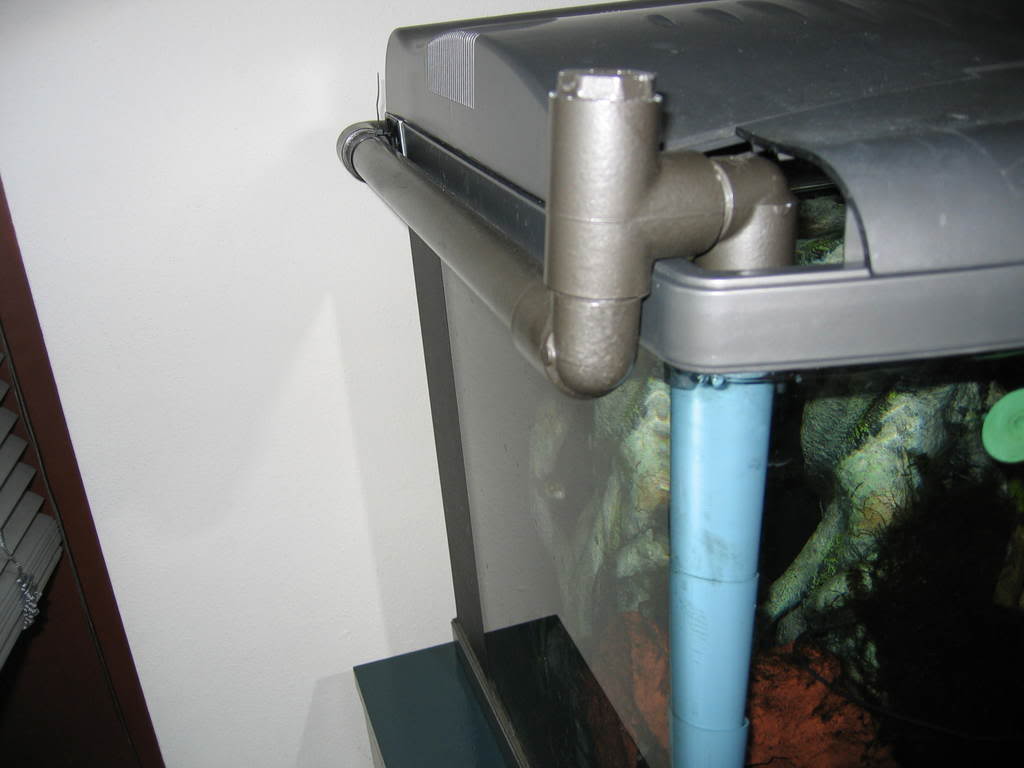
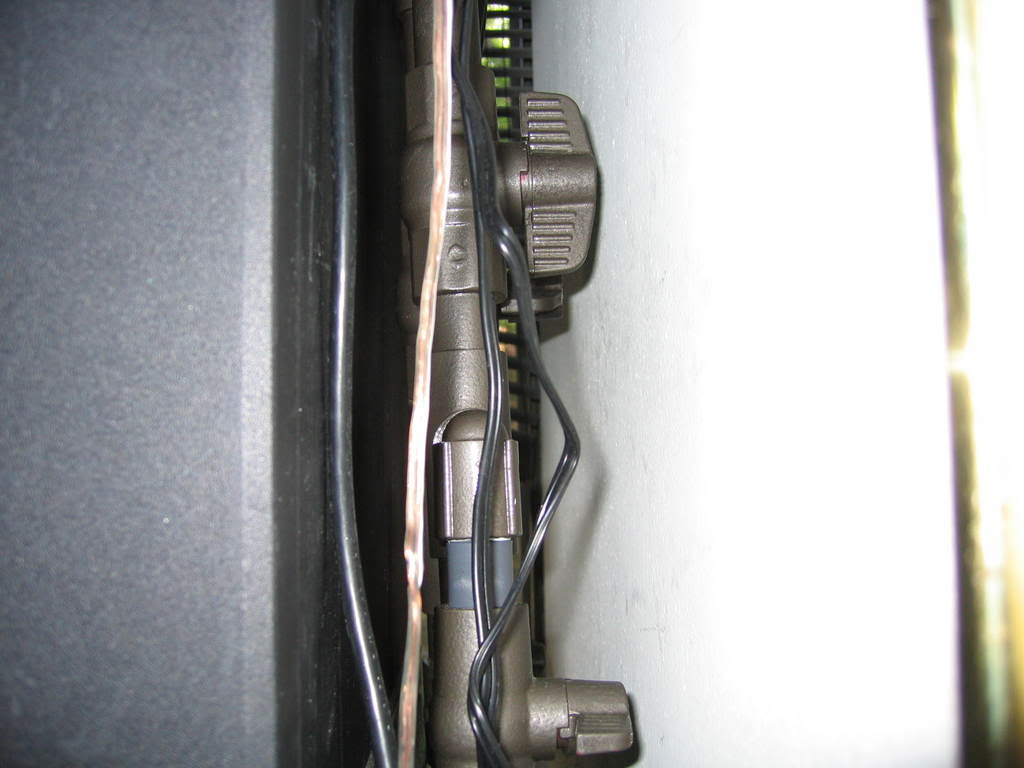
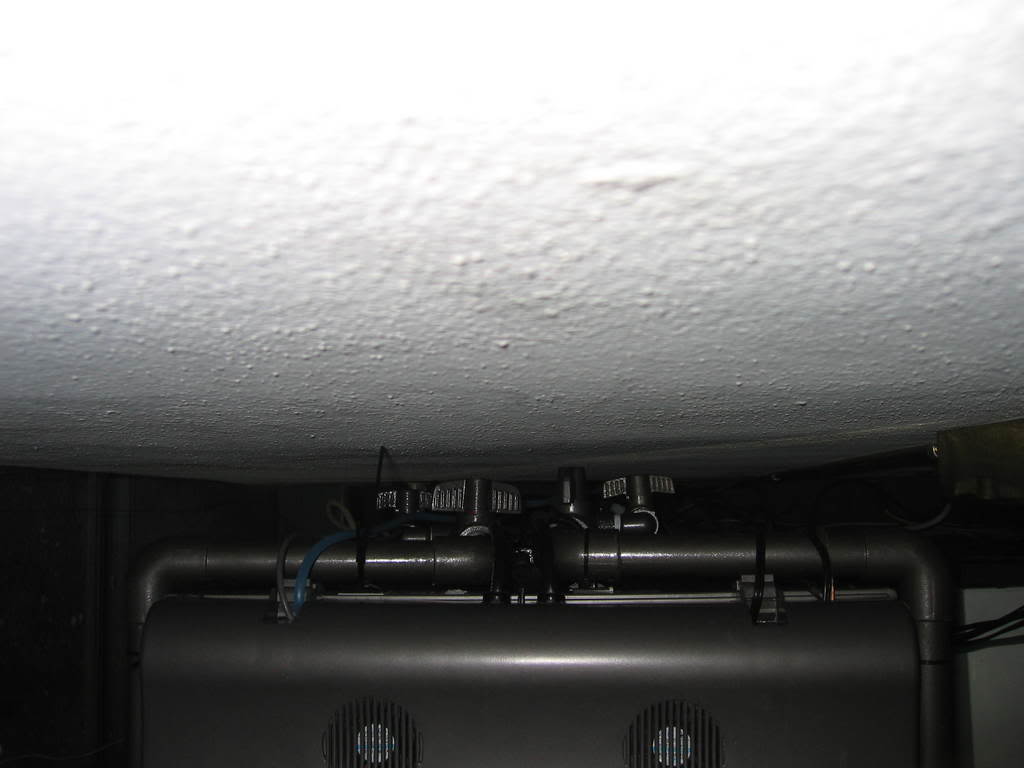
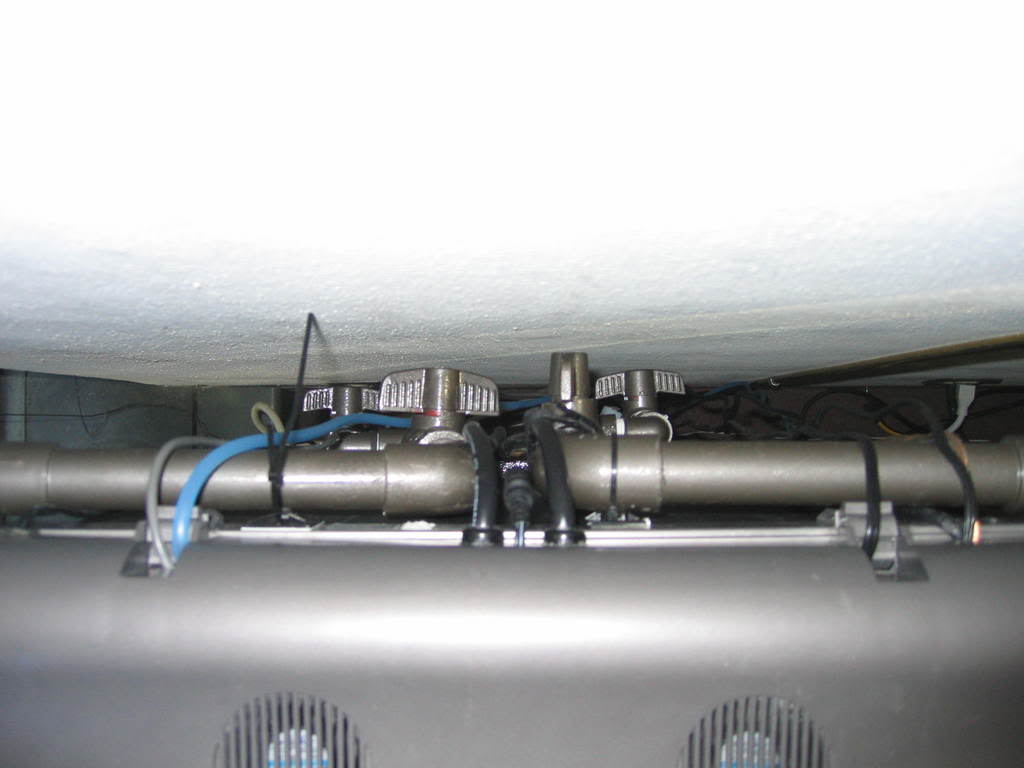
I envision a plumbing system on my filter pump that is as follows:

I would have one three way valve on my outlet tubing of the filter, one position connects the filter to the tank and another connects it to a section of tubing that I have go out my window (or could go to a bucket or a drain if your housing situation permits it). Another three way valve would go on the intake tubing of my filter. One position of the valve would be normal filtration operation and the other position would connect the intake of the filter to tubing which would go to my 6 gallon jug where I prepare my backish water in (This could go to any type of reservoir where you store/age water or even all the way to your sink).

Therefore:
Lets say I want to do a 3 gallon PWC, all I have to do is switch the first three way valve to vent the outlet water out my window until I get about 3 gallons. Then turn it so it connects back to the tank. Then take the other three way valve and pull water from my 6 gallon reservoir until I fill the tank back up.

The benefits that I see to this plumbing situation:
1) The tubing which I will use to connect to the 6 gal reservoir will actually be my gravel cleaner (which has a one way valve), therefore I can just as easily do a gravel vacuuming with this tubing just by turn the valve.
2) When I do gravel vacuuming (which would normally be during PWC) all the crap I vacuum will go onto my filter. This could be a benefit or a deficit depending on how you look at it. I see it as a benefit because sometimes I suck up things I still want like big sections of free floating java moss and other plant parts. I could just pick it out of my sponge in my filter.
3) Makes PWC a breeze, all you have to do is turn a switch.
4) I don't need an extra pump to pump from my reservoir to my tank.

I bought all the supplies I needed plus extra stuff from www.mcmaster.com for about $50 shipped. Not bad.
 
Wel I got all of the parts in and set everything up, major failure. The problem was that I did not realize that the three way valves that I ordered, although having 1/4" NPT holes (thats just over .5" because NPT is weird) had major restrictions inside where the ball actually is located. The result was majorly reduced flow rate. I am down but not defeated. I am going to try to return some of the parts to McMaster and I just ordered
a Pondmaster Adjustable Diverter Valves which is rated for much higher flow rates so I should be fine with this one. Hopefully no further problems. I will keep you updated.
 
helicopter said:
Wel I got all of the parts in and set everything up, major failure. The problem was that I did not realize that the three way valves that I ordered, although having 1/4" NPT holes (thats just over .5" because NPT is weird) had major restrictions inside where the ball actually is located. The result was majorly reduced flow rate. I am down but not defeated. I am going to try to return some of the parts to McMaster and I just ordered
a Pondmaster Adjustable Diverter Valves which is rated for much higher flow rates so I should be fine with this one. Hopefully no further problems. I will keep you updated.

NPT should not be weird. It stands for National Pipe Thread and should be standard. The difference you're probably seeing is tubing versus piping. Pipe is measured with ID. Tubing is measured with OD. Is this a conventional port ball valve? There are full port ball valves available, although for a higher price. You can always just bush up and back down and just use a large valve if you have the space.
 
Update

Well I got the Pondmaster Adjustable Diverter Valve in with all the fittings and clamps. I am pretty disappointed by it. I could tell just from testing it by pressurizing it (by blowing with my mouth) that the valve did not seal. My initial installation verified this. Not only would you get a constant drip coming out of the port which was supposed to sealed by the valve position, I also got leaks coming out of the housing itself. I took everything off and opened up the valve, it looks like a pretty crappy design on the inside. The o-ring that is supposed to seal the housing looks too small and things do not seat properly. I coated the o-ring with a thick layer of silicone lubricant and put everything back together. I also put a lot more teflon tape on the threads. I doesn't seem to leak hardly at all now, except maybe a few drips when you first start a flow. I am pretty pissed by the whole thing, luckily I still had one of the 3 way valves from Mcmaster which I use to "completely" seal off the section of tubing connected to my reservoir when I am not vacuuming or refilling from the reservoir.

Oh the place I ordered the valve from http://store.123ponds.com/ does not seem to be too helpful about defective products. Also $10 of the $30 that I paid them was in shipping so its not really worth trying to "return" the product, plus they charge high restocking fees. I am very annoyed by all of that.
 
Is a diverter valve absolutely necessary? Although it's another piece, perhaps a tee with two ball valves would work better? You have to turn two thing at once, but it shouldn't be too much of a chore.
 
Yes, that is exactly what I decided to change to. I just ordered about $50 more supplies for my plumbing adventure. I ordered from http://www.aquacave.com and found a t valve that is 3/4 on two sides and 1/4 on the odd side, exactly what I need. I also got two ball valves from them. I wish I would have just done this in the first place, I would have saved so much money.

Then I bought some extra stuff from Mcmaster.com to route my plumbing. I bought about 6 feet of black vinyl 3/4" tubing and some black elbows. I am going to vertically with the black tubing on the front two edges of the tank, one side will go to the intake and the other to the outlet. I figure I am just going to have to deal with tubes on the front (black looks kind of nice with the rest of the color scheme of the exterior of the nano cube) and I will probably cut into the sides of the front lid so that the lid can close without obstructing the intake and outlet connections. I am going to route the blacking tubing along the contours of the my tank and use the elbows at the bends. Hopefully there won't be too much pressure loss from the 90 degree bends of the elbows.

Knowing all of this information in the beginning would have saved me so much money in wasted supplies. I actually think the two ball valves is nicer than a single 3-way. Believe it or not, I think two small ball valves will fit in more inconspicously than one large chunky three way valve. Also it will give me greater flexibility in controlling flow rates.


~~~~Appended to previous post~~~~~
Ok I just figured out what I am going to do about hiding my tubes. I will go along the rim at the top of the tank and in through the front (will still have to cut holes in the feeding lid but if I ever wanted to, I could just order another feeding lid for cheap). This way I won't obstruct any viewing.
 
helicopter said:
Knowing all of this information in the beginning would have saved me so much money in wasted supplies.

Just be glad you're not doing industrial systems. To test out stuff, the parts cost us $1000+ to see if a product will work. :D Then they're used once we test them and the restock fee is ridiculously high. Can't wait to see how this is all plumbed in when you're done.
 
I like the idea of the valving on the output. I could use something like that, it would make quick water of a water change. the idea for the input is a really good idea but I like the output one the best lol thanks for the tip!
 
Update:

Well I learned that trial and error coupled with indecision can be expensive. I bought everything I needed (valves, barb fittings, etc...) to do this with soft tubing but I have since abandoned this designs and finally have ended up going with PVC pipe. I bought 3/4" thin walled PVC pipe (schedule 22.5 I think) that follows the rim of my tank, 90 degrees elbows around the back following the rim still, another 90 degree turns the pipe to vertical. Then I have it connect to a 3/4" valve, then a T reduction fitting with 1/2" on the perpendicular side. The 3/4" side of the T follows vertically down to a threaded fitting where I will screw a barb fitting into to connect my filter hose. The 1/2" then has a 90 degree bend to another 1/2" valve. There are two of these entire setups, one for inlet, one for outlet. It is a little confusing to follow this in words so I will post pictures as soon as possible. I will also try to explain better how I plan on using this plumbing system. I designed it so I could easily tap into the system in the future if for instance I want to add a chiller, or if I go reef with my nano cube I can easily do the whole fuge route.

I have cemented all the PVC fittings together and then sanded everything with 400 grit sand paper. This is so that the paint will adhere to it. I used rustoleum plastic paint which is supposed to have a "hammered metal" finish. I used grey hammered metal and it matches my nano cube pretty well. The entire setup has been spray painted and is hanging up to dry. I still haven't figured out what I want to do inside the tank (intake screen and spray bar) but when I do I also have black Krylon fusion which is aquarium safe (and reef safe).

I am going to mount the entire thing with these little sticky mount pads that have holes in them to zip tie to. It should look pretty slick when done.

It is kind of sad though, I could have done this so cheaply had I know what I wanted to do from the beginning (and wasting probably around $50 or more on valves, fittings, and tubing that I didn't use). The PVC method was actually very cheap.

10 ft of 3/4" thin walled was about $1-$2
10 ft of 1/2" thin walled was about $1-$2
Various PVC fittings and valves from Home Depot - $10-$15
Krylon and Rustoluem paint - $9

It is sooooo much cheaper and soooo much easier to go to home depot than being plumbing from aquarium dealers. I am so kicking myself for paying double (or even triple) for stuff I didn't even use!

Anyway, I will post pictures as soon as possible.
 
Feast your eyes!

img_818087_0_170e2fd84465f6857c63a868a2b4290e.jpg


img_818087_1_708b4b3557cf26a6b99638fa8bad28a4.jpg


img_818087_2_b319cfde1f4ec20e0b8ff3fa89b60f41.jpg


img_818087_3_14191be43df3572ba827face37000b1b.jpg


img_818087_4_ad67e639f1753288b1f49c7436cceb4a.jpg


img_818087_5_bee811dd05cb317276e74816b3aa17ff.jpg
 
Would anyone be interested in purchasing this plumbing assembly for $20 plus shipping? It has worked perfectly for me but I am now selling off all of my equiptment.
 
Back
Top Bottom