iTJ84
Aquarium Advice Apprentice
- Joined
- Aug 27, 2013
- Messages
- 11
I'm new here and just wanted to share my build of converting an old iMac G3 into a small aquarium.
My girlfriend gave me the idea after seeing several pictures and such online of people who have done so. Well, the problem was, I didn't have one and I wasn't going to buy a working one to just tear it apart, because I honestly was sure how I was going to do it.
Luck on my side, I happened to come a cross an old, non-working iMac I had amongst some of old junk (hoarding comes in handy at times! Lol). Even though I had one, the hard part was figuring out a way to build a tank inside the case and have remain as a stock iMac.

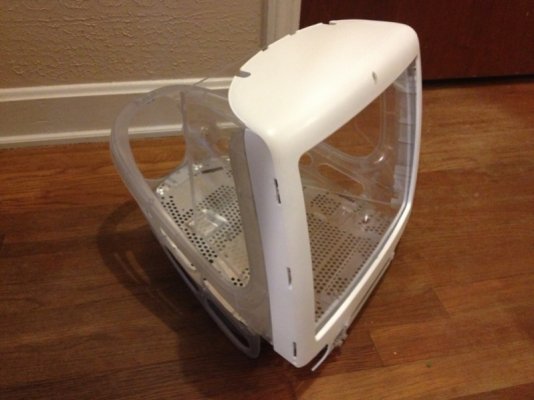
So, let the tear down begin!! Started off by taking the casing off and started removing all of the electronic down to the bare frame. Cleaned up and buffed the casing as it was pretty scratched up. I saved the power button, audio jacks, speakers, and the the external ports to retain the look of the computer. Since the computer was over 12 years old, the plastic inner bezel had turned that old, nasty, yellow color, so I repainted it white and sealed it to make water safe and nontoxic to fish just in case as I still had no clue on what I was going to do as far as the tank went.


The parts sat around as I tried to figure out what to do for the tank. Came across a guy online that builds and sells these. Checked out photos and stuff of his work and decided to replicate what he had done. First challenge was the front. Since I wanted to look of the computer, the front was going to need to be a bow front to match the old CRT. Second challenge how much room will have for the tank, as the back casing isn't flat, but rather curves, so the tank can't extend the length of the case. After measuring and some trial and error, figured out some dimensions that would work. Now the tank, used some standard acrylic and the build the walls and base. Used a thinner piece for the bow to be able to curve it and than use acrylic glue and sealed the inside to protect from leakage. A lot of trial and error, believe me!! Never did an exact measurement, but I know it's right around 3 gallons, maybe just a bit more

After a week of curing, drying, and water testing, it was time to put it all together. Used rope along the front to give a glow look to the "screen" and started out with a Whisper 3i internal filter, as with the casing, I needed an internal filter. Have everything wired internal and water sealed inside below the tank. Got a simple rocker switch and installed it on the back to control the lights. Basically, when the unit it plugged in, the filter will always run, but the lights can be turned on and off via the rocker switch.


Then I added some glass beads/marbles as the base and a few plants as I, at the time, thought it looked "pretty" and was thinking of a betta to go in it.


Well, as the tank sat there to cycle, it gave me time to think and read. After a couple of weeks, I gave the "substrate" a re-think. Realized how much empty space there was and how easy food was going to get trapped there and what a problem it would cause. Also, after some time getting use to the tank, the air pump from the filter was becoming annoying, far from a "whisper". Tried muffling it, but still hated it. So since I was going to interrupt the cycling to change the substrate, I decided to change the filter too. Switched out the glass for black tahitian moon sand and replace the filter with an Aqueon Quietflow Internal filter. Added a few more plants and some re-wiring was involved, I added the small TrueLumen blue LED strip with a dimmer. My camera is sensitive to the blue light, so it looks a lot brighter than what it really is.


It's been "complete" for a couple of weeks now and still needs to finish cycling before it's fish ready. Just wanted to share! (Got too involved in the build to take more pictures :/ Sorry! )
Do have 2 questions:
1) Since I've had time to think, I've thought of going with a dwarf puffer or some crystal cherry shrimp instead of a betta. Thoughts?
2) Thought about going with real plants/moss instead of the plastic. Will any work with sand? If so, what are some easy, slow growing plants that would work in a small tank?
My girlfriend gave me the idea after seeing several pictures and such online of people who have done so. Well, the problem was, I didn't have one and I wasn't going to buy a working one to just tear it apart, because I honestly was sure how I was going to do it.
Luck on my side, I happened to come a cross an old, non-working iMac I had amongst some of old junk (hoarding comes in handy at times! Lol). Even though I had one, the hard part was figuring out a way to build a tank inside the case and have remain as a stock iMac.
So, let the tear down begin!!
Started off by taking the casing off and started removing all of the electronic down to the bare frame. Cleaned up and buffed the casing as it was pretty scratched up. I saved the power button, audio jacks, speakers, and the the external ports to retain the look of the computer. Since the computer was over 12 years old, the plastic inner bezel had turned that old, nasty, yellow color, so I repainted it white and sealed it to make water safe and nontoxic to fish just in case as I still had no clue on what I was going to do as far as the tank went.The parts sat around as I tried to figure out what to do for the tank. Came across a guy online that builds and sells these. Checked out photos and stuff of his work and decided to replicate what he had done. First challenge was the front. Since I wanted to look of the computer, the front was going to need to be a bow front to match the old CRT. Second challenge how much room will have for the tank, as the back casing isn't flat, but rather curves, so the tank can't extend the length of the case. After measuring and some trial and error, figured out some dimensions that would work. Now the tank, used some standard acrylic and the build the walls and base. Used a thinner piece for the bow to be able to curve it and than use acrylic glue and sealed the inside to protect from leakage. A lot of trial and error, believe me!! Never did an exact measurement, but I know it's right around 3 gallons, maybe just a bit more
After a week of curing, drying, and water testing, it was time to put it all together. Used rope along the front to give a glow look to the "screen" and started out with a Whisper 3i internal filter, as with the casing, I needed an internal filter. Have everything wired internal and water sealed inside below the tank. Got a simple rocker switch and installed it on the back to control the lights. Basically, when the unit it plugged in, the filter will always run, but the lights can be turned on and off via the rocker switch.
Then I added some glass beads/marbles as the base and a few plants as I, at the time, thought it looked "pretty" and was thinking of a betta to go in it.
Well, as the tank sat there to cycle, it gave me time to think and read. After a couple of weeks, I gave the "substrate" a re-think. Realized how much empty space there was and how easy food was going to get trapped there and what a problem it would cause. Also, after some time getting use to the tank, the air pump from the filter was becoming annoying, far from a "whisper". Tried muffling it, but still hated it. So since I was going to interrupt the cycling to change the substrate, I decided to change the filter too. Switched out the glass for black tahitian moon sand and replace the filter with an Aqueon Quietflow Internal filter. Added a few more plants and some re-wiring was involved, I added the small TrueLumen blue LED strip with a dimmer. My camera is sensitive to the blue light, so it looks a lot brighter than what it really is.
It's been "complete" for a couple of weeks now and still needs to finish cycling before it's fish ready. Just wanted to share!
(Got too involved in the build to take more pictures :/ Sorry! )Do have 2 questions:
1) Since I've had time to think, I've thought of going with a dwarf puffer or some crystal cherry shrimp instead of a betta. Thoughts?
2) Thought about going with real plants/moss instead of the plastic. Will any work with sand? If so, what are some easy, slow growing plants that would work in a small tank?