Some DIY ZFlow Observations

The friendliest place on the web for anyone with an interest in aquariums or fish keeping!
If you have answers, please help by responding to the unanswered posts.

yaksplat

Aquarium Advice Freak
Joined
Jan 2, 2004
Messages
434
Location
orchard park, ny
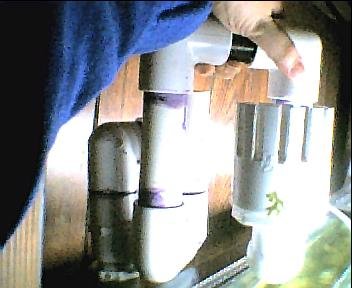
I decided to install a sump into my stand and used the z-flow setup mentioned in this forum. It turns out that there are some unmentioned variables in the z-flow setup. The vacuum release hole size is very important in controlling waterflow. The height of the tee in relation to the water surface is also critical.

Vacuum release hole:

this is the hole in the cap that keeps the system primed and allows air to travel with the water into the sump. When a smaller hole is used, the flowrate increases drastically. Going from a 1/4" hole to a 1/16" increased the flow from about 110 to 500 gph. The reasoning for this is tendancy towards a true siphon all the way to the sump. The relative height is now 3 feet instead of 3 inches from the water surface to the water outlet. The greater the height differential, the greater the pressure drop, the higher the flow....up to the maximum for that diameter of pipe. You have to be careful that there is a high enough flow of water back into the tank though or else the overflow could suck air into the system and kill the siphon.

Tee Elevation:

The elevation of the tee will determine the level of the water that is in the overflow. Too high, and the flowrate will be very small. If it is too low, the overflow will pull air into the system. Preferably you will want the bottom of the horizontal portion of the tee to be at least an inch above the lowest elbow inside the tank and also about 3" below the water surface. Which is roughly 2.5" below the surface of the overflow cup.

Combing this knowledge with the post by BillyZ should result in a good functioning Z-flow with no problems. Being on the careful side, I'm in the process of installing a floatswitch in the tank that will shut off the main pump if the waterlevel gets too high.


Jim
 
Thanks Yak! I actualy performed some tests of my own recently and was a little dissapointed in the results as well. With this additional information I'll probably update the Z-Flow post after I've had a chance to make some more modifications and test again. I think the fact that I used 90 degree elbows causes extra "friction". I've picked up some 1 1/2" u traps and will see what kind of increases i get with that plus your observations.

Did you use 1" pipe for your z-flow yak?

Does anyone have any thoughts on how to prevent the suction of air into the syphon if we use a smaller vent hole?
 
Air will pull into the pipe if there is a vacuum. The vacuum is relieved from the hole in the cap. But since it's drilled very small, the airflow is not very high and it is unable to eliminate the suction as fast. If you listen to the hole while in operation, you can really hear it sucking. We need air to rapidly enter the stack when the water level drops in the collection cup. Short of a level switch and a solentiod, i'm not sure.....

I'm going to try something when i get home.... :!: ..Stack height. The higher the stack, the longer it takes to dissapate the vacuum. A very short stack could eliminate this. Or preferably a very narrow stack. since the taller the stack, the quieter the operation.

I'm using 1" pipe in mine. I have the middle portion of the tee facing upwards to the stack. The outlet of the tee uses 2-45's instead of a 90, which i think decreased pressure drop and made it a little quieter.

Preferably, after the collection cup, the pipe would travel to the bottom of the tank, and then up and over the edge. The deeper this goes, the lower the chance of getting air into the system. I got air in it last week and got 6 gallons on the floor and into my basement. Salt water and cast iron do not mix well. I have my woodshop right under the tank. :roll:

I've made 3 so far. Changing the design each time. My tank is so full of rock that it's a PITA to remove the air from the z-flow without tapping a coral. But right now i have my quiet one 3000 pumping full bore into the tank without a problem. I think i'm getting just under 500 gph this way.


We'll see what happens...


Jim
 
I got air in it last week and got 6 gallons on the floor and into my basement. Salt water and cast iron do not mix well. I have my woodshop right under the tank
8O ack! god i'm sorry about that.

However, you did just give me a brilliant idea... going to make another horrible sketch, but it should make it pretty clear. THere's a very easy way to maximize the flow while still providing a vacume release... (pay no attention to the pathetic use of "MS Paint" :wink: )


basicaly, the red line represents a piece of air line tubing or perhaps something even a little thicker. When the water level in the collection cup is normal, the red air line draws water due to the vacume produced at the Tee. However, if the pump fails, the water in the collection cup will drop as the syphon continues. As soon as the water level drops below the end of the red air line tubing, that tubing then draws air. If the tubing is thick enough this should provide for a fast air break in the syphon at the tee.


Thoughts?
 
That could work out quite well. Currently, my water level is about 3/8" above the collection cup, so anything below the ledge could work. This should be a secondary air intake, otherwise you will get the constant flushing effect that'll get annoying really quick.

Sounds like we've both got something to do this weekend

Jim
 
I ditched it and bought a CPR. I couldn't get it to perform with continued success. I also had a problem with snails filling the pipe and causing overflow of the tank. My cpr has been up and running without problem for about a month and a half.

how about yours?
 
how about yours?
Still sitting in the bucket :?

My new stand and in general my plan to move my tank has been delayed significantly so I've had no driving factors in experimenting/testing more.

I think it was a decent concept but had a few fatal flaws. :|
At least it was a cheap experiment... unless you count water damage... sorry about that :(
 
So, the general conclusion is that this is a failure? Now I don't feel so bad. To bad I had to go re-invent the wheel before finding that I really needed a hovercraft. :?
 

Attachments

  • overflowassembly_171.jpg
    overflowassembly_171.jpg
    18.1 KB · Views: 1,657
I think yaksplats observations could be used to help you tweak your design.. by putting a cap on your vent and drilling a small hole you will increase your GPH considerably.. being careful of the other variables mentioned about the height of the vent and the devises tendency to create true syphon.. much like tuning a durso standpipe.. HTH

edit.. http://www.dursostandpipes.com/ check out the building your own durso standpipe frame.. it explains the vent.. HTH
 
I'm rather discouraged that the two origional collaborators didn't end up using this on a live system.

The cap with a small hole I can definatly try, I'm going to try gluing in an air valve to the hole for adjustability.

I'm more and more wishing I'd just spent the extra for the drilled tank.

Considering that this is a planted tank, and the water chemistry looks good without the sump, I'm also half thinking of just putting in an air supply for circulation and going filterless. I read up on it on thekrib.com.
 
there are some that go without circulation even.. but I would suggest having almost exactly 2 watts per gallon just a touch over could be OK.. and keep up on your mainatince.. removing dead plant material...
 
The plan is to go a touch over, 160 watts on a 75 gallon. Currently I only have 80 there.

Long term I want to go way over, keep high light requiring plants, and eventually convert the tank to a reef aquarium.
 
If you go to medium light.. the 2.13wpg sounds good by the way.. It sounds like it would work.. but upgrading to high light CO2 injected with fertilizers.. it would be just as easy to upgrade to reef.. IMO.. just need more light and (~115-150lb) LR and a good skimmer... :p.. some reading material would be nice as well.. :p
 
on a tank that big I would go DIY presurized (I did a little reaserch and put it in this link http://www.aquariumadvice.com/viewtopic.php?t=43055)
or use very large generators on a yeast powered one.. like two of the big garden sprayers.. :p
and yes.. CO2 will help even a low light planted tank.. whe have a section in this forum for planted tank discussion.. http://www.aquariumadvice.com/viewforum.php?f=21

once you get to high light fertilizer management will make it almost as dificult as maintaining a reef tank.. according to some.. HTH
 
I might not go that far with it. I'm going to stretch the possibility of my current setup before I invest in improvements.

My most successful plant tank was rather backwards by standard rules. It was in the window, so it had full sun on it, and was slightly overstocked with fish. The only real maintenance I did was weekly water change and filter cleaning. I moved elsewhere, tried to start taking proper care of it, and the tank went downhill.
 
LOL.. we seem to be in the same boat..
I have 17 years of FW experiance and am looking into doing SW.. :p
that and my current big tank is a 75 gallon.. WOW.. how strange.. :p
 
My first tank was somewhat accedental and hurridly put together. A "fish pond" had been put together as decoration for a conference my parents were working on. At the end of the conference the teenagers started daring each other to eat the fish, the adults didn't care since they were at a loss for what to do with all of them. I begged my mom to rescue the fish, and we took all 20 goldfish home. There was an awfully high mortiality rate, especially when Dad tried to use local rainwater for a water change. Cramming the survivors into at 10 gallong tank didn't help. I migrated to tropical soon after that. My mother still has that 10 gallon, and I've been progressing up from there.
 
greenmaji said:
or use very large generators on a yeast powered one.. like two of the big garden sprayers.. :p
I have seen plans for a paralell CO2 yeast generator. One bottle at a time changed out on a set schedule gave more even CO2 generation than one or two larger. It called for a large number of check vavles though, and I have not found one that works well under these conditions.
 
Back
Top Bottom