Pre Step 1. How big do you want it? Make sure you know how big of an area you can work with here by measuring doorways, hallways, etc. unless you plan on leaving the tank with the house. Also by using
www.garf.org you can calculate the volume of the tank by typing in the measurements!
Pre Step 2. Know how it will be filtered ahead of time Wet/Dry, Canister, Hang On so that you can leave cut outs or drill holes before sealing the wood so that the sealant doesn’t splinter/crack/shatter etc...
Pre Step 3. Know what your livestock will be. This will also help determine the size you will need to make it...always be thinking ahead to foresee any "territorial issues"
These Are going to be instructions for a 240 Gallon Plywood Tank 96" x 24" x 24"
---------------------------------------------------------------------------------------------------------------------------------------------------------------
Step 1. Local Hardware Store
A. Plywood
1. Two 4' x 8' Sheets Of Oak Veneer Plywood
2. One 2' x 4' Sheet Of Oak Veneer Plywood
B. Fiberglass Resin
1. Two Gallons Of FiberGlass Resin
2. Buy A Couple Of Extra Tubes Of Hardener
C. Oil Based Paint
1. One Gallon Of Black Oil Based Paint
D. Disposable Brushes
1. Ten 3" Disposable Brushes
E. Screws
1. 10 Pound Box Of 1 1/2" Drywall Screws
F. Sand Paper
1. Four Sheets Of High Grit Sandpaper
2. Four Sheets Of Low Grit Sandpaper
G. Silicone
1. Four Tubes Of GE Silicon II Rubber
H. Clamps
1. Six Plastic Clamps To Hold the Glass In Place
---------------------------------------------------------------------------------------------------------------------------------------------------------------
Step 2. The Glass Store
A. Front Glass Piece
1. 95.5" x 23.5" x 3/8" Plate Glass
---------------------------------------------------------------------------------------------------------------------------------------------------------------
Now That You've got your materials...Get your tools together. You can go about this One of Two ways.
Option 1. Have Someone Professionally Cut Your Wood For You
Option 2. Cut Your Own Wood...You Need A Steady Hand
I took mine to have it done professionally at a lumber yard for like 30 bucks.
---------------------------------------------------------------------------------------------------------------------------------------------------------------
Tools Needed
Circular Saw
Jigsaw
Palm Sander
Drill
Caulking Gun
Plastic Clamps
2.5" Hole Saw Blade For Wet/Dry Filters (Optional)
---------------------------------------------------------------------------------------------------------------------------------------------------------------
Now It's Time to Get Busy!
Step One: Cut The Following Pieces If You Are Doing This Yourself
Bottom: 96" x 24"
Top: 96" x 24"
Back: 96" x 24"
Front: 96" x 24"
2 Sides: 24" x 22.5"
Step Two: Screw The Pieces Together. Make Sure To Place A Screw Every 3" Apart.
A. Place The Back Piece On Top Of The Bottom Piece Flush With The Back And Screw It Together.
B. Place The Front Piece On Top Of The Bottom Piece Flush With The Front And Screw It Together
C. Place The Two Side Pieces On Top Of The Bottom Piece Between The Front And Back Pieces Flush With The End And Screw All Three Sides Together
D. Screw Top To The Back, Front, And Two Sides
You should now have a completely enclosed "casket"
Step Three: Get a pencil and draw your cut-outs for the front and the top. For the front i recommend leaving a 2" lip on top and bottom and a 2.75" lip on the 2 sides for stability. The top piece, draw out 3 equal sections leaving behind two 4" supports after you jigsaw it out. Also leave a 2" lip going around the top frame
Now, take your jig saw and cut out the lines for the top and the bottom.
You now know what your beautiful tank looks like! and now it's time to get it ready for fishes!
The Oak veneer comes pre-sanded so we get to skip out on one round of sanding!
Step Four: If you are doing a Wet/Dry Filter, now would be a good time to drill a hole in the bottom or back of your tank. I'm running a
DIY wet/dry Filter so I'm cutting a 2" holes in the back top corners of my tank. Otherwise if you are going to be running a hang on like an Aqua Clear or something make cut outs in the top piece for where they will go. Canister filters need no special attention because they can just hang over the edge.
Step Five: If you want the "Wood" look in your tank, you can skip this step and go straight to step 6. I, on the other hand want a Black background so this is where I'll be painting the inside of my tank black, using my gallon of Black oil based paint. The paint type doesn’t really matter because it will never touch the fish because of the ¼” thick layer of fiberglass resin that will cover it
Step Six: Get a 1/2 quart cup or something close to that amount. Fill it 80% of the way with your fiberglass resin and put 30 drops of hardener into it. Now stir it up with a spoon and pour a line down the middle of the bottom of the tank. Quickly take one of those disposable brushes and smooth it out over the entire surface of the bottom piece. It will take about 2 hours to dry if the temp is around 80 degrees. Make sure it's not windy when you are doing this otherwise you will collect nasty stuff in your tank, embedded there FOREVER!. Fiberglass resin is very potent so make sure you have ventilation! After the bottom is dry, turn the tank on its back and repeat the same thing to the back that you did to the bottom. For the end pieces you only need 1/2 the amount as the bottom and back...so I'm sure you can figure that out yourself. Do the same thing to the end pieces.
Now that the back, bottom, and two sides have been "sealed" bust out the heavy duty 80 grit sandpaper and rough it all up again. Now seal all 4 sides again and sand again using 80 grit sandpaper. Seal all 4 side once more for the final time, and do not sand them after they have dried for they are the final product.
As for the Top Braces. Know that the braces will be hovering over water 100% of the time collecting humidity and braces are kind of important to the structure of a plywood tank so we need to really protect them! So, mix up that quart again and dip the brush in it and "paint" the bottom of the braces as well as the 3/4" sides of the braces to seal them up!...sand and repeat just like the sides of the tank. This is vital otherwise you may come home to a shattered tank after some time of warping has gone by.
Step Seven: Got your glass ready to go? Heavy SOB isn't it? Ok, now...here comes the tricky part. Get it into your tank by angling it in through the front. Once it's in the tank, stand it up so that it’s ready to be put in place. Now put a 1/2" bead of silicone all the way around the edge of the glass and then press it firmly into the front frame! use clamps to hold the top to the wood, and to keep pressure on the bottom I used a couple 2x4's that i wedged into the bottom part and screwed 1 screw through the 2x4 where it met the top back part of my tank.
Let it sit like this for 24-30 hours...Now you feel the excitement because your almost done!
Now run a 1/4" bead of silicone across every joint in the tank just for added safety against leaks using your finger to smooth it into the corner...it takes practice, but you'll have it down by the third line!
Step Eight: Take your "beast" outside and put it on a level surface (on the ground) and fill it up with water about 25% let it sit for an hour or so. Fill it up 1/2 way and let sit for another hour. Calm down! Your almost there, relax its worth the time! Now go ahead and fill it up the rest of the way. Let it sit for an hour...any leaks? Of course not good job! Now let it sit for a week full of water to pull out the impurities in the resin. After 1 week drain the tank and fill it up one more time and then drain for good measure.
Congratulations...You have successfully built your own 240 Gallon plywood tank for 1/2 the price of an all glass. It's stronger, more flexible, safer, and cheaper than glass and it will be an amazing conversational piece when guests come to dinner!
I hope that this post will answer all questions concerning home made plywood tanks and if there's anything I missed that you other experienced DIYers can think of, let me know so that I can edit this bad boy!
---------------------------------------------------------------------------------------------------------------------------------------------------------------
Tank Costs
3/4" Oak Veneer Plywood Sheets $37.79 ea (4) Total $151.16
1 5/8" Drywall Screws 5 Pound Box $9.07 (1) Total $9.07
1"x3"x8' Select "Guide" Board $4.96 (1) Total $4.96
Rustoleum "Black" Oil Based Paint 1 Quart $7.27 (1) Total $7.27
Brush And Roller Set For Painting $7.97 (1) Total $7.97
Gallon Of "Bondo" All Purpose Fiberglass Resin $24.97 (4) Total $99.88
5" Orbital Sanding Pads 20 Pack 80 Grit $8.99 (1) Total $8.99
Wedged 80 Grit Sanding Blocks $2.79 (2) Total $5.97
3" Disposable Paint Brush $1.48 ea (9) Total $13.32
GE Rubber Silicone I $3.47 ea (5) Total $18.56
93.75" x 23.25" x 3/8" Thick Plate Glass $150.00ea (1) Total $150.00
---------------------------------------------------------------------------------------------------------------------------------------------------------------
Plumbing Costs
2" Elbow
PVC Fitting $0.89 ea (1) Total $0.89
2" Adapter
PVC Fitting $0.41 ea (1) Total $0.41
1.5" Ten Foot
PVC Pipe $4.28 ea (1) Total $4.28
1.5" Bulk Head Fitting $13.00ea (1) Total $13.00
1.5"
PVC Fitting $0.98ea (1) Total $0.98
1.5"
PVC Fitting $0.59ea (1) Total $0.59
1.5"
PVC Fitting $0.99ea (1) Total $0.99
PVC Cement $3.96ea (1) Total $3.96
---------------------------------------------------------------------------------------------------------------------------------------------------------------
Stand Costs
4"x4"x8' Pressure Treated Pine $6.97 ea (3) Total $20.91
2"x4"x8' Standard Pine $2.91 ea (10)Total $30.84
3" Drywall Screws 1 Pound Box $3.20 ea (2) Total $6.85
---------------------------------------------------------------------------------------------------------------------------------------------------------------
Personal Costs
Safety Goggles $1.68 (1) Total $1.68
Jigsaw Blades $2.99 (1) Total $2.99
7 1/4" Circular Saw Plywood Blade $5.99 (1) Total $5.99
Folding Saw Horses 2 Pair $9.98 (1) Total $19.96
Skil Orbital Sander $39.63 (1) Total $39.63
source:
http://www.piranha-fury.com/pfury/index.php?showtopic=76219&hl=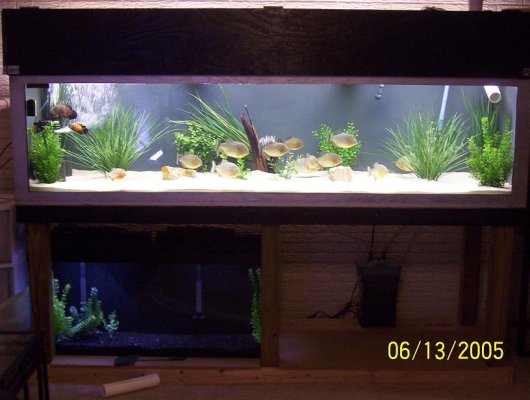
")