best way to diffuse DIY CO2?

The friendliest place on the web for anyone with an interest in aquariums or fish keeping!
If you have answers, please help by responding to the unanswered posts.

JustOneMore20

Algae Fighter
Joined
May 30, 2006
Messages
3,872
Location
Birmingham, AL
I want to hook up DIY CO2 on one of my tanks...just haven't decided between the 55g or 29g yet.

I've heard different opinions on ways to diffuse the bubbles. I have heard that a limewood airstone (tiny bubbles) is a good way, but I've also heard it isn't very effective. I've also been told to just stick the air/CO2 line into the filter intake, but I don't want to do this because of noise and/or damage to the impellar.

I was thinking of getting one of the Hagen ladders (not the whole system, just the ladder diffusor) and using that on my DIY. Would that work?

In your opinion(s), what is the best way to diffuse the CO2?
 
I just use a fine pore diffuser/airstone. (I'm cheap.) There are some nifty ceramic CO2 diffusers that I've heard good things about. The ladder would also work, as would a bell diffuser.
 
Wow, $50....I am low on money at the moment, so I may just have to wait on DIY or use my limewood airstones. Thanks for the suggestion!

Do you know if another site sells a diffusor like that? I'm not a fan of Floridadriftwood.com....to make a long story short I ordered plants there and they didn't ship after like 2 weeks...tried to email, tried to call and got nowhere...so I don't order from them anymore...bad customer service IMO.

I could try DIY, but I'm not really a DIY type of person...lol.
 
JustOneMore20 said:
I'm not a fan of Floridadriftwood.com.......bad customer service IMO.
Oh? Someone else recommended them to me, they're the only place so far that I've seen Marsilea minuta, and was thinking of making an order before fall. I'll keep your experience in mind.
 
Yep...I ordered once from there with no problems...but the second time it was a bad experience. I haven't tried them again. I use Aquariumplants.com for plants now.

So the fine airstone works for you? I may just use that...that's what I had planned to use, until I thought about the ladder.
 
http://plantguild.com/html/co2.html

These guys have always been good to deal with in my experience, but the price remains the same.

It looks like rich311k has put together a really cool design and saved a few dollars. There are a lot of DIY ideas floating around that would work just fine, it's just that I usually have more money than spare time and went the lazy route.
 
I have used the Hagen ladders and they do work pretty well. Only problem with them is they are a pain to clean and they are easily clogged. One small piece of plant leave in it is all it takes to stop the bubbles from running up the ladder. Once this happens, your CO2 level will drop pretty quick. This will usually happen when you are not home so you don't see it for who knows how long! I am currently piping my CO2 into the output of my cannister filter.
 
Glenc said:
I am currently piping my CO2 into the output of my cannister filter.
Output rather than input? That would get rid of the impeller wear issues, but how well do the bubles disolve? How far do the bubbles travel in the output line before being released in the tank?
 
I am currently piping my CO2 into the output of my cannister filter.
Does that work pretty well for you? How do you do it? I have an XP3 with the spraybar. Any way I could do it with that?

Thanks for the tip on the ladder...I think I'll pass on that.
 
Most of the inline diffusers use some bio-balls in the flow path to create turbulence and break up the bubbles. In mine, the water actually runs down through the diffuser, with the CO2 injected at the top. The bubbles want to go up, the current goes down, and the bio-balls help break everything up.

Full disclosure: I haven't used mine yet - I don't have the CO2 rig at this time, but it's based upon plans from people who have had good success, and I expect it to work fine. It certainly does a good job of diffusing any air that is trapped in the system whenver I drain/re-prime it.
 
Thanks src, thats pretty much explains it. I do get some fine bubbles coming in from the output into my tank but I don't mind as it kind of acts like mist diffusion. I have bio balls plus some of those cheap plastic pot scrubbers in the reactor chamber. It is piped in about 6" from the top of the cannister on the output side, for the very reason you mentioned dskidsmore, wear and tear on the impellor. I didn't shorten the hose at all when I got this filter new, so the CO2 water mix travels about four feet after the reactor before it hits the tank. Best method of diffusion I've used so far. As for the reactor, I copied Purrbox's design, I used 2" plumbing fittings and pipe. I still use the Hagen ladder in my 10 gallon, it does work well and is worth getting if your not handy, just got to keep an eye on it.
 
it does work well and is worth getting if your not handy
I'm not very handy. In fact, I got lost reading the two last posts. Didn't have a clue what src was talking about. I kind of understand how the method of diffusion you use, but not really.

Is there any kind of step by step method of building the reactor that Purrbox sells? Any chance its on a website somewhere?

I could make something like that with directions...but not just by looking at the picture of it.

Maybe I'll just stick with the ladder or the airstone...they are for non-handy people like me. :)
 
Here's a thread that discusses reactors: Thread

and a website: DIY Reactor

This should give you most of the info you need. Please note that the inline reactors only work if you use a cannister filter, or use a seperate water pump to run tank water through them.
 
I do have an XP3 on my 55g (looking for a DIY reactor for that one as well as the 29g). The 29g does not have a cannister, so I'll have to use the airstone method on it.

Thanks for the link src.
 
In case it helps at all, here's a picture of my current setup:


The output from the Rena XP3 goes to the top of the DIY reactor (far right), out the bottom, over to the Hydor inline heater, then up to the tank. You can see the check valve near the top of the reactor, where CO2 will be added.

Note that this does pose some priming issues. When the tubes are full of air, priming works just fine. However, if the tubes have water in them, the XP3 won't fully prime automatically. I have to make sure that the XP3 is mostly full of water before I put it back in, otherwise the prime will stall. Not a huge deal, but something to be aware of.

On the plus side, all of my equipment is out of sight.
 
That helps alot src...now I have a visual.

I just heard about the inline heaters. I'll be checking into getting one of those soon. Having my heater in the tank really takes away from the plants, even though its black. I'd rather have it outside the tank.
 
ringfinger said:
http://www.floridadriftwood.com/product.asp?0=217&1=253&3=404

This is a very good Co2 diffuser that has worked very well for me in a 29 gallon tank. There is also another model that is made for tanks 30 gallons and up. The price is a little high(like twice as much as it should be) but they are very well made. And the design is an easy one to copy if you are a DIY kinda person.

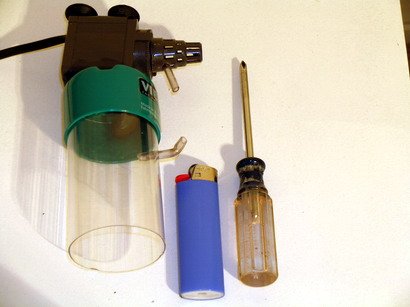
This is based on my original idea going back 12 years ago.
You can use a viewtainer(1.99$) from a hardware store like Orchard's and drill a few holes or use a lighter and hot 3/16" dia screw driver to make the holes. Looks as good and does not need sponge.
 

Attachments

  • diyventuri_planresized_850.jpg
    diyventuri_planresized_850.jpg
    37.1 KB · Views: 56
  • venturidiyreactorresized_207.jpg
    venturidiyreactorresized_207.jpg
    31.7 KB · Views: 75
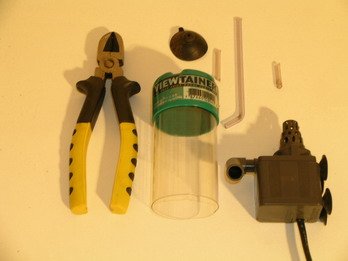
Here's the exploded parts list, the size is 4"x2", the rio 180 runs about 10$ on line.

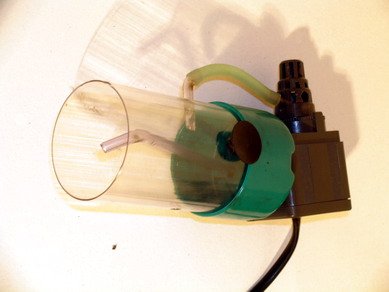
The venturi loop really kicks the CO2 into over drive.
It's also the easiest CO2 reactor around to use.
It's self leveling ansd you cannot crack or drop and break the viewtainer.

Regards,
Tom Barr
 

Attachments

  • resizedpartsrx_513.jpg
    resizedpartsrx_513.jpg
    26.9 KB · Views: 882
Back
Top Bottom