75-90G stand with 55G tank..?

The friendliest place on the web for anyone with an interest in aquariums or fish keeping!
If you have answers, please help by responding to the unanswered posts.

partypalooza5

Aquarium Advice Addict
Joined
Mar 28, 2009
Messages
1,274
Location
Texas
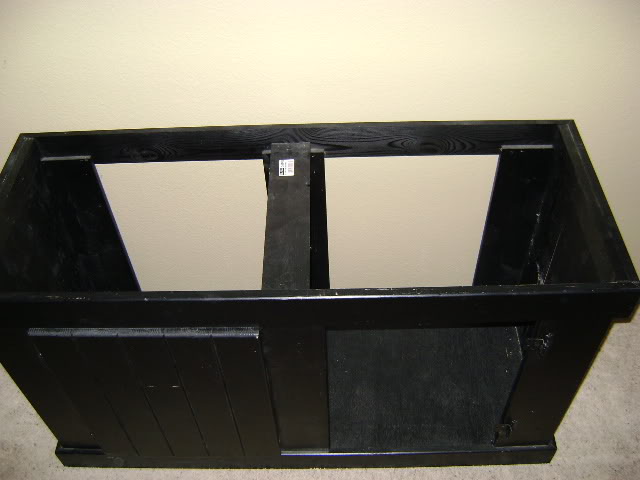
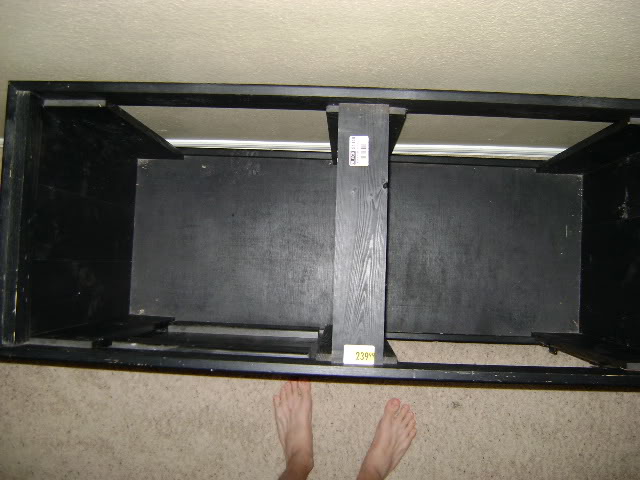
I may have made a huge mistake. I bought a stand meant to hold a 75-90G aquarium. I'm going to buy a 55G (all I can afford) I tested it out at the store, and the stand is LONG enough but its TOO wide. The back of the tank is totally un supported. Will this be seriously bad? It's solid on the sides and the front just not the back. Any suggestions? I like the stand alot (plenty of room for a sump/fuge) and I don't want to take it back.

Thanks.
 
Do not use it if it doesn't support all faces of the tank equally. Seriously bad = Yes.
 
Add a 1" plywood top, or something similar. Bolt that to the top of the stand, and you should be okay. Maybe cross brace it with 1"x ? wood boards. There is ALWAYS a way to make it work.
 
Thanks, I didn't think it would work like that xD. I'm glad I thought about it before I did it!!

I'll try the plywood and bracing attached to the stand.
Will 1" plywood warp under that weight though? (even if supported from underneath)
 
Is this a wrought iron stand? What are we talking about here? And no, one inch ply will not warp, but it ain't cheap! You don't have to use that, you can use other woods/materials.
 
No its a wood stand. It's pretty solid from what I'm seeing. Everything is fine with it but the fact that its too wide. If I could get a 75G tank I would feel safer.

What about 3/4" plywood? too thin?
 
Can you modify it with a 2" x 4" just where the rear edge would fall, possibly with a center leg to prevent it from bowing in the center of that back edge? I really think you could modify it, no problem, especially if it is wood!
 
XD I know I can modify it. (I gots power tools! :) ) I'm just looking for the most secure way to do it.
 
just get a piece of 3/4" inch plywood. the decent looking stuff with the sanded side should cost $30-$40. cut it to fit in the top of the stand like the 75g is supposed to. then cut a second piece the same size (you will have plenty of material out of a 4'x8' piece) and glue one on top of the other. i would recommend titebond 3 wood glue. spread the glue nice and even on both pieces and then stick them together. put lots of weight across the whole top of it while the glue dries. this will give you a 1-1/2" top and will be stronger than any weight the stand can support. then just sand, stain, and seal (poly, shellac, lacquer whatever you like)
 
just get a piece of 3/4" inch plywood. the decent looking stuff with the sanded side should cost $30-$40. cut it to fit in the top of the stand like the 75g is supposed to. then cut a second piece the same size (you will have plenty of material out of a 4'x8' piece) and glue one on top of the other. i would recommend titebond 3 wood glue. spread the glue nice and even on both pieces and then stick them together. put lots of weight across the whole top of it while the glue dries. this will give you a 1-1/2" top and will be stronger than any weight the stand can support. then just sand, stain, and seal (poly, shellac, lacquer whatever you like)

Slight bit of over-engineering, but that is definitely be a great way to go about it. My main concern would be on how to conceal the edges of the ply. Also, make sure to SEAL the edges of the ply with poly, paint, whatever, as the edge is what fails on plywood once it is wet...

I actually like the idea of having room behind the tank for equipment, sump, filtration, whatever... I have thought about doing something like this on purpose, and almost used my old 55 gallon as a planted fuge underneath my 75 gallon on an iron stand, pushed all the way to the front with plumbing and equipment behind it out of sight.
 
I want to keep the look of the stand but I want to make sure it is functional. So any modifications have to either blend in or not be too obvious. A single 2x4 screwed in to support the back edge with two supports underneath it is what I'll probably do.
 
the plywood if done correctly would sit recessed in the top just like the tank would. the only difference would be the tank would sit on top above the rim of the stand. the 3/4 ply would be cheaper than 1" as some one suggested and there is plenty of material left to glue up an 1-1/2" for less money and better safe than sorry in this case. i think a plywood top would be best and that is what i would do but it's your stand and tank so good luck.

be careful to get that 2x4 perfectly flat and level with the rest of the stand. i prefer hard woods (poplar is sufficient) that are more stable than pine 2x4's which can twist and cup and bow something awful. use screws so the wood can't pull apart when it shrinks.
 
I want to keep the look of the stand but I want to make sure it is functional. So any modifications have to either blend in or not be too obvious. A single 2x4 screwed in to support the back edge with two supports underneath it is what I'll probably do.

I like the double plywood top idea better. If you do a 2x4 across the back, make sure that it is on edge, & you would want to have at least 3 "legs", and those legs will have to go through the bottom of your cabinet to reach the floor. I would not trust putting the weight on the cabinet bottom (ie having the "leg" totally inside the cabinet). That part is not meant to support a lot of weight & prob only 1/2" or so thick & will likely sag or even punch through.
 
I just looked at the stand again and there is a center brace that goes the width of the stand. Could I attach something to this?
 
OK here are some pics of the stand. (one door was removed because my cat kept getting stuck XD)


img_994341_0_288b402b83097033fc4e6d6649d19703.jpg


img_994341_1_4624aa19c1ea6185fefb2cfb6108f402.jpg


The stand was regularly 240 bucks! I got it for 120 :D.
 
Well, Nevermind everyone. It turns out I won't be getting a 55G tank afterall..


BUT I WILL BE GETTING A 75G!!! :D :D :D :D :D

Me = Very happy guy right now.
 
Back
Top Bottom