The slow 112G jungle tank build ...

The friendliest place on the web for anyone with an interest in aquariums or fish keeping!
If you have answers, please help by responding to the unanswered posts.

Harry Muscle

Aquarium Advice Activist
Joined
Jun 22, 2015
Messages
160
I just joined this forum and I wanted to share what I'm currently working on.

Note: The first few posts will be reposts of things I've posted on another forum over the last few months.

Thanks for looking ...

Originally posted February 28, 2015:

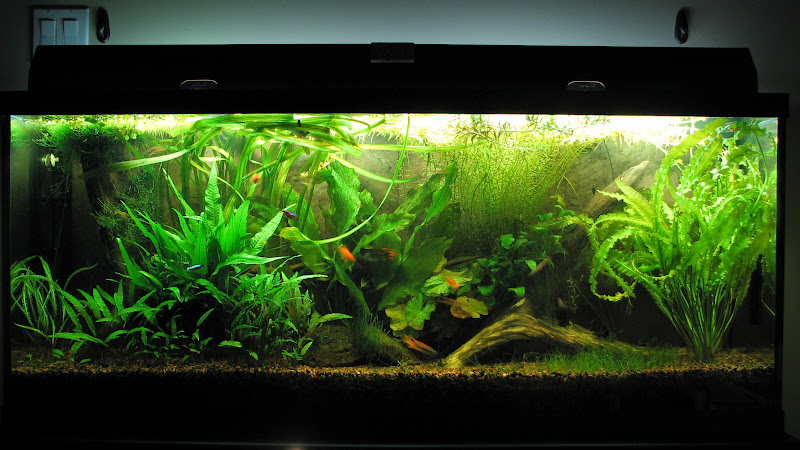
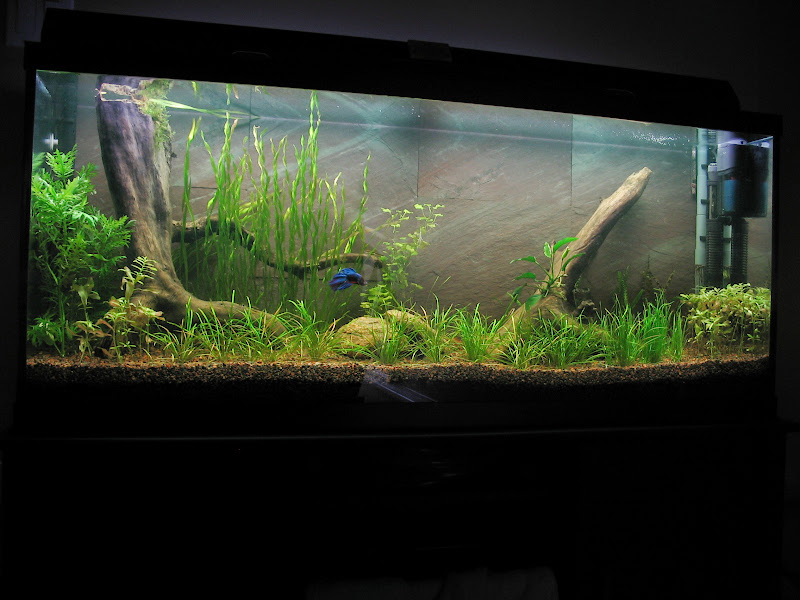
I wanted to start this journal to document my 90G jungle tank. I'm currently in the planning stages, although I have already started construction on the fish room in the basement that will house all of the equipment.

I've also narrowed down the equipment list and started looking for deals. Here's my list so far:

IMG_20150121_213802.jpg


IMG_20150121_213812.jpg


I got an good deal on the Mag 12 pump ($100 brand new) so that's already bought and an amazing deal on the ProFlex Model 3 sump ($140 new).

I've also got some rocks (some are from a previous tank from a few years ago, others I bought recently).

IMG_20150215_181849.jpg


The rocks on the left are dragon stone and the gray rocks are seiryu stones. I'm thinking of going with the seiryu stones and possibly getting a few more.

Here's the driftwood I was going to get from Tom Barr so I could do a trunk with roots effect.

IMG_3746_zps5ceede10.jpg


However there was a bit of a mix up and I believe here's the pieces I'll be getting instead (I'll know for sure next week when I'm back in town to actually check what arrived).

IMG_4801_zpsae089420.jpg


IMG_4784_zps2fcb680e.jpg


Well that's all I got so far. Feel free to provide feedback or suggestions and ask questions. I'll post updates as I make progress on getting this tank up and ruining.

Thanks,
Harry
 
Originally posted March 1, 2015:

Did a bit more work in the fish room today. It's going under the stairs. There will be just enough room for a 30" cabinet, water change container (hopefully 55G drum) and a small sink.

IMG_20150301_164427.jpg


First thing that needs to be done is to fix some of the bad work the builder did in supporting the stairs. At the same time I'll be making everything square and plumb.

Thanks,
Harry
 
Originally posted March 2, 2015:

A few more details ...

I'm planning on going with Tom Barr's non CO2 method as outlined on his site (and probably several other places). I had great success with it in the past so why mess with a good thing.

Here's a picture of my 55G tank that I used to have about 6 or 7 years ago. It used Tom's method and I'm hoping to reproduce this again just on a larger scale.

IMG_0652.JPG


On the left side the tank had a trunk with some roots. I'm hoping to go with something similar again. The right side in the new tank will be some sort of seiryu rock arrangement.

Here's a picture of the 55G when it was first setup. It's easier to see the trunk and roots in this picture.

IMG_0775.JPG


That's all for now,
Harry
 
Originally posted March 18, 2015:

I did some plumbing work today.

There are two main drain stacks close to the future fish room, so I've tied into both of them. One will be used for draining my sump for water changes and the other as the drain for the sink in the fish room. Cause of the layout of things it was easier to split this up instead of tying everything into one drain.

Here's what I started with

IMG_20150318_121003.jpg


And here's what the finished products looked like

IMG_20150318_152935.jpg


IMG_20150318_121217.jpg


By taking advantage of the existing cleanouts I was able to avoid have to cut the main stacks ... something that was a big no no with my better half [emoji2]. And everything is still to code (more or less [emoji57]).

Thanks,
Harry
 
Originally posted May 12, 2015:

Things have been going slower than I would have hoped for but I've been making progress. Most of the work since the last update has been to the area surrounding the fishroom. Here's the wall opposite the fishroom:

IMG_20150512_203423.jpg


The moisture barrier against the concrete is all up and the framing is coming along nicely.

I've also run four circuits to the basement from the electrical panel:

IMG_20150512_203435.jpg


One of these circuits will be dedicated for the fishroom and fish tank.

I've also been busy writing a IR Light Controller based on an Arduino Uno board with an Ethernet shield. I'm most likely going to get an Ecoxotic E Series light for the tank so this controller will automate things for me ... too bad these lights don't work with an Apex controller. There's still work left on the controller but I'd say it's probably 75% done. Here's a link to the code in case anyone is curious:

https://github.com/Stonyx/IRLightController

Once I get further with the controller I'll create a sperate thread with more details on it.

I think that about sums up the last little while.

Thanks for reading,
Harry
 
Originally posted May 27, 2015:

I finally got to check out some of the stuff I've been ordering over the last few months (I ship things to a relative's place to save a bundle on shipping costs).

Turns out I received a larger sump (Aqueon Proflex Model 4) than the one I ordered (Aqueon Proflex Model 3). Pleasant surprise ... I'll just have to adjust the space I allotted for the sump in the fishroom.

IMG_20150516_214050.jpg


I also finally got to checkout the driftwood I got from Tom Barr. Here's a picture of some of the nicer pieces arranged together:

IMG_20150516_170942.jpg


I was a bit disappointed with the wood ... as mentioned in one of my previous posts the wood I got wasn't the one I ordered so I'm gonna have to play around more to figure out how to combine the pieces to get the look I'm going for. Also all the manzanita wood that I've ever had before was a lot smoother and slicker [emoji57]. This wood is more weathered and rougher. I believe Tom only collects dead wood which would explain things ... I guess it's better for the environment [emoji3].

Most of the other things were as I expected them. Although the Mag 12 pump got damaged in shipping ... hopefully spare parts can fix it.

Thanks,
Harry
 
Originally posted June 17, 2015:

I went to visit Miracles Aquariums on Monday and again today. I decided to order the 112G tank instead of the 90G. I also placed an order for a custom maple plywood stand. The new tank dimensions are going to be 60" wide, 18" front to back, and 24" high. I'll be getting three holes drilled in the back, one for the overflow and two for the returns. Here's the hole layout:

IMG_20150617_133038.jpg


I took a bunch of close up pictures of the stand style I'll be getting. I've never been able to find these kind of close-up pictures of their stands before, so here they are for the benefit of anyone else considering a Miracles stand.

Here's the overall stand ... it's the picture supplied by Miracles ... ironically I didn't take one myself of the whole stand. Mine will be a foot longer and have three doors. It will also have a full flat top.

189579_402511343140880_505737417_n.jpg


Here's the inside back left corner:

IMG_20150617_110354.jpg


Here's the inside back right corner:

IMG_20150617_110404.jpg


Here's the inside front left corner:

IMG_20150617_110442.jpg


Here's the back of the stand:

IMG_20150617_110740.jpg


IMG_20150617_110746.jpg


Here's the front with one door open and one closed:

IMG_20150617_111034.jpg


Thanks,
Harry
 
Most of the framing in other areas of the basement that I'm working on are now done, so I started adding structural supports for dealing with the weight of a 112G tank. I decided to create a closet in the basement that is right underneath where the tank will be in the living room and use it for providing extra support

The first step is to add extra joists. This might be a bit overkill but I prefer that than the tank ending up in the basement :)

I sistered the two end joists and added extra joists in between so that they are now 8" on center.

IMG_20150708_125611.jpg


IMG_20150708_125600.jpg


Next will come beams to support the joists and then columns to support the beams.

Thanks,
Harry
 
The columns are starting to go in. Three 2x4s at each corner plus additional support around the closet door opening and the back wall.

IMG_20150711_203752.jpg


I also took a picture of my cutting area in case anyone wants to copy it. It's ABS pipe and fittings that fit together to make a cube that is then covered in thin plastic. Allows me to do so my cutting in the basement (instead of the driveway) and keep the dust from going everywhere.

IMG_20150711_205409.jpg


Thanks,
Harry
 
Look good man! Cant wait to see it all set up. Following!

Sent from my SM-N900V using Aquarium Advice mobile app
 
I'd say that'll hold er;) nice work man!!

Sent from my SAMSUNG-SM-G900A using Aquarium Advice mobile app
 
The structural support for the tank is all done ... I just haven't taken a picture if it yet. Lots of other framing work has also been finished in the basement including the fish room.

I started work in the living room where the plumbing and electrical will be next to the fish tank:

IMG_20150811_214326.jpg


Here's what's inside the wall:

IMG_20150801_104943.jpg


That's all for now.

Thanks,
Harry
 
I've been slowly getting things ready for running the pipes inside the wall. I have added additional supports around where the pipes will exit the wall so that they can be attached better.

IMG_20150817_193954.jpg


I have also added supports to the drain pipe that I'll be running aquarium pipes beside ... didn't want to accidentally damage it.

IMG_20150829_103134.jpg


IMG_20150829_103031.jpg


Thanks,
Harry
 
The pipes went into the wall today. This was probably the hardest part of all the plumbing since I'm working in an existing wall and the only access I have is through the small opening where the electrical will go afterwards. Here's what the living room part looks like:

IMG_20150831_161502.jpg


Here's what we have in the basement:

IMG_20150831_161538.jpg


And here's what's in the wall:

IMG_20150831_151007.jpg


IMG_20150831_161432.jpg


You might notice that I insulated the pipe a bit. I figure I'll have about 15' of pipe for the round trip from tank to sump and back to the tank, which is a lot of surface area to lose heat.

Thanks,
Harry

Great progress Harry&that was an excellent idea insulating the piping...!

sit in silence...
 
Back
Top Bottom