You are using an out of date browser. It may not display this or other websites correctly.
You should upgrade or use an alternative browser.
You should upgrade or use an alternative browser.
Custom Built Rockwall
- Thread starter Morrowboarder
- Start date
The friendliest place on the web for anyone with an interest in aquariums or fish keeping!
If you have answers, please help by responding to the unanswered posts.
If you have answers, please help by responding to the unanswered posts.
Morrowboarder
Aquarium Advice Apprentice
- Joined
- Nov 10, 2012
- Messages
- 31
Wow! Youve inspired me! Could you give me a list of equipment you used for this (as well as cheaper stuff now that you have built one)? Money is kind of tight but I really want a 3D rock background.
Thanks! I was first inspired by some of the salt water coral rock walls I saw on some other forums. How big is your tank? The tank size definitely plays a big role in how much it costs to do something like this.
Tools required:
- dremel
- tape measure
- razor blades
- sos pad
- scissors or wire cutters
- power drill and bits (optional)
- cable ties
Supplies:
- polished river rock (made for fountains or koi ponds)
- playground sand
- pond foam (like insulator foam, but made for ponds)
- eggcrate (it's actually a light diffuser for drop ceilings)
- PVC tubing (optional for hiding the heater and water filter)
- tupperware (optional for hiding the heater and water filter)
- plexiglass (again, optional for sealing the back on the rock wall)
- JB waterweld (by far the most expensive)
You can start by purchasing the eggcrate from lowes or a similar store. Just go to the dry wall section and look for light diffusers. A store associate should know where this is. Also, while you're there go and get some cable ties. I found some pond foam there in the pond and outdoor section. If they don't have any there, go to menards and the have "Great Stuff Pond Foam". That stuff is actually cheaper and better than what Lowes had.
Then you can go to Hobby Lobby or some other hobby store and purchase some fountain rock. It's pretty cheap and I haven't seen any change in PH as a result from using this rock. If you want larger rocks or something else besides this type of rock, ensure it's not limestone.
Now, measure the inside of the fish tank. Don't measure the outside of the tank or use the tank dimensions specified on the box or tank. You want to make sure the rock wall can fit between the lip on the tank lid. Mine really cut it close and if you look at my images, the rock wall doesn't completely fit the back wall where I have it leaned up against. Take any other measurements as needed if you want your water filter and tank heater to sit within the rock wall.
Take those dimensions and use them to cut out your eggcrate. I used regular scissors to do this, but it will hurt your hand after a while. If you want to make a cave, make sure it doesn't stick out too far, because you have to remember that you will be adding layers to the eggcrate when you start putting rocks on and pond foam. The shelf I put on mine was also framed out with eggcrate. Again, don't go too far out with the shelf, because the foam and rocks really put a build on the whole structure.
Use the zip/cable ties to attach the eggcrate framework together. Done tighten these too much, otherwise the eggcrate either cracks or bends to an undesired structure. Once that all gets pieced together, I took my tank lid off and set the eggcrate structure in the aquarium to see how much clearance I had and just to get a feel with how everything will look.
After you're good with the eggcrate design, go outside or in your garage (need ventilation, but also temperature above 60°F) and lay the eggcrate flat on the ground on some cardboard. Start placing your rocks on the eggcrate in random places or however you want it. Make sure there is some space between each rock for the pond foam to expand. I left about a quarter to half inch between each rock. The pond foam comes with a tube or hose that you attach to the nozzle. Shake it well and slowly pull the trigger to release the foam onto the eggcrate, but between the rocks. Don't worry about making a mess, it comes off the rock and can be cut down to size once it dries. Also, you don't need to completely fill the gaps with the wet pond foam when you're putting it on. This stuff will triple in size when it cures. If you mess something up, you can always let it cure, cut out the mistake and start over on the section. I had to come back countless times to fix something with pond foam.
The foam dries and is ready to cut within 24 hours. You really don'e have to cut the foam if you don't want. Some people prefer the bulging look of the foam. For my look, I cut it down between the rocks with a razor blade. Make sure you have like 5 blades for this, because they dull quickly. Pull off any foam on the rocks and use the sos pad to clean things up a bit.
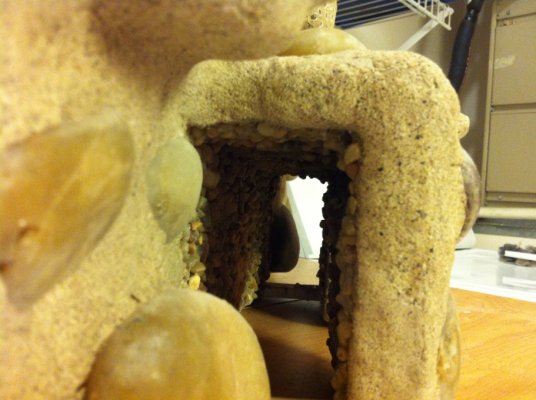
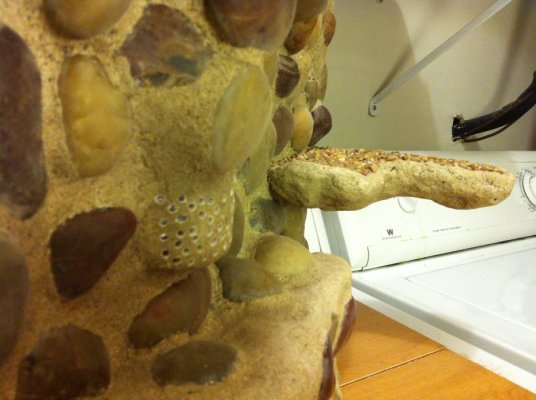
For inside the cave, I put a layer of pond foam on and cut it flat with a razor. Then I squeezed a tube of silicone over the flat surface of the pond foam. Then I used the same type of aquarium gravel I have on the base of my tank to spread over the wet silicone. This holds the gravel on pretty well and is aquarium safe. I did the cave in sections, so it was easier for me to silicone and gravel the walls. I did the same thing for the rock shelf surface if you look at the images. I notice it grows a lot of algae in between the gravel on the rock shelf, but my chinese algae eater loves it.


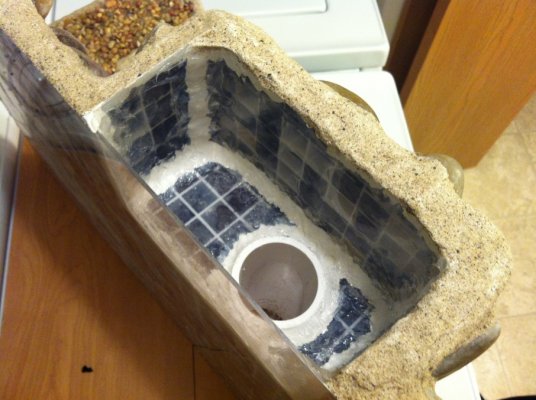
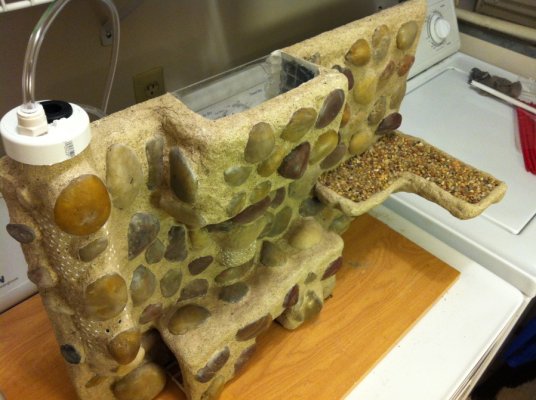
I use the dremel to sand down the foam in some sections, but limited my use because I kept hitting the rocks with the dremel bit. The dremel was most helpful to me when I was sanding down the pond foam on the rock shelf. After everything was foamed and felt solid, I cut out pieces of tupperware for the inside chamber where the water filter sits. I used JB waterweld and silicone to seal the tupperware walls inside the water filter chamber. The JB waterweld was applied before the silicone. If you want to seal the back of the rock wall like I did, you can go to menards or lowes and get a sheet of plexiglass cut to your specs. I recommend finding an alternative to plexiglass if you want to do this cheaper. The sheet I bought was $30. I sealed the plexiglass to the back of the rockwall with silicone. Also, I installed my air pump tube inside the rock wall to hide the tube.


Ok, getting this far seemed very extensive. I did a lot of research to find the final layer to put on the rock wall. Essentially, I ended up going with JB waterweld because the manufacturer said it was aquarium safe, drinking water safe and people who have salt water tanks use it for their reef rock walls. So everything up to this point was fish safe, so I didn't want to ruin my whole project by layering something on the front that kills the fish. The JB waterweld is like a putty and each stick is $5. I had to buy around 20 sticks to cover my rock wall for a 20 gallon tank. The part I liked is that you can mold the putty around the rocks and other structures. While the putty was wet, I dumped playground sand on top and applied pressure to the putty area. This gave the final layer a rough grout look, which satisfied me. Also, the putty is super light, but messy and sticky to use. The biggest downside was how quick it dried. I had to putty the rock wall in sections because if I went ahead and putty half the rock wall at once, the playground sand wouldn't stick to certain areas. One alternative I saw besides using JB waterweld was using a marine 2 part epoxy and apply it to the pond foam areas and then throw some sand on top. However, the manufacturer of the epoxy states the product isn't fish safe. In that case, you would have to use something like Shields All to layer on top of the epoxy, which costs 40 dollars just for the Shields All.
Last step was drilling out the holes for the water inlet where the filter draws water in. I drilled holes for the water heater chamber as well.
Thanks! I was first inspired by some of the salt water coral rock walls I saw on some other forums. How big is your tank? The tank size definitely plays a big role in how much it costs to do something like this.
Tools required:
- dremel
- tape measure
- razor blades
- sos pad
- scissors or wire cutters
- power drill and bits (optional)
- cable ties
Supplies:
You can start by purchasing the eggcrate from lowes or a similar store. Just go to the dry wall section and look for light diffusers. A store associate should know where this is. Also, while you're there go and get some cable ties. I found some pond foam there in the pond and outdoor section. If they don't have any there, go to menards and the have "Great Stuff Pond Foam". That stuff is actually cheaper and better than what Lowes had.
- polished river rock (made for fountains or koi ponds)
- playground sand
- pond foam (like insulator foam, but made for ponds)
- eggcrate (it's actually a light diffuser for drop ceilings)
- PVC tubing (optional for hiding the heater and water filter)
- tupperware (optional for hiding the heater and water filter)
- plexiglass (again, optional for sealing the back on the rock wall)
- JB waterweld (by far the most expensive)
Then you can go to Hobby Lobby or some other hobby store and purchase some fountain rock. It's pretty cheap and I haven't seen any change in PH as a result from using this rock. If you want larger rocks or something else besides this type of rock, ensure it's not limestone.
Now, measure the inside of the fish tank. Don't measure the outside of the tank or use the tank dimensions specified on the box or tank. You want to make sure the rock wall can fit between the lip on the tank lid. Mine really cut it close and if you look at my images, the rock wall doesn't completely fit the back wall where I have it leaned up against. Take any other measurements as needed if you want your water filter and tank heater to sit within the rock wall.
Take those dimensions and use them to cut out your eggcrate. I used regular scissors to do this, but it will hurt your hand after a while. If you want to make a cave, make sure it doesn't stick out too far, because you have to remember that you will be adding layers to the eggcrate when you start putting rocks on and pond foam. The shelf I put on mine was also framed out with eggcrate. Again, don't go too far out with the shelf, because the foam and rocks really put a build on the whole structure.
Use the zip/cable ties to attach the eggcrate framework together. Done tighten these too much, otherwise the eggcrate either cracks or bends to an undesired structure. Once that all gets pieced together, I took my tank lid off and set the eggcrate structure in the aquarium to see how much clearance I had and just to get a feel with how everything will look.
After you're good with the eggcrate design, go outside or in your garage (need ventilation, but also temperature above 60°F) and lay the eggcrate flat on the ground on some cardboard. Start placing your rocks on the eggcrate in random places or however you want it. Make sure there is some space between each rock for the pond foam to expand. I left about a quarter to half inch between each rock. The pond foam comes with a tube or hose that you attach to the nozzle. Shake it well and slowly pull the trigger to release the foam onto the eggcrate, but between the rocks. Don't worry about making a mess, it comes off the rock and can be cut down to size once it dries. Also, you don't need to completely fill the gaps with the wet pond foam when you're putting it on. This stuff will triple in size when it cures. If you mess something up, you can always let it cure, cut out the mistake and start over on the section. I had to come back countless times to fix something with pond foam.
The foam dries and is ready to cut within 24 hours. You really don'e have to cut the foam if you don't want. Some people prefer the bulging look of the foam. For my look, I cut it down between the rocks with a razor blade. Make sure you have like 5 blades for this, because they dull quickly. Pull off any foam on the rocks and use the sos pad to clean things up a bit.
For inside the cave, I put a layer of pond foam on and cut it flat with a razor. Then I squeezed a tube of silicone over the flat surface of the pond foam. Then I used the same type of aquarium gravel I have on the base of my tank to spread over the wet silicone. This holds the gravel on pretty well and is aquarium safe. I did the cave in sections, so it was easier for me to silicone and gravel the walls. I did the same thing for the rock shelf surface if you look at the images. I notice it grows a lot of algae in between the gravel on the rock shelf, but my chinese algae eater loves it.
View attachment 152564
View attachment 152565
I use the dremel to sand down the foam in some sections, but limited my use because I kept hitting the rocks with the dremel bit. The dremel was most helpful to me when I was sanding down the pond foam on the rock shelf. After everything was foamed and felt solid, I cut out pieces of tupperware for the inside chamber where the water filter sits. I used JB waterweld and silicone to seal the tupperware walls inside the water filter chamber. The JB waterweld was applied before the silicone. If you want to seal the back of the rock wall like I did, you can go to menards or lowes and get a sheet of plexiglass cut to your specs. I recommend finding an alternative to plexiglass if you want to do this cheaper. The sheet I bought was $30. I sealed the plexiglass to the back of the rockwall with silicone. Also, I installed my air pump tube inside the rock wall to hide the tube.
View attachment 152562
View attachment 152563
Ok, getting this far seemed very extensive. I did a lot of research to find the final layer to put on the rock wall. Essentially, I ended up going with JB waterweld because the manufacturer said it was aquarium safe, drinking water safe and people who have salt water tanks use it for their reef rock walls. So everything up to this point was fish safe, so I didn't want to ruin my whole project by layering something on the front that kills the fish. The JB waterweld is like a putty and each stick is $5. I had to buy around 20 sticks to cover my rock wall for a 20 gallon tank. The part I liked is that you can mold the putty around the rocks and other structures. While the putty was wet, I dumped playground sand on top and applied pressure to the putty area. This gave the final layer a rough grout look, which satisfied me. Also, the putty is super light, but messy and sticky to use. The biggest downside was how quick it dried. I had to putty the rock wall in sections because if I went ahead and putty half the rock wall at once, the playground sand wouldn't stick to certain areas. One alternative I saw besides using JB waterweld was using a marine 2 part epoxy and apply it to the pond foam areas and then throw some sand on top. However, the manufacturer of the epoxy states the product isn't fish safe. In that case, you would have to use something like Shields All to layer on top of the epoxy, which costs 40 dollars just for the Shields All.
Last step was drilling out the holes for the water inlet where the filter draws water in. I drilled holes for the water heater chamber as well.
Thanks! That is an awesome explanation. Gives me a good idea on how to do mine if I find the time. Anyway excellent job on yours. If you do anymore projects like this please let us know.
thursyanna
Aquarium Advice Freak
Your rock wall looks awesome!!! I love it!!
Morrowboarder
Aquarium Advice Apprentice
- Joined
- Nov 10, 2012
- Messages
- 31
I'm glad everyone likes it. Right now, I'm working on a co2 system for plants. Might go the yeast route since I do a lot of beer brewing anyway. I even made a DIY drop checker, but I'm unsure it's working properly.
Tetra1990
Aquarium Advice Addict
This is amazing!! Way to go.
Hholly
Aquarium Advice Addict
Very cool!
Similar threads
- Replies
- 5
- Views
- 387
- Replies
- 4
- Views
- 476
- Replies
- 1
- Views
- 394
- Replies
- 16
- Views
- 502
- Replies
- 5
- Views
- 377
