1/4 DIY, 3/4 purchased co2 system

The friendliest place on the web for anyone with an interest in aquariums or fish keeping!
If you have answers, please help by responding to the unanswered posts.

libbyb

Aquarium Advice FINatic
Joined
Sep 11, 2010
Messages
649
Location
From Baltimore, now in New Jersey
Let me start off by saying that the mechanical process of setting up and running a complete co2 system eludes me. I am confident in my ability to learn it and I think you guys would be the best teachers.

I understand the cycle of plants and photosynthesis and the exchange of gases (it's been many years but I still remember some of it). My concern is HOW to make my planted tank better by supplimenting my tank with co2.

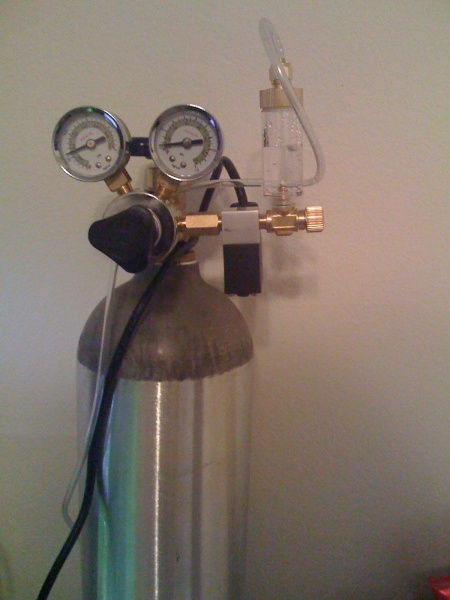
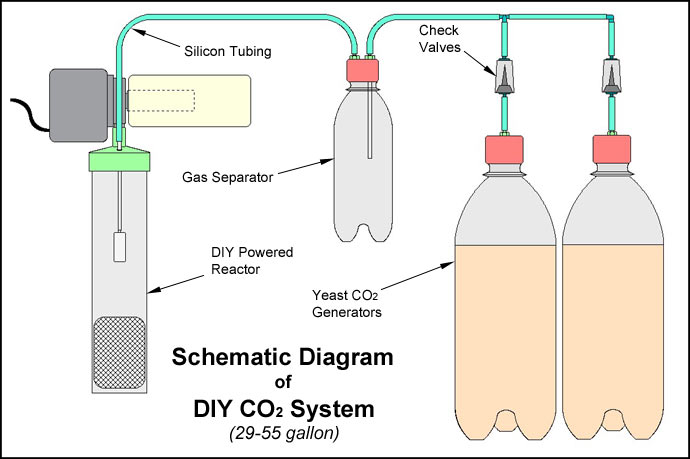
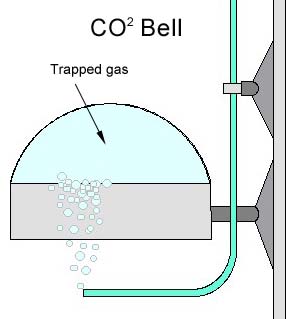
Before we go into the quantity and quality of co2, I want simply to put the parts together. I don't know what the parts should be, but I'm positive that I can use a sugar and yeast method and replace the co2 bottle. I have a feeling that's about all the DIY I can handle at this point. Mainly because I am unfamiliar with the "machine/physics" as it is supposed to work.

BIG FACTOR: money. Period.

I have no doubt I can purchase parts online at various sites. (I'm good at shopping) but I don't know exactly which parts are necessary, which are nice to have and which are a ploy for LFS to sell more.

My tank is 55g. Currently planted and stocked.

I hope you have some feedback so far. Thanks! :confused:
.Thank you.
 
Plants need carbon to grow. CO2 is a source of carbon. That's the short and simple answer.

DIY CO2 is pretty simple to set up, but pressurized is cheaper in the long run.

Here's the DIY CO2 setup I used:

Supplies:
- One 2L pop bottle with cap
- One 20oz Gatorade bottle with cap
- One roll of duct tape
- Air line
- Cheap bamboo chopsticks

Tools:
- Scissors
- Pliers
- Drill or something sharp to auger holes in bottle caps. I used the awl on my multitool.

1. Drill a hole in the 2L bottle cap. Make the hole slightly smaller than the OD of your airline. This will help make gastight seals.

2. Drill two holes in the Gatorade bottle cap. Space them apart as far as you can without drilling into the side of the cap. Also make these holes slightly smaller than the OD of the airline.

3. Stand the 2L and the Gatorade bottles upright on the floor next to one another. Duct tape the bottles together so they both touch the floor.

4. Cut a 10" piece of airline. Cut both ends on a diagonal to make it easier to pull through the cap. Pull one end through the hole in the 2L cap and the other through one of the holes in the Gatorade cap.

5. Cut a piece of airline to reach from your bottles into your tank. Cut the end diagonally and pull through the remaining hole in the Gatorade cap.

6. Cut a short piece of bamboo chopstick and jam it in the end of the airline that goes in your tank.

You've just finished building your own yeast-based CO2 generator. The yeast-sugar mixture goes in the 2L. The Gatorade bottle acts as a purge tank, catching yeast mixture overflow. The chopstick is a cheap diffuser. For a 55g, you'll need two or more 2L to generate any noticeable CO2 levels. You can add check valves if needed and it wouldn't be hard to make a better diffuser or reactor.

Mixture Ingredients (Fills one 2L):
- 2 cups sugar
- 1/8-1/4 tsp yeast
- warm water

1. Mix your yeast in a cup of warm water to activate it. Set aside.

2. Pour your sugar in the 2L bottle.

3. Fill the 2L with warm water almost to the top. Leave enough room to add your yeast solution. Cap the top with your palm and shake to dissolve the sugar.

4. Add your yeast mixture and shake the 2L again.

5. Reattach the reactor cap.

I was able to get 2-3 weeks of decent CO2 production in my 20L using this setup and mixture. It wasn't constant, but the plants grew well and I had much less BBA.
 
Pressurized = a co2 tank (looks like a diver's tank) with a regulator, needle valve, solenoid.
Looks like:
19738-albums313-picture2166.jpg


DIY (Do it Yourself) = build a pressure vessel out of a plastic bottle (soda or juice bottle) and use a yeast/sugar mix to generate CO2 (yeast gives off CO2 as a by product from consuming the sugar). No pump is involved. They are both technically "pressurized" but in the parlance (dude) of AquariumAdvice and the hobby in general, pressurized refers to a co2 tank/regulator setup, where as DIY refers to a yeast generator.

Here is a simple schematic/example of a DIY system as described above (note the "reactor" is not a requirement. The chopstick method will work fine):
bigdiyco255.jpg


and an example of what it might look like once built (the grey bottle on the right is a commercially available DIY vessel--big time waste of money. Plastic bottle is better (bigger) and free):
19738-albums313-picture2026.jpg
 
The CO2 flows through the airline into the tank. Some people pipe it into a powerhead to diffuse the CO2 into the water. Others use reactors that increase the time a CO2 bubble is exposed to the water. Others simply use an airstone to break the CO2 into little bubbles, but this isn't the most efficient way.
 
Thank you! I appreciate your patience. I'm a visual and a hands on kinda girl and the only time I have to get on the computer is when the house is asleep or I'm at work. (I wish there was a tank here. I work at a dentist's office and dentist offices and aquariums are a magical combination!)

I don't know anyone around here with a planted tank with co2 so that I can actually look at where the exit of co2 from the end of the tubing goes directly into the water. I do have a small pump for my 18" airstone strip. Darned if I'm at work and don't remember the size pump. It only has one male outlet for the tube that connects to the airstone. Wouldn't it need 2? How does the co2 enter the water?
Again, thank you for your patience! :sorry:
 
Ther are no pumps involved. It works by pressure. You have co2 in an enclosed space. It has to leave the container as pressure builds (will move to area of least resistance.). So you run the tubing into your tank and hook it up to a co2 glass/ceramic Diffusor, an airstone, a co2 reactor, etc so that the co2 runs out the tube, and is dissolved into your tank water. Does that make sense? Will post some pics of this when I get home I'd no one has chimed in.
 
Alright so here is how you get CO2 dissolved into your tank.

Take this diagram...
bigdiyco255.jpg


on the left side of the image is the first option, a CO2 powered reactor. Takes up some room, kind of unsightly... not too many people use this method.

Second method is to build an inline co2 reactor. This is a good method, and popular if you have a canister filter. Basically, it would be hooked inline with your canister filter so all the co2 gets dissolved outside the tank. You get almost 100% diffusion (very efficient) and it keeps unsightly equipment out of the tank. You can also buy these commercially, but they are really easy to make, and cost only a few dollars to DIY, vs. a lot more to purchase off the shelf.
diy6.jpg

Here is Rex Grigg's step by step instructions on how to build the reactor pictured above:
How To Build A CO2 Reactor | Build a Regulator | Test Kit

The next option is to use a CO2 ceramic/gass diffusor. This is basically just a small attachment that you then suction cup to the inside of your tank. Small tiny bubbles are formed as the pressure from your system "squeezes" CO2 through the ceramic. They are not 100% efficient though, as some of the tiny micro bubbles will make it to the surface, escaping in the air, and thus not dissolving in your tank.
56b7_1.jpg

You can see the little micro bubbles coming out of the top of the disc...


The next method is called "the mist method". I used this for awhile. It is imo the BEST method for plant growth/co2 saturation, but it has a lot of drawbacks. It can be noisy, and it causes a lot of turbidity in your water (the water will look cloudy from all the bubbles). The basic premise is that you position an airstone or glass/ceramic diffusor directly below the intake for a powerhead, which then sucks up the co2 bubbles, where the impeller chops them up into even smaller tiny micro bubbles that end up getting blown all over your tank. The bubbles are so small that the current keeps them from rising to the surface for a long time. As an added benefit, some of the co2 will get trapped directly under your plant's leaves where they can directly absorb the co2 during photosynthesis. My plants absolutely LOVED this method. Unfortunately, water clarity suffered. No real photos of this... just imagine the glass/ceramic diffusor pictured above situated directly under the intake of a powerhead... and lots of little tiny bubbles in the water column...

There are also lots of inexpensive ways to do this... but they can also be inefficient. You can just put a 70 cent airstone on the end of the co2 line and let it bubble in the water. Bigger bubbles means less gets dissolved into the water. Other solution is to use a "bubble ladder". The co2 flows up the ladder, and you can see the bubbles get smaller as they make their way up the ladder (as the co2 dissolves). However, a big ol' bubble comes off the top that then goes straight into the air (very inefficient). (see picture below)
19738-albums313-picture2165.jpg


Kind of blurry, but you can see the little co2 bubbles "climbing" the ladder.

Yet another way: A home made bell diffusor. Just cut the bottom off a plastic bottle, and attach it upside down in the tank with some suction cups, etc. Bubble the co2 line into it, and co2 gets trapped in the bell. Some co2 will dissolve in the water since it is trapped under the bell... however, this is pretty unsightly in a tank, and also inefficient.
bell.jpg

I am sure there are countless other ways people have used, and probably even more that haven't even been thought of yet. The key is whatever works for your building skills, your time, and your budget. CO2 itself is cheap (whether pressurized or from yeast) so the process doesn't need to be 100% efficient. However, the more you get dissolved in the water, the more your plants are going to thrive (to a point of course... don't want so much that your fish suffocate!).

Hope this helps.

Good luck, and let us know if you have other questions.
 
Wow, you are good. Once I decide which diffusion method on, how do I make sure I'm not over doing it? That's what a bubble counter is for I assume. If I do everything DIY, how do I turn on and off the co2?
 
You dont thats the problem, when i turn the lights out the plants need oxygen and dont need co2 so at night i turn the bubbler on only at night though because a build up of co2 can kill your fish!
Also have fun with this i i did!
 
well... there are 2 basic ways to measure CO2 (both based on the same principle). When you inject CO2 into water, it lowers the pH (don't worry - it isn't the same as moving the pH with chemicals or buffers... the fish don't notice this kind of pH swing). So, if we know the amount of buffers in your water (using a degrees Carbonic Hardness measurement (abbreviated KH), and then we know the pH of your tank, we can use a chart to extrapolate how much CO2 is in the tank. Ideally, we want somewhere between 20-40 ppm CO2 in our tank. I always shoot for 30ppm. Below is what the chart looks like:
ph-kh.jpg


So, based on the chart, lets say you have a pH of 6.8, and a dKH (degrees carbonic hardness) of 7. That puts your co2 right in the sweet spot of 34ppm. Hopefully you already have a pH test kit... Any pet or aquarium store will sell a KH test kit for 5 dollars or so.

Now, for the ingenious, often preferred way to test your CO2: An aquarium drop checker. It works on the same principal I described above. It measures pH, and indicates a certain color based on how much CO2 you have in the tank. You fill it with water of a known carbonic hardness (KH), and a few drops of pH indicating solution. The best value is 4 degrees KH water (you can make this using baking soda and distilled water). With the drop checker filled with 4dKH water and some pH indicating solution, it will always let you know at a glance where your CO2 levels are at. If the solution is blue, your pH is high, and it tells you the CO2 is less than 20 or so PPM. If it is dark green, it is around ~25ppm. If it is lighter green, it will be around ~30ppm co2. If it is yellow, than you are above 35 or so ppm. The drop checker pictured below is reading a nice green color, so the CO2 in this tank is just about perfect. Here is what a drop checker looks like:
drop_checker.jpg


Now, mixing up the 4dKH solution (baking soda and water) can be tricky, as it requires a pretty sensitive scale and some very small measurements. The drop checker will function less accurately, but still give you an idea, if you just fill it with some tank water (the directions that come with the checkers tell you to do that anyway... but the consensus based on scientific fact show that the most accurate way to use it is to use a specific water/baking soda solution that is measured at 4dKH).

The drop checkers you can get on ebay (search for "CO2 drop checker) for the best price. They range in price from a rediculous $40 for an official ADA drop checker, to a chinese knock off that looks almost the same (and definitely functions EXACTLY the same) for $5-6. Some folks are handy enough to actually build their own for next to nothing, with things laying around the house.

The drop checker is great because it will always let you know how you are doing with CO2, but it does lag just a bit. It will be about 15-30 minutes behind what is actually happening in the tank, but that is close enough to give you an accurate picture of what is going on.

Now, as for DIY, you do not shut it off, it is a continuous process. This means when the lights go out and your plants are not using CO2, CO2 levels will rise in the tank. You definitely have to watch this. If it is getting too high for comfort, you can set an airstone on an airpump opposite the timer for the lights. This way, the bubbles will help get rid of the co2 in the water while the plants are not using it. During the day, the air needs to be shut off so that the co2 stays in the water and your plants use it. It is all going to be based on a little trial and error, and some testing, tinkering, and adjusting. It sounds intimidating at first, but you will get the hang of it quick, and once you figure out what is working for your tank, it won't require much adjustment.

Anyway, sorry I wrote you a book. Let us know if you have more if this spurs more questions!
 
You're amazing. It does sound intimidating but I am up to the challenge. My LFS's are petco and petsmart and they don't have kh or gh test kits. I'll have to get something online. API good? I do have the API master and can measure my pH, is that enough?
Jason, what kind of diffuser do you use?
 
The API should work but the results are off from my Hagen kit. Maybe it's too old.

I am currently using the red sea reactor. A glass diffuser, hagen elite mini, intake of hob filter, pvc inline reactor or bubble ladder all work.
 
You said an air stone is ok? Will it clog up after a while? In a 55g, should I have a few little ones, 1 big one? I saw one today and it said "fine" Does it matter what grit it is?
 
An airstone is a really inefficient way to diffuse CO2, especially in a tank that large. It will work mind you, but there will be definite better ways to do it. You could try it and see what kind of results you get, and if you don't seem to be reaching or maintaining the CO2 levels you are looking for, you could try a different method.

The finer, the better. The smaller the bubbles, the more surface area of the gas is touching the water, allowing for more diffusion.

As far as breaking down, yes this will happen after awhile. Regular airline tubing, plastic check valves, and airstones will all need to be replaced every year or 18 months... CO2 is corrosive.
 
Hey!!
I finally got my system going but I'm getting only 1 bubble about every 2-3 seconds. Here's the recipe I used for 2-4L soda bottles:
4 c sugar
1/2 t yeast
1/2 t baking soda

Any ideas?
 
Less sugar (maybe 1-2 cups) less baking soda (1/4 tsp) and more yeast (1tsp). I would try that and continue to adjust for what works for you.
Also did you "activate" the yeast before you put it in the bottle? Take the yeast and a little bit of sugar and put it in a cup for 20 mins with warm (not hot) water. This will get the yeast going aerobically before you seal them off in the anaerobic environment.
 
Back
Top Bottom