DIY Hood for 12 gallon with moving moonlights, sunrise/sunsets, and cooling

The friendliest place on the web for anyone with an interest in aquariums or fish keeping!
If you have answers, please help by responding to the unanswered posts.

corrado33

Aquarium Advice Freak
Joined
Feb 25, 2010
Messages
478
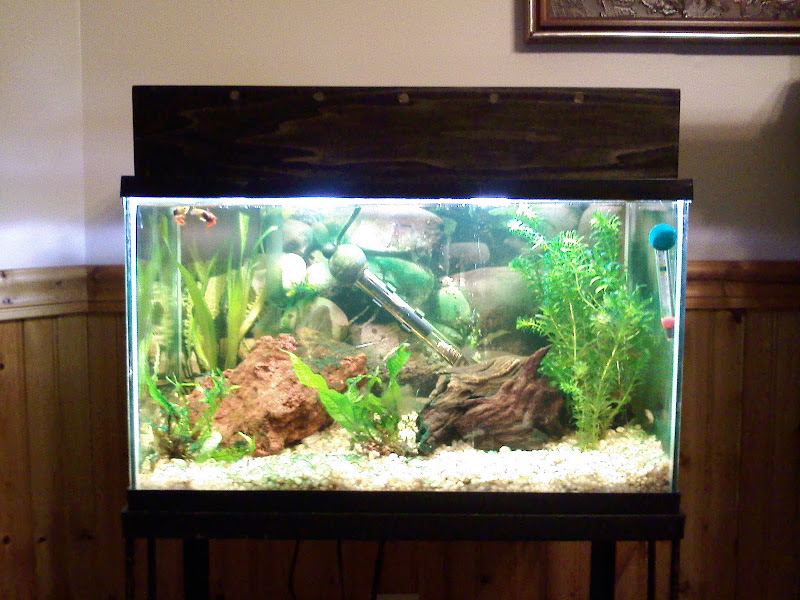
Well, it's about time I made a build thread. It's not done, but it will be in the next couple days. Here is that I have done so far. I used poplar wood from lowes, with "Ebony" stain and "Semi-Gloss" polyurathane. It fits together very well I think. It's not perfect, but it's better than most things I make.

Here are some pics so far.

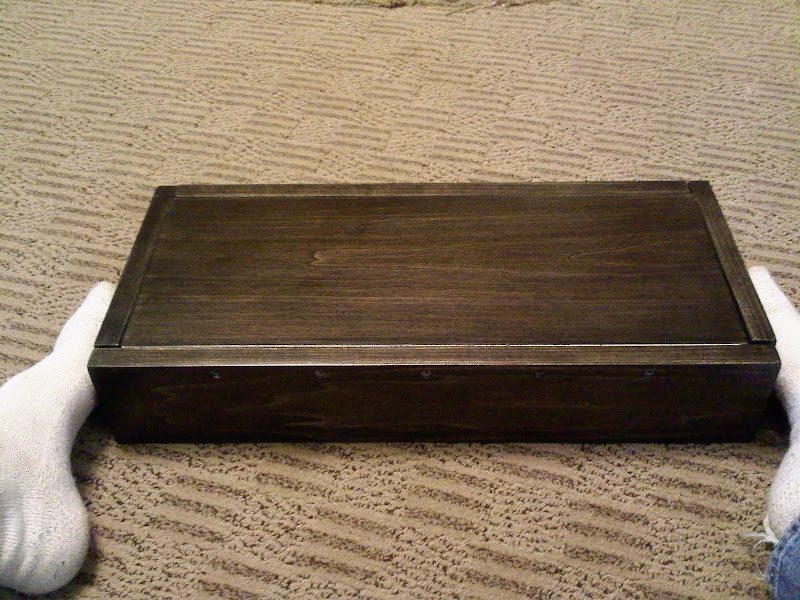
Closed, with my feet holding the sides (they bow out a TINY bit, but the rim of the tank will hold it in place. It's build to sit down in the rim of the tank obviously.
0618001554a.jpg


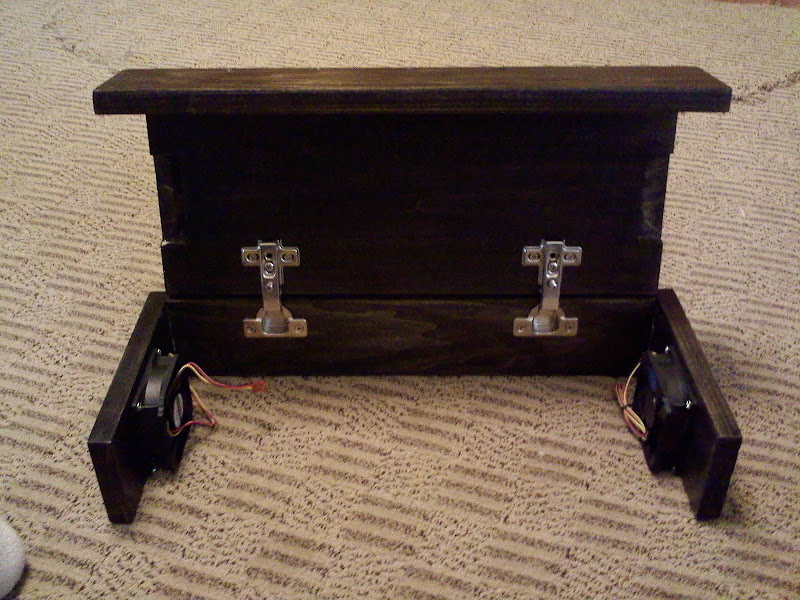
Open, I used cabinet hinges. Notice the fans.
0618001554.jpg


Holes in side for fans. This was a pain to do without a drill press...
0618001554b.jpg


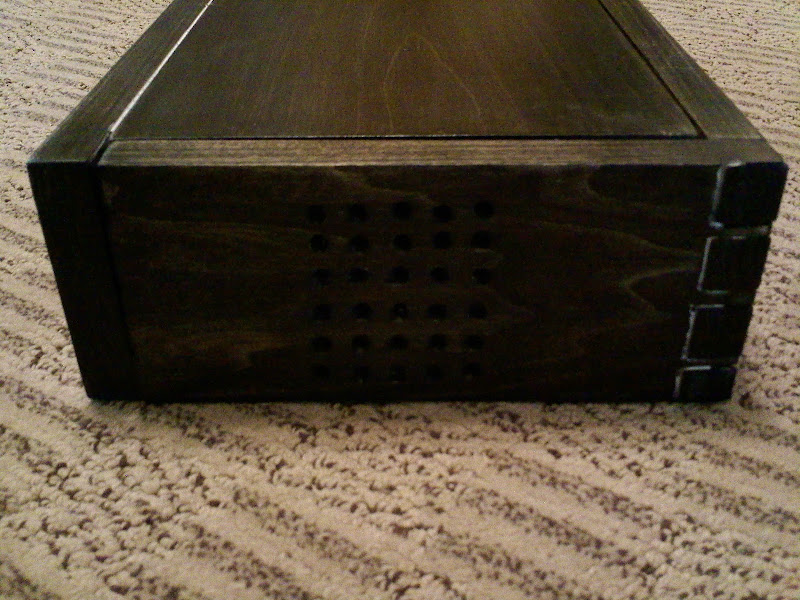
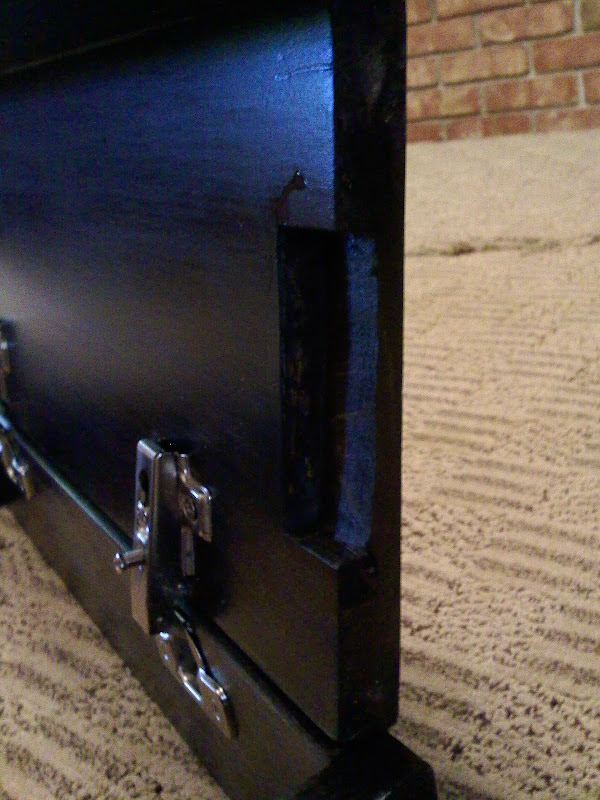
Notches for the fans. They were a bit tall. This would have been easy with a router, if I had one. I dremeled the thing out, so it's less than perfect.
0618001555.jpg


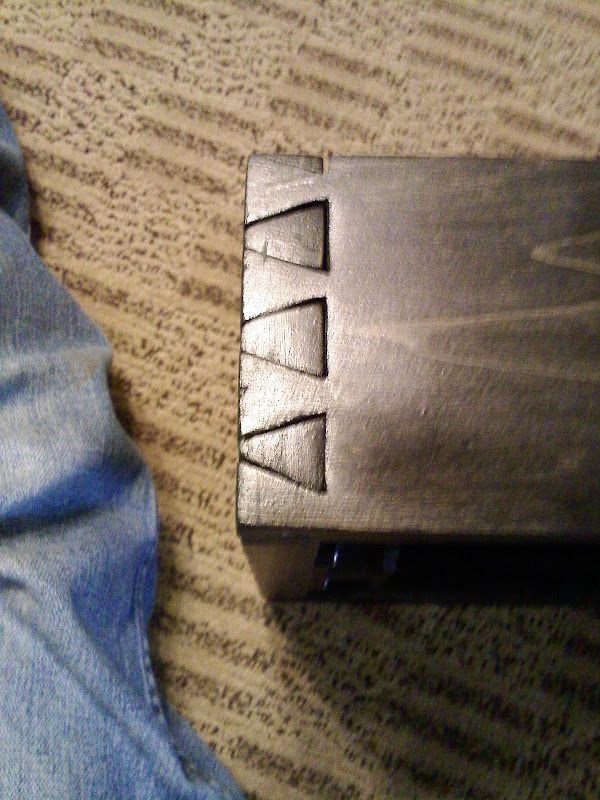
This was my first attempt at making dovetail joints (Ever). I did them by hand, and I think they turned out alright. They sure as heck hold the wood in there, although I should have made them the other way, so the wood couldn't be pulled forward. Oh well, they look cool. I HATE butt joints, I always manage to screw them up.
0618001556.jpg


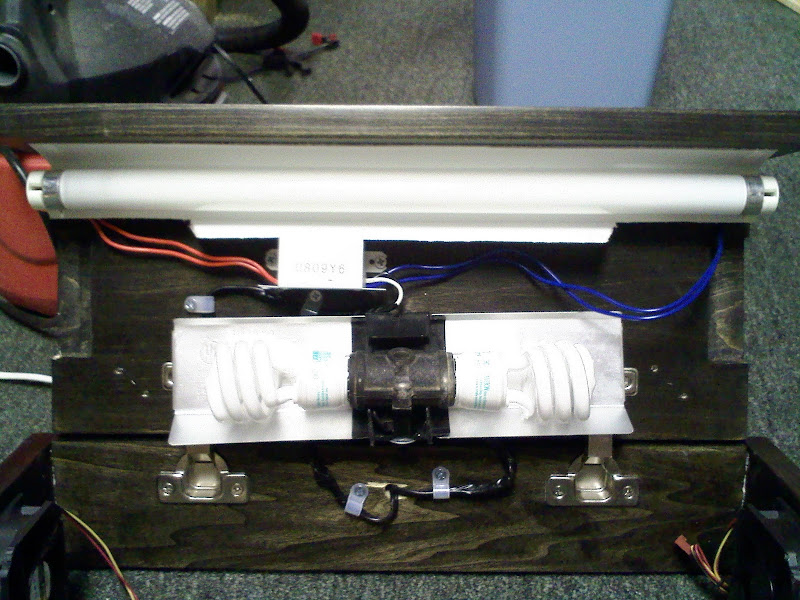
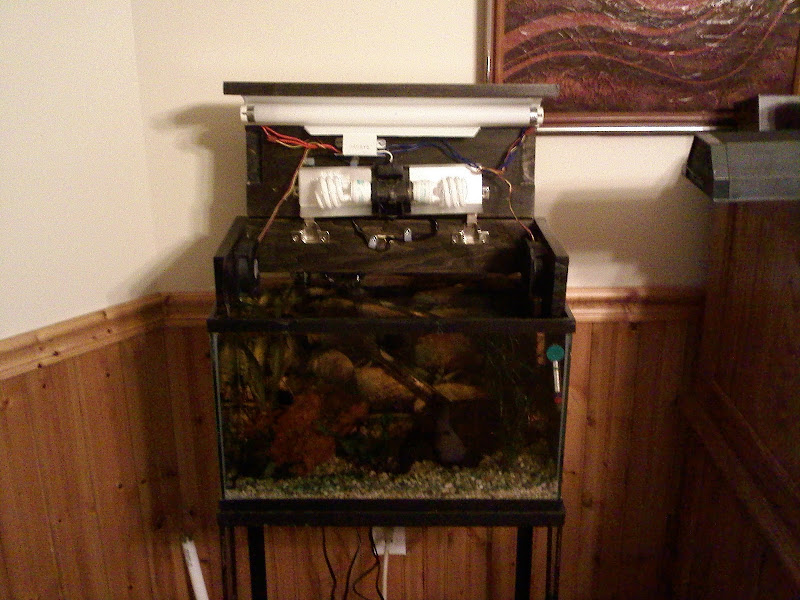
The thing still needs to be sanded once, and some other little things need to be done. You can't see it on the tank cause the filter is in the way (one of the things that needs to get done) ;) Also, the electronics are being built right now, so they'll be in in a couple days. I'll keep ya updated.
 
That's really cool! I wish I could build stuff like that. :)

You mentioned that the canopy is made to sit down in the frame of your tank. Are you worried at all about having the fans so close to the water?
 
That's really cool! I wish I could build stuff like that. :)

You mentioned that the canopy is made to sit down in the frame of your tank. Are you worried at all about having the fans so close to the water?

Thanks! I'm not really worried. If you're thinking that the fish are going to jump up and make sushi slices, well I'll probably put a screen over the intake so that won't be possible. If they get wet? Well, they're only 2 bucks online so I'm not that worried about it. Also, I was debating making a slot for a piece of acrylic to slip in to, but I haven't decided yet.

As for the lighting. I'm basically cannibalizing two aquarium lights that I have now, as they are both incomplete hoods. Ones a normal 18 inch fluorescent aquarium lamp, and the other is a light fixture that holds incandescent bulbs, but I've put two CFL bulbs in it (daytime ones). Actually I just bought the CFLs today. The main reason I installed the fans is because the old bulbs raised the temp of the tank by 5 degrees!

Anyway, really the lighting is open ended. I'll screw the mounts in, but it's not like I can't change it in the future. I'll probably end up just puttin a few 18 inch fluorescent bulbs in there. (The 18 inch bulbs are TIGHT) There's about 2 mm of clearance on both sides of it.:D)

EDIT: For the moonlights it'll be blue LEDs, and for the sunrise/sunset, I'll just use white LEDs with maybe an orange and red thrown in there for effect. The moonlight will be dark enough that it won't bug the fishies (The LEDs will be dimmed) and the light will actually move across the top of the tank, so there will always be dark spots in the tank.

Oh and for the record. I LOVE the ebony stain. It's absolutely gorgeous. I was going to try to make the outside ebony and the inside a lighter stain, but on my first stroke of the ebony, the stain soaked across the table I was staining on, and got on the inside. I they said "Screw it, it's all gunna be black". And that's that. I'll need to make a reflector for the fluorescent bulb, that that'll be easy.
 
Love the ebony too. Cool build, I'll have to show my Dad cause he'll be doing the lighting and cabinets for my build :)
Can't wait to see the rest.

Oh, and groovy dovetails :)
 
is this for a marine setup? if so the hinges you have will rust and condensation may drip down into the tank from the hinges,rusty water and fish don't mix.I would probably open up the sides for the fans rather than holes and just fit some black grilles as I don't think there is enough holes for the airflow.But it looks good so far.
 
the holes will be enough for air flow, and i think this is for his FW tank. and there is rust in alot of water. plus they wont rust that quick unless he has insane amounts of evap..
 
the holes will be enough for air flow, and i think this is for his FW tank. and there is rust in alot of water. plus they wont rust that quick unless he has insane amounts of evap..

You are correct. I also know that the hinges ARE the weak point in the design, as they are the only thing that will rust. If I use this hood long enough, I'll simply have to replace them every once in a while. (Or take them apart and paint them with some non rusting outdoor paint).

EDIT: I just remembered, the "reflector" for the fluorescent bulb is right below the hinges, so any water dripping from them will land on the plastic reflector, which then can easily be directed to someplace outside of the tank.

On another note, I test fitted the lights today, I can't believe how well they fit. It's amazing how everything is coming together. I'm still workin on the electronics, as I can't find some of my parts (I just moved, and I still have stuff in boxes). I think I'm just going to place an order for some new stuff anyway, I really just want to get the actual lights workin so that I can use the hood day to day. The electronics are just icing on the cake, so they can be done at a later time.

Anyway, I'm off to do my last coat of polyurathane.
 
+1 to just dremel out the wood and set the fan inside the frame of the wood. those holes will burnout the fan. and well. less maintenance in the future. Id do it for both intake and out. any computer fan will burn out if its being heavily restricted. let alone the air movement would suck
 
the holes will be enough for air flow, and i think this is for his FW tank. and there is rust in alot of water. plus they wont rust that quick unless he has insane amounts of evap..

I think you'll find if there is enough restriction against the blades the fans will overheat,you need to measure the opening of the fan and have the same amount in the hood,i use these fans at work and they don't take any restrictions hence all the noise from computer fans because no one cleans the inlets this applies to fridges and freezers which use these fans.
 
Thanks for the advice guys. I think that I'm just going to leave the fans and housing as is. My reasoning is that the fans are only going to come on whenever the tank gets above a certain temp (probably 82 degrees). Meaning that they're probably never going to come on since my temp is set at 77 degrees or so. (Well, I'll probably turn them on once a day to keep them from dying from never being used) The hood doesn't cover ALL of the tank, there's about an inch in the back that is still uncovered, so I think there'll be enough airflow. It leaves more room uncovered than both of my other hoods did. Also, if something bad were to happen where the tank would REALLY heat up... (Like our A/C breaking), I'd know about it, and simply remove the hood. Honestly the fans are for the (Just in case scenario). However, like I said previously, I will probably turn them on once every couple hours (for a few minutes) to get the air moving a bit, so they won't have time to overheat.

I appreciate the advice though.

Anyway, I installed the fluorescent bulb last night, as I wanted to use the hood today (since both of my other lights are in pieces :p). It looks really good on the tank, but I haven't taken a picture yet, as I'm going to the Pittsburgh Parts-A-Rama today :) I'll have some pics tonight.
 
Update!!

Alright guys, it's finished for now. All that's left to do is the electronics, and I have a shipment coming, so those will be done soon. Basically, last night when I installed the fluorescent light, it hit the fans when the lid was opening and closing, so I took out the fans. This morning I realized that I could just move the fluorescent bulb to the front instead of the back. That's exactly what I did. I also installed the other set of lights and drilled and sealed a whole in the back for wires. I also did some wire management. The lid is about an inch and a half above the water, and the light bulbs are about 2.5-3 inches above it. Here are the pics!

Here's the lid open. Yes the CFLs are a bit crooked... stupid screw slipage...
0620002014.jpg


Here it is on the dark tank.
0620002019.jpg

0620002019a.jpg


Lid open on dark tank.
0620002020.jpg


Here it is with the lights on. (yeah I stressed the fish a bit, they'll be fine).
0620002022.jpg
 
I think it great :) Looks really good on top of the tank, and since you built it you'll learn from it so if you build another it will be even better.
KUDOS
 
Alright guys, the electronics are... well.. tested... Right now they're sitting on a breadboard in front of me lol. Basically this is what they do.

I have my desk light on, so when the program starts running, it tests the light and waits for it to be turned off (waits for the normal lights in my hood to turn off. They're controlled by a timer in the wall). Once the lights are turned off, immediately my "sunset" LEDs turn on. It'll maybe be a second (hopefully a microsecond) before the lights turn on, so it shouldn't spook the fish. Then, the sunset lights dim over a time period. Immediately after that (well, maybe after a half hour or so), the moving moonlights turn on. They move from the left side to the right side of the tank. Once they're done, the "sunrise" lights start getting brighter and brighter. (Again, maybe a half hour pause between the moonlights and sunrise lights.) Once the sunrise lights are at their brightest, they stay on until they detect light (from the normal aquarium lights). Once that happens, the cycle starts over again.

Cool. Right? I like them, now I just gotta get it soldered up and put in my hood. I'll have a vid in a few.

Here's the vid. In the video the middle green LED is the sensing LED, it's slow at sensing right now, but I'm sure I can modify the program to sense things much faster. The green LED on the right represents the sunrise and sunset LEDs (of course there will be a lot more in place of one single LED :)). The red LEDs represent the moving moonlight. There are only three cause that's all I need for my tank (and I'll still have to dim those). Once everything get's installed, the moonlight will be blue, and the sensing LED will be white, and the sunrise/sunset LEDs will be a mix of red, orange, some yellow, and a bunch of white. Oh, and as I mentioned, the moonlights are still dimmable so I can make them dark as heck if I want to (as to not bug the fish). When I say dimmable, I mean overall. Yes they dim and stuff when they move, but I'm talking about overall dimming, I can make their overall brightness much...well... dimmer lol.

Oh and, yeah, everything's pretty much light speed right now as I don't feel like waiting 12 hours for this whole process to finish... Oh, and I'll throw a lunar cycle in there. That's really simple. It's just a 28 day counter that has an overall brightness "factor". Since I already have a "factor" like that implemented, it'll be just adding one more variable. Actually, it's already done. :) (Yes I finished it between those two sentences)

EDIT: **Read the above paragraphs before you watch the video, it'll make EVERYTHING clear!**

EDIT: And I just made it sense 10x faster. It's pretty much instant now.

EDIT3: Sweet I just found some purple LEDs at radioshack. They're actually labeled UV but if they were I wouldn't be able to see them. lol They have a wavelength of 395 - 410 which is right at the edge of the visible light spectrum. I think I'm gunna use these for moonlights.
 
I am very, VERY interested in your LED setup. I've been toying with the idea of doing pretty much exactly what you did with some high-power LEDs for a planted tank. Would you be willing to share the technical details of your setup?
 
I might have skimmed over it, but what are you using to program all of this, Arduino? Also, you should just get a really thin piece of acrylic and screw it on the underside for a splash guard. Will help keep the evap and all that stuff you were worried about to a minimum.
 
I am very, VERY interested in your LED setup. I've been toying with the idea of doing pretty much exactly what you did with some high-power LEDs for a planted tank. Would you be willing to share the technical details of your setup?

Of course! Let me get it workin first :). I'm halfway through soldering everything in. I was going to make a nice PCB for it, but I don't have any etchant, so I did it all on a little project board. It's a PITA doing it this way, but it'll work. And I'm gunna make a small "Project Box" out of acrylic to hold everything, (and keep it dry).

And I'm using an Amtel AtMega8, as it's the microcontroller I'm most familiar with. (And I have a socket for it, and it works with a project board) But the programming can easily be adapted to other microcontrollers. Heck, I'll even help ya do it.

I'll also draw up a schematic on the computer when I have time.
 
Radio Shack carries little project boxes that could be waterproofed. I used their little aluminum box to make a portable fish finder last summer. I didn't waterproof it, but it could be done.

The microcontroller is where I was struggling. I haven't worked with them before, so I didn't know where to start to pick one. HowStuffWorks built a clock using a microcontroller and it cost them $200! I figure there has to be a cheaper way. I've got three tanks, maybe more, that I want to do this with, so even if the startup cost was a little higher, I'd be fine with it if the extra controllers were cheap.
 
Ha, microcontrollers are REALLY cheap. Mine cost $3. :p (EDIT: The most expensive part of this project is the LEDs) If you wanted to, I could help you with the programming and what not, since I have all of the stuff to program the microcontrollers, I could just send the programmed chip to you? We'd change the programming to whatever you wanted it to be though, as I'm sure our needs/wants are slightly different. I'm sure we could work something out. The programming is done in C, if you want to try it yourself, but you gotta learn about the "registers" and stuff to change in the microcontroller. Basically on my MCU (microcontroller Unit?), there are 28 pins. Almost every pin does 3 different things. To make the pins do different things, you gotta change "registers" or basically switches inside of the chip. There are thousands of switches, and anywhere from 1 to 20 need to be in the exact right position to make the pin do what you want.

If you want to do it yourself, I'd be glad to help you out. I've learned that I'm actually a pretty good teacher when it comes to these things. Other people really really over complicate it. I just say 'Look up what switches to change, then change them'. Of course, the whole "looking up" and "changing" are two completely different and a little complicated things, but once you do it once, it's easy. Once I learned how to program MCUs, my whole world of electronics opened up. You can't imagine what you can do with these little things.

Anyway, I've got everything soldered, but I've run into a problem. Apparently my potentiometer (variable resistor) either broke, or isn't the one I thought it was. I thought it was a 10k pot, meaning it could have values anywhere from 0 to 10k Ohms of resistance, but mine only goes to 1000 (actually 800). I used a variable voltage regulator cause that's what I had available, and I need a resistance of 2000 for it to work. So I gotta desolder the pot and switch it for another one... On a high note though, I applied power, and got regulated voltages of 15.5 and 5V. I found out my power supply isn't a regulated power supply, so I had to regulate it twice regardless. Oh, and nothing blew up when I applied power. :p
 
Back
Top Bottom