Thoughts on HOME MADE CO2?

The friendliest place on the web for anyone with an interest in aquariums or fish keeping!
If you have answers, please help by responding to the unanswered posts.

AdamsAquarium

Aquarium Advice Freak
Joined
Aug 30, 2014
Messages
273
Location
San Diego, CA
I've been watching videos on people making co2 out of yeast, sugar water in 2 liter bottles. They run them to a co2 diffuser, and that's it.

My dream is to run co2 to my tanks at a cheaper cost than a store priced system, so I saw this and was intrigued. Is it too good to to be true?

Is it dangerous?

Sent from my SM-N900V using Aquarium Advice mobile app
 
Go for it. I used DIY co2 for 2 years before I finally went pressurized just a couple of weeks ago. It's not dangerous and easy to do.


Sent from my iPad using Aquarium Advice
 
IMO yes, but pressurized stays constant; whereas DIY co2 fluctuates needing to be changed frequently.


Sent from my iPad using Aquarium Advice
 
DIY co2 is much cheaper but a bit more complicated. Depending on how you make it(Most use yeast if im correct) it can create some harmful stuff but can be avoided. Anyways, if you cant afford a pressurized, DIY co2 will cut it :)
 
I have my diy co2 set up! I have the hose running into a jar of water for now. Going to wait until I start to see the co2 bubbles pop out! I'm stoked!

Sent from my SM-N900V using Aquarium Advice mobile app
 
DIY CO2 is a bit different in effectiveness from the pressurized bottled gas through a regulator, even though it's the same gas. DIY is harder to regulate in terms of just how much gas you are adding at any one time, and you cannot turn it off at night either.

If you add up the cost of sugar and yeast to maintain CO2 year round, you'll find it's not all that cheap. If you want to do CO2 for more than one tank or a big tank, certainly the least costly method over the course of a few years is to buy the CO2 in the metal cylinders and the regulator, etc. to run it.

But, to start with, DIY is a great way to get the same basic effect with almost no up front costs. There is even a way to do it using a couple of simple chemicals, and if I can find the post I saw on this, I'll post it.

The main disadvantage to it is simply that you have to start new bottles every couple of weeks, give or take, because as the yeast ferments, it produces alcohol. {yes, some folks have tasted it and apparently it's pretty disgusting :) }. Once the alcohol level rises past a certain percentage, it kills the yeast and that's why bottles stop producing.

They also produce less and less CO2 as the alcohol level rises, so the output does drop off toward the end of the bottle's life. Some use two bottles or more, started in staggered times, second one a week after the first and so on, to help keep the gas levels in the tank more even. Using a drop checker will help a lot, you'll be able to see whether you've got enough gas in the tank to do the job.

Btw, DIY bottles won't work with commercial diffusers that are designed to work with pressurized gas cylinders. Those need more pressure than a DIY bottle can generate. But you can help them be more efficient by making sure the seal around the tubing is air tight.

Leakage is a common problem with DIY bottles. There are tiny bulkhead fittings you can get from hobby shops that work really well for this. They're not terribly expensive, come in pairs either 1/8" or 3/16". They are normally used to attach gas line tubing to fuel tanks on model airplanes and such. Model's fuel tubing is identical to our air line tubing, only it's all silicone and comes in a some nifty colours. Of course you can get silicone air tubing and it's nice, more flexible and long lasting, but regular air hose works too.

These little bulkheads give you an air tight seal for your tubing that is hard to beat. But silicone sealant, as is used for tanks, will also work. Use plenty of it for an air tight seal around the air tubing.

It's also helpful to run the gas from a DIY bottle into another, smaller bottle, part full of water, and then from the second bottle into the tank. This intermediate bottle of water helps prevent buildup of a sort of slime that sometimes shows up with DIY yeast.

So you'd have a bottle of yeast/sugar, with a tube in the cap running to a second small bottle, with two tubes in the cap, one of which is the input from the yeast bottle, the second is the tube going to the tank and diffuser setup. I'll see if I can find a pic of this, if you haven't seen it. I know some guys who have used DIY with and without this second bottle in between, and they all said the bottle in between was worth having. It also prevents any chance of accidentally discharging any of the yeast mixture or alcohol into the tank.

I'd have to look to remember the name of the little bulkheads.. but they are not hard to find Seen them online a few times, got mine from a local hobby store that ordered them for me.
 
I used DIY CO2 for about a year and found it made a big difference in plant growth in my tank.
What I found the worked well in terms of a leak free seal was a 3/8" hole in the bottle cap and silicone airline tubing. Cutting the end of the tubing at a sharp angle allows you to pull it through the hole pretty easily with needle nose pliers.
I always had an additional bottle between the CO2 generator and the tank. This served as a bubble counter and as a trap to reduce the amount of yeast from escaping into the tank.


Sent from my iPhone using Aquarium Advice
 
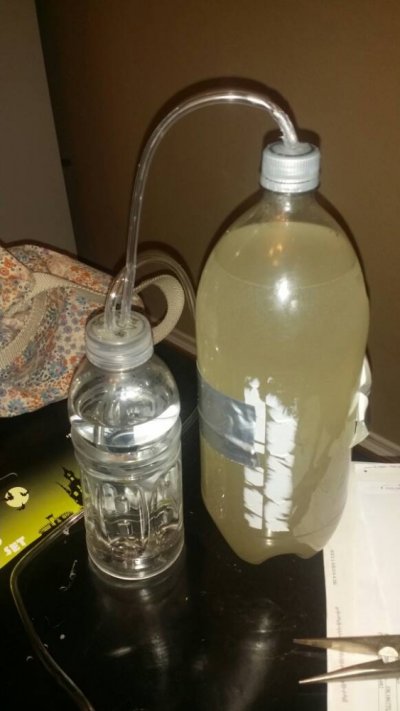
Here's the DIY set up I just put together. I took some before pictures of my sad plants. Haha hopefully we'll see some results shortly. Fortunately the pump on my tank has an airline adaptor spot so I didn't have to worry about a diffuser

Sent from my SM-N900V using Aquarium Advice mobile app
 

Attachments

  • 1414545537751.jpg
    1414545537751.jpg
    125.4 KB · Views: 55
Initially I uses 2 two liter bottles, but it wasn't putting out, so I used a Gatorade bottle and it worked. Could have been a leak in my seal, because the first seal was pretty botched and I am using airline tubing, not silicone tubing

Sent from my SM-N900V using Aquarium Advice mobile app
 
I have my co2 hooked up to my filters pump, which has an air valve that I was able to plug into and really dispersed the co2 bubbles into many small bubbles and throws them around slightly as they come back into the tank but don't stay long.

Should I find a new way of dispersing the co2 to keep it in the tank longer? Actual time those bubbles spend in my tank is around 2 seconds.

Sent from my SM-N900V using Aquarium Advice mobile app
 
Can you post a pic of your setup?
Perhaps directing the filter output down or moving the filter closer to the bottom will increase the time the bubbles are spent in the water.


Sent from my iPhone using Aquarium Advice
 
I have my co2 hooked up to my filters pump, which has an air valve that I was able to plug into and really dispersed the co2 bubbles into many small bubbles and throws them around slightly as they come back into the tank but don't stay long.

Should I find a new way of dispersing the co2 to keep it in the tank longer? Actual time those bubbles spend in my tank is around 2 seconds.

Sent from my SM-N900V using Aquarium Advice mobile app

I'm thinking about DIY CO2 for my next tank. After doing some research, I've decided on a DIY venturi reactor using a powerhead or possibly an Eheim Skim 350 if it will work. There are lots of photos and instructions out there on how to do this. Basically it's a vertical tube with downward water flow which forces the bubbles to dissolve instead of escaping to the surface. If you have a canister filter, you can just use an inline reactor, which is the same idea.
 
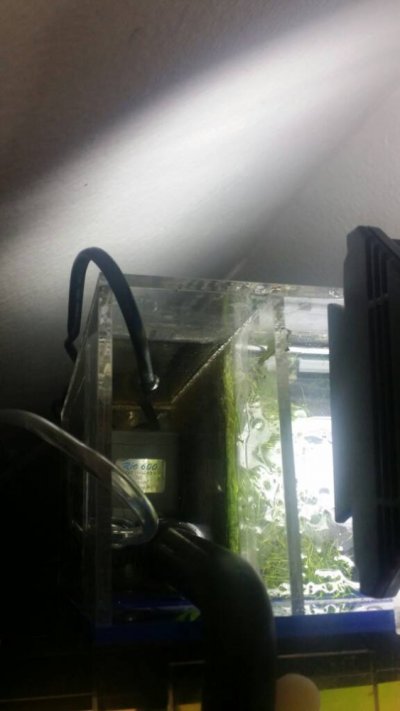
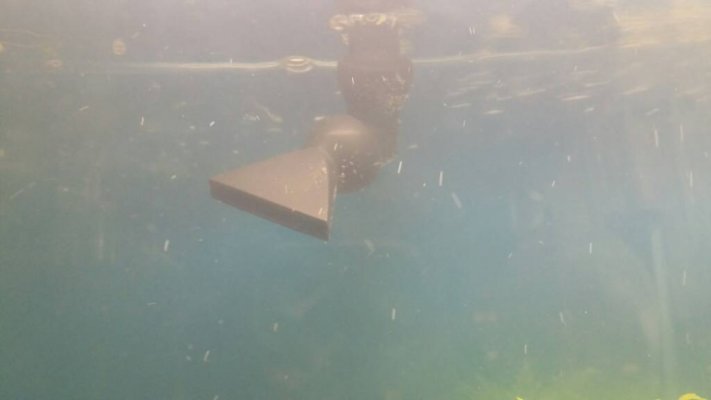
Here's a photo of the pump in my hob refugium. Also is a photo of where the bubbles come out.

Sent from my SM-N900V using Aquarium Advice mobile app
 

Attachments

  • 1414682986537.jpg
    1414682986537.jpg
    104 KB · Views: 48
  • 1414682997748.jpg
    1414682997748.jpg
    70.7 KB · Views: 42
Here's a photo of the pump in my hob refugium. Also is a photo of where the bubbles come out.

Sent from my SM-N900V using Aquarium Advice mobile app

In the second picture do you have to drill a hole in the side for the part where the bubbkes come out? I have never used powerheads before

Sent from my SCH-I545 using Aquarium Advice mobile app
 
Nope. The pump in the first photo in the refugium has a valve where you can plug the air hose into it. It will then squirt the co2 out of the nozzle just like it does with the tank water

Sent from my SM-N900V using Aquarium Advice mobile app
 
You can see the air hose going into the pump in the 1st photo

Sent from my SM-N900V using Aquarium Advice mobile app
 
So are the bubbles dissolving into the water before they reach the surface? The idea is to get the bubbles to dissolve completely. You might be able to experiment with extending or re-routing the tubing for your pump outlet until you no can longer see bubbles exiting the outlet into the tank (which would mean they are fully dissolving, instead of just rising to the surface and escaping into the air)
 
Right now they are spreading out into many small bubbles but it doesn't seem to have enough time to fully dissolve into the water. They are still rising to the top. are you saying I should get some pipe and extend the hose towards the bottom of the tank?

Or should I invest in a power head? I should mention this is a 29 gal tank TALL.

Sent from my SM-N900V using Aquarium Advice mobile app
 
Back
Top Bottom