New Tank Build: 29 Gallon GSP Adventure

The friendliest place on the web for anyone with an interest in aquariums or fish keeping!
If you have answers, please help by responding to the unanswered posts.

Mr. Limpet

Aquarium Advice Addict
Joined
Mar 9, 2011
Messages
4,505
Location
Northern California (Marin)
This is my first venture beyond FW and it's pretty exciting. My GF has been slowly getting used to my hobby and when she saw some GSP at Walmart, she fell in love with them. Althought I'd never let wally profit off me with a fish sale, it was clear she wanted me to get this project off the ground. We found a great shop 30 miles away that is one of the best I've found in our area. They have FW, SW, brackish, a good selection of plants and a knowledgeable staff, what more could I ask for. Well they did have our new Fluval EBI system at a good price, so there is that :).

With the first part done, finding a reputable LFS, it's time to get this project moving.
 
Next step was finding a tank. Initially we were going to use a 20g tank, which I knew was going to be too small, but we found a 29g tank with stand and all the accessories and then some on CL. If anyones interested in a tank decco that says "No Swimming", let me know lol.

Before I do any clean up, water testing a used tank is a must and while my leak test is in progress (1 week minimum) the stand needs some major upgrades to meet my standards.
 

Attachments

  • ForumRunner_20110404_200834.jpg
    ForumRunner_20110404_200834.jpg
    64.2 KB · Views: 307
  • 2011-04-04 18.28.49-1.jpg
    2011-04-04 18.28.49-1.jpg
    57.7 KB · Views: 311
xxwolfpackof1xx said:
congratz i cant wait till i venture into sw my only question is why no back on the stand?

Thanks wolf!

Well this is brackish, but it'll build my knowledge base for when I get to do my 29g SW at some point.

I thought that too, but decided that since I'm putting a Fluval 305 on this tank, I won't have to chop the back apart to house it. I'll do a mini thread build on beefing up the stand.
 
Mr. Limpet said:
Thanks wolf!

Well this is brackish, but it'll build my knowledge base for when I get to do my 29g SW at some point.

I thought that too, but decided that since I'm putting a Fluval 305 on this tank, I won't have to chop the back apart to house it. I'll do a mini thread build on beefing up the stand.

cant wait will be following along really wana get a start on my 10g reef but the darn RODI is the only thing standing in my way i don't want to spend all that money on one my set up for the tank its self is around 200 counting Hood lr filter but another 200 on a rodi gah its killin me 14 yr olds need more cash i tell you! lol sorry to get off topic but gl will deff be following and learning hope to see that tank up soon.
 
xxwolfpackof1xx said:
cant wait will be following along really wana get a start on my 10g reef but the darn RODI is the only thing standing in my way i don't want to spend all that money on one my set up for the tank its self is around 200 counting Hood lr filter but another 200 on a rodi gah its killin me 14 yr olds need more cash i tell you! lol sorry to get off topic but gl will deff be following and learning hope to see that tank up soon.

You could always consider buying RO water, for a 10g a inhome unit seems a bit much to me. Even if you paid a premium of $.50 a gallon, it would take a long time to reach the $ amount an RO unit would cost IMO.
 
Reinforcing the stand: First things first, break it down to its essential components. The cheapo pin and lock connectors that most of these DIY stands have are fine for books or grandma's tea. I'm not inclined to trust them with 350lbs of brackish water and GSP pets on my carpet/floor. They'll stay in for the top, but only as guides since drilling and set screws may interfere with the tanks base. The frame will get a 2x3 cage* installed and hardened as the main support structure. The base will get custom cut 2x4 insert that will be hog bolted to the cage.

* due to limited internal space, 2x3's are needed/useable. Calculations show about a 1,000lbs capacity with this design (3/1 is my standard).
 

Attachments

  • 2011-04-06 13.10.53-1.jpg
    2011-04-06 13.10.53-1.jpg
    66.1 KB · Views: 218
Aquarium/stand rebuild:

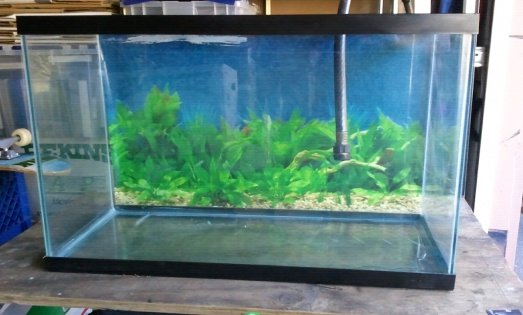
A week of water testing and the tank seems solid (Yay, no leaks), I installed the old Regent filter for some water circulation, added a cup or so of bleach to kill anything they might have had in the tank and will let it run for 3-4hrs. The trick to using bleach is rinse, rinse, rinse and then rinse again (FYI: http://freshaquarium.about.com/od/maintenance/a/bleach.htm).

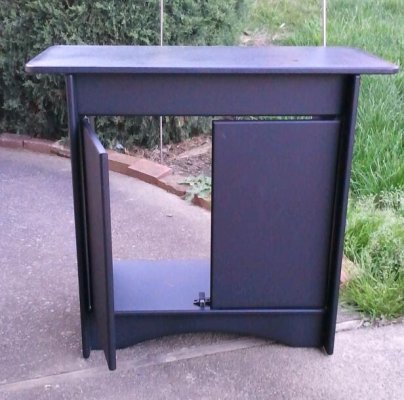
The stand is done and turned out better than expected and here's what I did to make sure it stays standing:

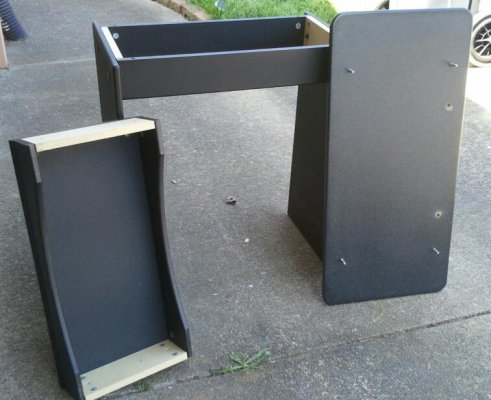
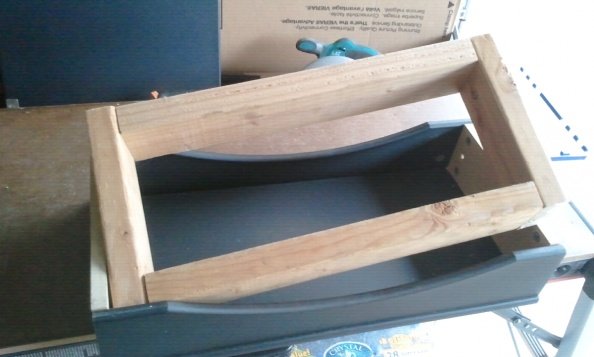
1. Broke it down to 3 main sections, top, main cabinet and base. Pics 1 & 2.

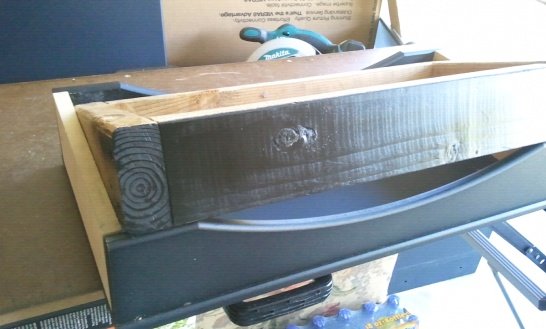
2. Bracing the base was nothing more than building a 2x4 internal cage (frame) and screwing/bolting the 4 particle board panels to it. I painted the front 2x4 black for aesthetics. Pics 3, 4 & 5.

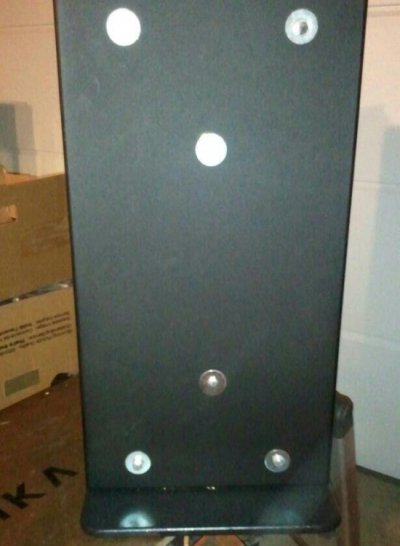
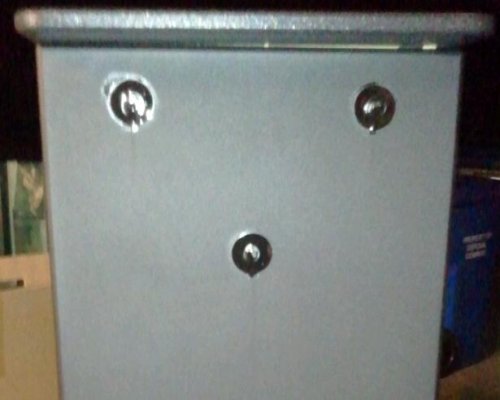
Front and back panel got decking screws to keep them in place (always drill pilot holes to avoid spliting wood). The side panels which were connected to the base with cheap bolts were replaced with hog bolts (lag bolts) flange washers and split ring washers. These bolts went into the 2x4 cage for a solid connetion (no more wobbly stand :D). Pics 6 & 7.

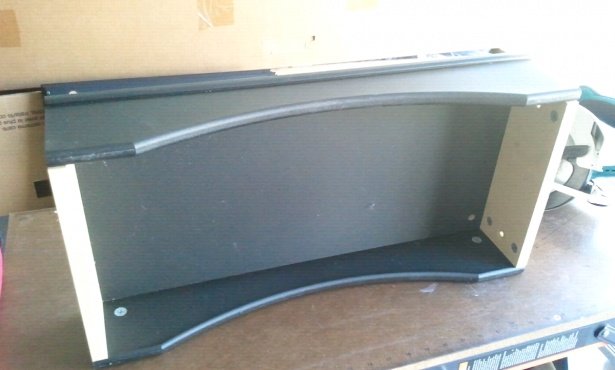
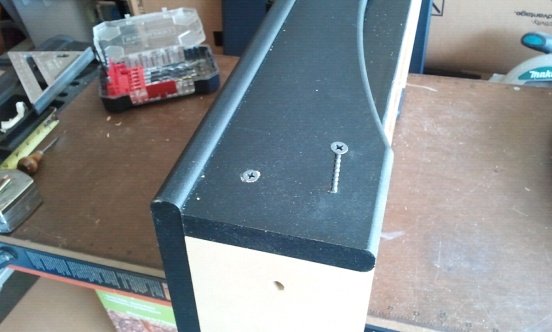
The main cabinet received the same treatment as the base. The top is using the original pin & lock system since it just needs to stay in place. Pic 8.

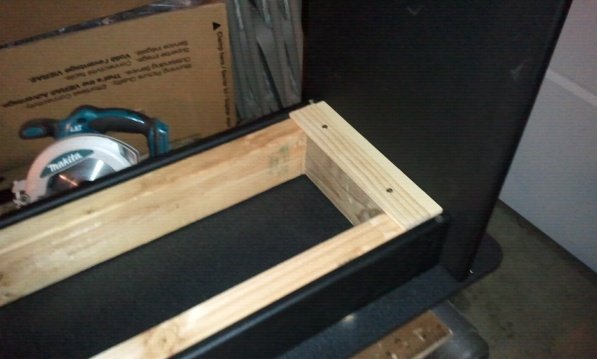
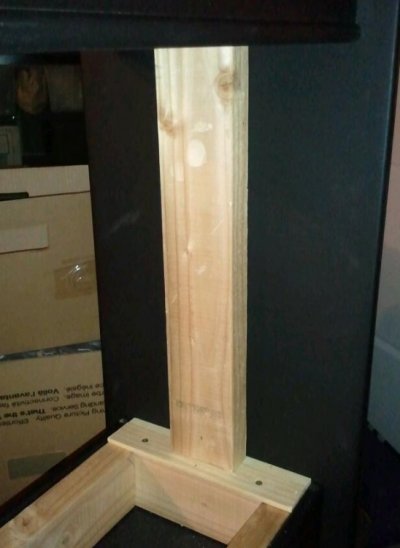
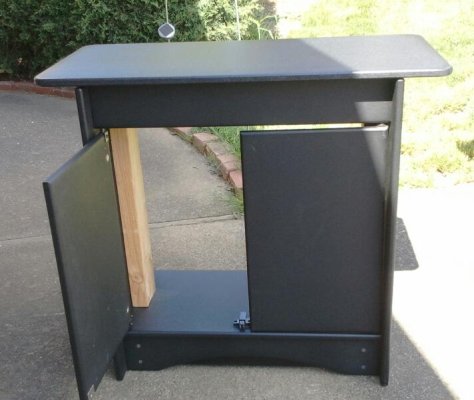
Once the base and main cabinet were bolted solid to each other, I wanted some vertical studs to aid the particle board risers in supporting the est. 350lbs it needed to hold up. I decided that any lateral shifting was not possible and using a single 2x4 centgered, wedged and hammered in (over cut 1/16") into place between the base and top 2x4 frames (cages) and hog bolted to the risers it made solid as a rock. Pic 9.

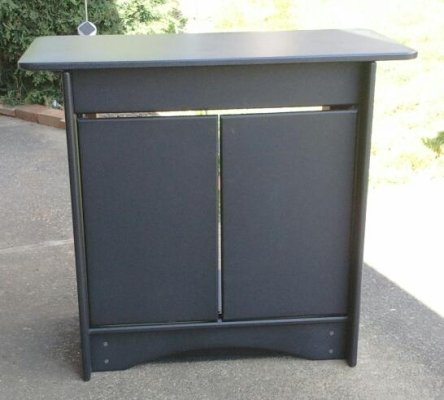
As you can see, the sides have bolts exposed, but a quick paint job and they blend in very well. The front looks clean and with the door open all you see is the 2x4 riser (studs) which I was ready to paint, but my GF declared (thankfully) was unnecessary :). Pics 10, 11, 12 & 13.

So the flimsy/wobbly aquarium stand can now support the tank it was made to with no worries. Total cost, $0 since I had everything in stock (est. cost $10-15).

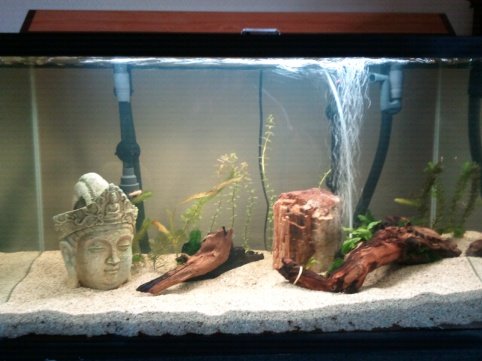
Next up, get it setup and start cycling the tank.
 

Attachments

  • 2011-04-04 18.28.49-1.jpg
    2011-04-04 18.28.49-1.jpg
    57.7 KB · Views: 217
  • 2011-04-06 13.10.53-1.jpg
    2011-04-06 13.10.53-1.jpg
    66.1 KB · Views: 218
  • ForumRunner_20110410_125728.jpg
    ForumRunner_20110410_125728.jpg
    60.3 KB · Views: 205
  • ForumRunner_20110410_125807.jpg
    ForumRunner_20110410_125807.jpg
    61.1 KB · Views: 217
  • ForumRunner_20110410_125841.jpg
    ForumRunner_20110410_125841.jpg
    62.9 KB · Views: 217
  • ForumRunner_20110410_125927.jpg
    ForumRunner_20110410_125927.jpg
    62.5 KB · Views: 196
  • ForumRunner_20110410_130015.jpg
    ForumRunner_20110410_130015.jpg
    61.8 KB · Views: 196
  • ForumRunner_20110410_130051.jpg
    ForumRunner_20110410_130051.jpg
    60.7 KB · Views: 201
  • 2011-04-09 22.57.31-1.jpg
    2011-04-09 22.57.31-1.jpg
    83 KB · Views: 206
  • 2011-04-09 22.57.09-1-1.jpg
    2011-04-09 22.57.09-1-1.jpg
    90.9 KB · Views: 200
  • 2011-04-09 23.15.26-1.jpg
    2011-04-09 23.15.26-1.jpg
    25.3 KB · Views: 193
  • 2011-04-10 11.19.32-1.jpg
    2011-04-10 11.19.32-1.jpg
    30.6 KB · Views: 200
  • 2011-04-10 11.20.14-1.jpg
    2011-04-10 11.20.14-1.jpg
    50.2 KB · Views: 227
Well the Fluval 305 canister is on order from petguys.com and I should be picking it up tomorrow (online store works out of Pet Clubs retail outlet) along with some plants (brackish suitable) and marine salt to get the salinity correct.

In the meantime, a diluted bleach wash to kill any garbage that might have been in the tank was done and I've been rinsing (x5) the tank with freshwater the past few days. Hopefully by the end of the weekend, it should be up and cycling.

For anyone interested in the unique divide between FW & SW, here's a good link on brackish aquariums that i've been using for some reference points along the way.

Introduction to Brackish Aquariums
 
Planted brackish tanks and suitable substrate seems to be a rarity and getting good info on what I can use below the sand bed isn't very clear.

Anybody have suggestions?

If not, I'm thinking of <1" of peat moss as a base and laterite mixed in/on it and PFS 2-3" deep over it.
 
Woo Hoo! Got my phone back, so here's an update on my project with some pics. let me know what you think.

Setup the tank on Saturday, added the peat/Laterite/sand bed and let it set in 5 gallons of water to settle down and put the decco and plants in later that day. Some Java fern on the DW along with some Java moss jammed in cracks here and there. I have a ton of Anacharis that got planted and floated with weights and some other plants I got at a LFS, of which I may never frequent again.

Started the Fluval 305 up Sat. evening and it runs like a champ, but a bit of rattling in the impeller was disconcerting till I found out about air causing noise, so we'll see. Sunday morning I got the cycled started and kinda over shot the ammo dosing, but got it back down to 4ppm quickly.

Cycling for 24hrs and my parameters are looking good for a planted, cycling tank.

Ammo 4ppm
No2 0ppm
No3 0-10ppm
pH 8.0 (7.8 day before)
Temp 76-78
 

Attachments

  • ForumRunner_20110418_200041.jpg
    ForumRunner_20110418_200041.jpg
    63.4 KB · Views: 204
  • ForumRunner_20110418_200132.jpg
    ForumRunner_20110418_200132.jpg
    60.2 KB · Views: 208
  • ForumRunner_20110418_200159.jpg
    ForumRunner_20110418_200159.jpg
    66.1 KB · Views: 219
  • ForumRunner_20110418_200223.jpg
    ForumRunner_20110418_200223.jpg
    66.2 KB · Views: 224
GSP update:

Got the spray bar for the Fluval 305 and it sure makes a difference in the flow of the tank. Got a massive Marimo algae ball for a really good price along with a couple other plants, so this going to be a green tank too :D.

Things in the tank are progressing well and I added some gravel from a betta tank that was heavily seeded so that will help the cycle along. It looks like I have a second source for Bumblebee Gobi's :D.

Now I just need to find a hydrometer that can read down to .000/.002 so I'll be able to start the salt conversion in a week or so.
 
I've heard lots of negative things about hydrometers. From browsing the SW forums, it appears a refractometer is a much more reliable piece of equipment. If I missed this, sorry, but make sure you take a look at dragonfish71's brackish tanks. She has lots of plants in hers. Some plants won't work, as I think you found out with the ludwigia. This looks like it's going to be an interesting build for sure. Not sure how the peat will affect the tank though. Since salt acts as a buffer and most brackish fish require hard water from my understanding.
 
mfdrookie516 said:
I've heard lots of negative things about hydrometers. From browsing the SW forums, it appears a refractometer is a much more reliable piece of equipment. If I missed this, sorry, but make sure you take a look at dragonfish71's brackish tanks. She has lots of plants in hers. Some plants won't work, as I think you found out with the ludwigia. This looks like it's going to be an interesting build for sure. Not sure how the peat will affect the tank though. Since salt acts as a buffer and most brackish fish require hard water from my understanding.

Can't find a refractometer locally so I'll order one online with a few more things I need. Plantgeek's and a couple other sites list brackiash adaptable plants so that's what the bulk of my buys have been, even got some nice looking plants at Walmart that will work and are in there now (the ludwigia will come out before I salt it). The presoaked peat is well sealed below the 2.5" sand bed and it should be fine since my fish stock won't be diggers. I have it in my EBI the same way and it works great with my pH rock solid at 7.8 like always.

Thanks for the heads up about dragonfish71 rookie, I'll check her threads out.

Flake said:
My hydrometers never worked right and always stuck. But I don't think even a refrac will read down that small.

Yeah, the few I see are cheap looking and as I convert from FW to BW I need to do it in small increments, so I want a good refratometer that can read down to .002 if possible. Plus when I get to do my SW tank I'll be covered :).
 
I'm trying to get ready to set up a brackish tank as well, now that I know the dragon goby my lfs sold me a while ago is actually brackish.. So I'll definitely be following your build so I know what to expect when I start mine. Good luck, your tank looks awesome already!
 
Reiner said:
I'm trying to get ready to set up a brackish tank as well, now that I know the dragon goby my lfs sold me a while ago is actually brackish.. So I'll definitely be following your build so I know what to expect when I start mine. Good luck, your tank looks awesome already!

We can learn together because I'm FW based and learning as I go, but baby steps, google and of course AA makes it easier in doing it right the first time :).

If your planting go to plantgeek.net and they have a section on brackish adaptable plants. It's best to start full FW and slowly convert to BW.

I know what you mean about falsely selling BW stock as FW. A LFS I thought was the best told me to forget about BW for the GSP because the owners daughter keeps hers as FW, no problem :(. Needless to say they got the last buck I'll ever spend there.

Thanks for the compliment, that's actually an old pic I should update it with a new load of plants :D.
 
Cycle Update:

Dropped 2ppm of ammo in the last 24hrs :D. Guess it pays to seed a tank with leftover gravel.

No nitrItes though.

Getting some nitrAtes, but that's from no3 laced water I put in from a 1g tank I dismantled.

pH is holding strong at 7.8-8.0, so even with the DW showing some leeching of tannins it's not affecting the pH.
 
how did you make sure your tank had no leaks? did you just fill it up for a week i think i might get some silicone glue(the kind for aquariums) and re-glue all the corners.
 
how did you make sure your tank had no leaks? did you just fill it up for a week i think i might get some silicone glue(the kind for aquariums) and re-glue all the corners.

Yep, filled it for a week, checked it multiple times a day and would tap the panels pretty good so if even a small bleeder was hiding I could make it more pronounced. So far, so good.

If you're going to redo the silicone, you need to pull it apart, clean all the seam areas really good and reseal the entire panel(s). Putting silicone over existing silicone or a leak will not fix anything.
 
Back
Top Bottom