Tim's 54 Gallon Corner -> Going Reef

The friendliest place on the web for anyone with an interest in aquariums or fish keeping!
If you have answers, please help by responding to the unanswered posts.
1st night with DIY mesh top... Cross your fingers I don't wake up with a tank full of electrocuted reef! I pushed as hard as I could on the light and it didn't budge. Leave it to my cat to figure out how...

I really need a canopy!

Here's a quick pic:
 
Thanks guys!

Please tell me your opinions:

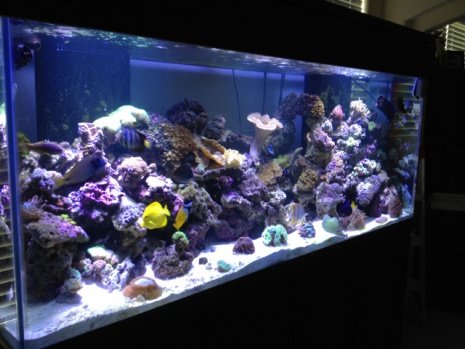
As you can see from my many FTS's throughout this thread, my reef is basically a large pile of rocks put together in a pyramid style in my tank. The corner shape of the tank biases the shape.

So I was thinking, since I've let the side glass go since I've had the tank, and its painted anyway, could I build up the sides of the reef up the side glass and fill it out more?

I was picturing like monti plate corals at different levels on the sides and other types of corals basically taking over the sides of the tank. I've never seen anyone do this, but I don't see why not.

In the extreme I was even thinking about somehow attaching acrylic "shelves" that would be hidden under rock with more corals on them.

Any thoughts?

I'm running out of room for corals and the only options I have to add more are up the sides or in the back!
 
I've been follwing your thread for a while and havent said anything until now but that sounds like a good idea. The sides are already painted and you want new corals why not go for it.
 
LOL, I guess I meant a corner tank! I guess it is the same idea! Well then, more rock it is!
 
I got my DIY ATO from BRS today along with the Tunze pump. I will give a more in depth analysis and my results a bit later.

Long story short... WOW! I almost burnt down my apartment!
 
Here is the basic rundown of what I did this morning:
Package arrived UPS in great shape. There were two separate components, the Tunze pump, and then the DIY ATO kit.

http://www.bulkreefsupply.com/store/products/pumps-and-plumbing/dosing-pumps-and-auto-top-off-systems/tunze-osmolator-replacement-metering-pump-5000-02.html

Top-it-Off Kit Premium includes:
1. (2) aquahub i-float float switches
2. 1 12V relay
3. 1 Relay Socket
4. 1 Package of Crimp Caps
5. 1 Mold-a-Holder (9 inch)
6. 1 do-it-yourself Slosh & Snail Guard
7. 1 Large Project Box
8. 1 12V wall transformer
http://www.bulkreefsupply.com/store/products/pumps-and-plumbing/dosing-pumps-and-auto-top-off-systems/top-it-off-kit-premium.html

Tools needed:
· Philips screwdriver - Medium
· Philips screwdriver – small (just bigger than eyeglass drivers)
· Drill
· Drill bits (I used 1/8”, 1/4”, and reamer bit on the tip of hole-saw because I didn’t have bigger than ¼” bit at my apt.)
· Razor blade – with handle
· Wire strippers w/ crimper
· Pliers – If you don’t have a crimper

Basically as you follow the instructions you do the following:

1. Take the long piece of white plastic (Mold-a-holder) and drill two holes in it per the directions.
a. TIP – It says use a 1/4” drill bit, however the threads for the floats are wider than that so a bigger size is necessary.

2. Cut a slit 3” up the plastic and then put them in very hot water until it turns clear and then you can basically mold it into any shape you want.
a. It is very flimsy at this point so I had to use a cookie sheet to keep it straight while bending the ends for the switches

3. The “Snail & Slosh guard” is a small jar that you need to drill holes in.
a. Again 1/4” is not big enough for the main hole for the switch.

4. Assembly of the switches onto the mount is easy – just screw it on

5. Wiring isn’t bad at all (At first)
a. Simple wire strippers and a Philips screwdriver is all I needed

6. Follow the wiring instructions to wire together the float switches, relay socket, and 12V wall transformer
a. The transformer comes with a RCA end and thumb switch that you will need to cut off

7. You will need to purchase an extension cord (GFCI if not going into a GFCI outlet)
a. This cord will only work if you are running a 120V pump
b. IMPORTANT – Tunze pump is 12V DC, if you try to run it with a 120V cord you will burn your house down! (That’s what I did before I realized and read the label after I blew the GFCI and the breaker to my bathroom)

8. Once the initial wiring is complete with the 12V included transformer you can test the relay

9. Then add your second 12V transformer or extension cord (purchased separately)
a. You will run this cord in-line with the relay socket

10. There are also tube adaptors that can be added to the float switches to cover the wiring with hose. The hose must be purchased separately as well.

Since I didn’t have an extra 12V transformer on hand, I will order one tonight and hopefully complete the project this week.
All-in-all I’ve got a couple hours into the project so far. I’d give it about (6 out of 10) on the difficulty scale.
(I have a decent amount of electrical knowledge and a degree in Automotive technology, so I am mechanically inclined.)
If anyone has any other questions, I will be happy to answer them.
 
Yes, it is a DIY ATO.

Basically Tunze has it's "Osmolator" unit which sells for $202 on BRS. You can buy the same pump and the DIY float switch kit for $76 and do basically the same thing without the electronic programmer.

TUNZE Osmolator Universal 3155 - English

That being said - You can purchase the JBJ ATO controller and the Tunze pump for $102 and with the AL pump for $97.

So basically for $20-$25 more than I spent for the DIY (before buying the 2nd 12V transformer or the extension cord, so more like $10-$15) , you can get an electronically controlled ATO and a good pump that hooks up in less than (5) minutes and looks clean and nice.

Or you can spend an hour or two putting together a DIY kit, trying to make it look decent and have no electronic controller.

My vote in now wholeheartedly to go with a JBJ controller and an aqualifter pump, as the Tunze has to be hardlined in.

I will certainly find some use out of the stuff I bought, but not as an ATO for my aquarium.
 
Back
Top Bottom