Algae Turf Scrubber (ATS) DIY build

The friendliest place on the web for anyone with an interest in aquariums or fish keeping!
If you have answers, please help by responding to the unanswered posts.
You can find it at just about any craft store in the knitting section. It's called Plastic Canvas - 7 mesh is the size, just ask any store worker. Michaels and Jo-Ann fabric carry them, or a similar store wherever you are.
 
thanks floyd, I am going to try this scrubber. I have some green slime in my frag tank and it started to grow now in my display. Thanks for sharing
 
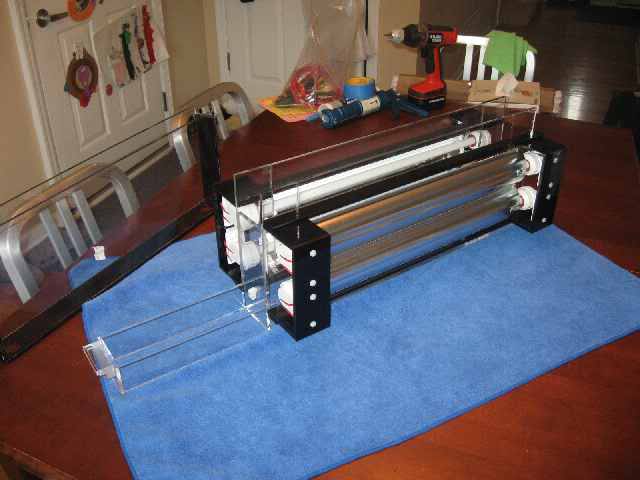
Well, I bought a table saw, acrylic blade, a router table and acrylic bit, and there's a local supplier with good prices on acrylic sheets so I suppose if you wanted me to make one for you I could do it. My opinion is that for it to be the most effective, you really have to custom design it for the specific tank setup. Santa Monica has one (the SM100) that you can order, but I don't know if he ships to the UK, I suppose he does though. The only issue that I can forsee is that the fluorescent light fixture ballast would have to work with the power over there. I don't think the lamps would have to be different, because they're driven by the ballast which converts the input power to standard output power (I think)...
 
Maybe I should look into building one myself, I have a router table called a romax which I bought from the USA and I have an acrylic bit but I'm not so hot on the cad designing part of it.
 
You need a table saw w/acrylic blade to make individual cuts. My Dad uses a jointer to shave 1/32" off each edge and make it clean looking, because he makes display cases. It also make for a very flat surface, which is important when bonding pieces to make a watertight box. The router table was our idea in place of the jointer, but we have yet to determine if it is the proper piece of equipment to use. You also need to use an acrylic bit, and my Dad broke one already. You can also just use very fine sandpaper on a hard block to take out any uneven spots along an edge, but it just takes a but longer. The table saw is the key piece of equipment. I think it would take quite a bit longer to make a functional piece of equipment without it.
 
Screen shots before cleaning over the last couple weeks:

12/29/10

img_1196025_0_600ef0c6f1d79cf9fc61dfb9545cdf75.jpg


01/06/11

img_1196025_1_058393b2e121622a35e96fc809548ee5.jpg


01/13/11

img_1196025_2_272417e870f706043ced5bfda633898c.jpg
 
img_1198104_0_80b3adb30f23fb3cb8648546f0530c8b.jpg


img_1198104_1_c1768c64a94edb361d2bd2130de1e7d3.jpg


img_1198104_2_8efd174d59eebf42fcaf7baa40a2d85b.jpg


img_1198104_3_156612344fdf59cfe97aa13e21b5d1c7.jpg


It does cut down on the excess light by about 50%, I might still add some more light blocking pieces when I get a chance. I only screwed up one part, getting the box in and out of the frame is rather a tight fit, I had to flip the one drain so that the shorter section was also on the outside. I also forgot to account for the fact that the slot pipe is sitting on top of the box, so when I have to take the box out I have to disconnect the screen first and remove the pipe before I can get the box out. Oops. I figured out how to get it in the frame with the screen partially in the box. It's not perfect. But a vast improvement. I also replaced the lamps and siliconed the lamp holders where the wiring goes in. The reflectors were getting some corrosion so I replaced them, going to use the old ones on the next tank (they cleaned up OK).

The bottom 2" of the screen is fully submerged all the time. I installed it on Saturday and went to check on it today, I am already getting 3D growth on the submerged section of the screen. I just cleaned the screen on Thursday so I was surprised to see that right away.

Gotta run, more later this week!
 
Floyd, I got mine running and it is working good. What do you do about sideways spray? Do you have full length acrylic shields or is there another trick. I am getting salt creep all over my flood bulbs.
 
Yes, if you do you have acrylic shielding the lamps then you need to install a spray blocker. I found a sheet of black rigid plastic at a local hobby store for about $2. It looks like this

img_1198343_0_9b4e035e751821371d6b96512ba5e6d8.jpg


You can cut it with a scissors and punch holes in it, then thread your zip-ties that hold your screen in the slot through the holes. I was going to do this then found out I don't need to.

PS this will also help keep algae from growing into the slot, which will cause even more spray.
 
I took this pic today (Tuesday), just 3 days after installation of the new box. I also should note that I replaced the lamps at the same time (they were 3 months old) but the growth, even from Sunday when I checked on it. It's a little hard to see, I had to turn the reflectors to get a look at the screen, but the entire bottom 2" that is submerged has filled out to the box with algae, and the middle section of the screen (out of the water) has filled out to the box also.

img_1198971_0_935645b3a4c900a7f351649d532df184.jpg


The owner also commented that the corals were much more open yesterday than they were before.

It's a little early to tell, but I would have to say that if you're going to build one of these and really want it to be the most effective, this is the way to go. There will definitely be pics taken from the next cleaning on Thursday or Friday.
 
In your aquarium, yes. On ATS, no. Growth drops off after 3 months. Standard practice is to replace all lamps every 3 months. Good thing I found a place that has them for $4 each.
 
So are you running a skimmer, GFO, carbon, De nitrite, phosban filter media or any other type of mechanical or chemical cleaning stuff?
 
Back
Top Bottom