snorkel
Aquarium Advice Regular
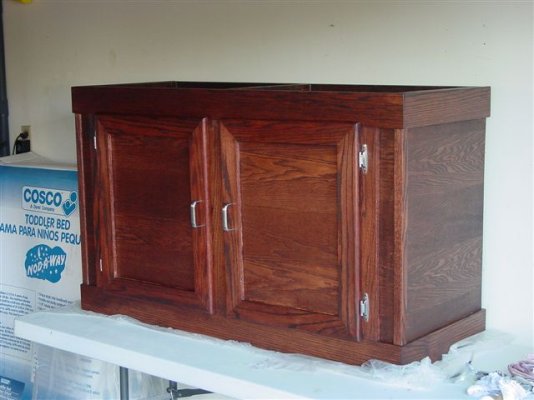
Thought I would share this with everyone, it turned out very nice.
(the last major project I did like this was 9th grade wood tech, so anyone can do this if you take your time)
I started with a 2x4 frame and skinned/trimmed it with Oak, then applied a Minwax Red mahogany stain, I still have to apply the poly to it.
I also made the doors using 1 3/4 oak with a router and a 1/4 inch straight bit for the rabbet/panel and a rounding bit for the outer edge of the door. The frame was cut using a power miter saw, and everything was screwed/glued with 3 inch deck screws.
The height of the stand is 30 inches and the frame is 48 1/2 X 18 1/2 which is the exact outside dimension of a All-Glass 75/90 gallon.
You can get the exact outside dimension of any All-Glass tank here:
http://www.all-glass.com/services/techinfo.shtml
Speaking of All-Glass, they are made about 5 miles from me in Franklin Wisconsin, cool eh?
The most important thing when doing one of these is to get the staightest 2x4s you can find. I got mine at Menards and I had to pick though a bunch to get straight ones.
Also when putting together the top and bottom frames it really helps to use corner clamps to hold everything together. Home Depot has nice ones for 8 bucks each. The corner clamps also come in handy for the doors. The doors are really nothing more than picture frames with 1/4 inch plywood instead of a picture.
Also if you can rent or borrow a router table it makes things a whole lot easier.
Another thing to note about this particular design is that a single 2x4 in will support over 1000lbs (compression), so a stand using this frame design will actually support the weight of a SUV, no kidding")
The Garf design is not as strong because the legs are simply screwed to the inside of the frame, now don't get me wrong, the Garf design is ok, and you would never have problems because any stand built wit 2x4s is overkill anyway.
Tools used:
1. power miter saw (borrowed from father inlaw,used to cut the frame and miter the doors and trim)
2. router table (used to round the doors and make the groove for the door panel)
3. Jig Saw (used to cut the plywood)
4. Cordless drill
5. Counter sinking drill bit for the deck screws
Materials:
1 4x8 sheet of oak veneer plywood (18.99 at home depot)
6 #2 2x4s (2.50 each at Menards)
1 pound of 3 inch deck screws (4.99)
1 box of 3d finishing nails (99 cents)
1 oak outside corner molding (8.99)
2 8 foot 1/2 x 4inch oak boards (for trim 12.99 each pre sanded)
1 4 foot 1/2 x 4 inch oak board (for trim 8.99 pre sanded)
2 1x8 oak boards for doors (8.99 pre sanded)
1 bottle of tightbond wood glue 2.99
1 can of MinWax Red mahogany stain 4.99
course medium and fine sand paper 6.00
Door handles and hinges (18 dollars at Menards)
Total cost of materials was around 140 dollars.
Keep in mind most of this cost was because I chose oak, Pine would have been 1/2 the cost give or take.
I also had to buy a few clamps I was missing, so my total cost was around 160 dollars. This is still far less expensive than a oak stand from All-Glass which retails for 399.99.


There are more pictures in my gallery.
Snorkel
(the last major project I did like this was 9th grade wood tech, so anyone can do this if you take your time)
I started with a 2x4 frame and skinned/trimmed it with Oak, then applied a Minwax Red mahogany stain, I still have to apply the poly to it.
I also made the doors using 1 3/4 oak with a router and a 1/4 inch straight bit for the rabbet/panel and a rounding bit for the outer edge of the door. The frame was cut using a power miter saw, and everything was screwed/glued with 3 inch deck screws.
The height of the stand is 30 inches and the frame is 48 1/2 X 18 1/2 which is the exact outside dimension of a All-Glass 75/90 gallon.
You can get the exact outside dimension of any All-Glass tank here:
http://www.all-glass.com/services/techinfo.shtml
Speaking of All-Glass, they are made about 5 miles from me in Franklin Wisconsin, cool eh?
The most important thing when doing one of these is to get the staightest 2x4s you can find. I got mine at Menards and I had to pick though a bunch to get straight ones.
Also when putting together the top and bottom frames it really helps to use corner clamps to hold everything together. Home Depot has nice ones for 8 bucks each. The corner clamps also come in handy for the doors. The doors are really nothing more than picture frames with 1/4 inch plywood instead of a picture.
Also if you can rent or borrow a router table it makes things a whole lot easier.
Another thing to note about this particular design is that a single 2x4 in will support over 1000lbs (compression), so a stand using this frame design will actually support the weight of a SUV, no kidding
The Garf design is not as strong because the legs are simply screwed to the inside of the frame, now don't get me wrong, the Garf design is ok, and you would never have problems because any stand built wit 2x4s is overkill anyway.
Tools used:
1. power miter saw (borrowed from father inlaw,used to cut the frame and miter the doors and trim)
2. router table (used to round the doors and make the groove for the door panel)
3. Jig Saw (used to cut the plywood)
4. Cordless drill
5. Counter sinking drill bit for the deck screws
Materials:
1 4x8 sheet of oak veneer plywood (18.99 at home depot)
6 #2 2x4s (2.50 each at Menards)
1 pound of 3 inch deck screws (4.99)
1 box of 3d finishing nails (99 cents)
1 oak outside corner molding (8.99)
2 8 foot 1/2 x 4inch oak boards (for trim 12.99 each pre sanded)
1 4 foot 1/2 x 4 inch oak board (for trim 8.99 pre sanded)
2 1x8 oak boards for doors (8.99 pre sanded)
1 bottle of tightbond wood glue 2.99
1 can of MinWax Red mahogany stain 4.99
course medium and fine sand paper 6.00
Door handles and hinges (18 dollars at Menards)
Total cost of materials was around 140 dollars.
Keep in mind most of this cost was because I chose oak, Pine would have been 1/2 the cost give or take.
I also had to buy a few clamps I was missing, so my total cost was around 160 dollars. This is still far less expensive than a oak stand from All-Glass which retails for 399.99.
There are more pictures in my gallery.
Snorkel