klam
Aquarium Advice FINatic
Hi all! Im new to the forums and just wanted to show my 14g starphire tank project.
I tore down my 10g acrylic tank because it was getting over taken from some kind of red macro algae and I gave up on pulling the stuff out weekly. It would infest everything and because of that I had to place all my corals on the sand bed which prevented me from buying anything new. My buddy mentioned that he can get a good price on starphire glass and that's when I decided it's time for a replacement tank.
Here are some pics of the beginnings of my 14g starphire tank that a buddy and me put together ourselves. The total cost of the starphire glass was around $30. The tank measures 20"L x 12"H x 13.5"W.

This was our first time building a glass tank, it wasn't hard but it took us a good 3-4hrs to put together including prep time. We also built a 20g starphire tank as the same time. We let the tanks sit waterless for a week for the silicon to cure. Than we filled the tanks up for a week to test for leaks.

I added a removable partition to the tank to hide all the equipment so the tank has an overall cleaner look to it. I used end channels (grooved extrusions) so I can easily remove the partition for maintenance. I divided the partition into two parts. The upper part can be removed while the lower part stays so the sand bed doesn't spill over to the back.

I sanded down the bottom edges of the lower partition so it wouldn't dig into the silicon

I used a dremel to cut out some teeth and to drill holes for water flow.

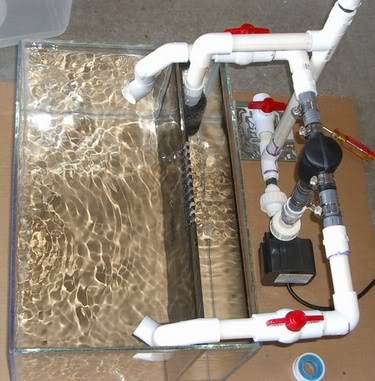
I finished my closed loop SCWD and testing it for leaks. Thanks to Melev for the DIY. http://www.melevsreef.com/closedloop.html
Making sure everything is the correct measurement before gluing together.

Testing for leaks in the scwd and tank for week. The ball valves on the returns are used to control flow rate.
The Remora skimmer was too tall for my tank so I took the feet off and used a dremel for finishing touches. Than it was a bit too short and I fixed that by using some old credit cards for height adjustments.

The tank swap including prep and clean up time took me 6-7 hours. I placed my fishes, bta, snails, hermits, and shrimp into the same container with a heater and a battery operated air pump. The softies in another cooler and my SPS in my minibow(sps will stay in minibow for a week until I’m certain the anemone found a spot it likes). I used about 90% of the water from my old tank and ditched the sand. Started with a new sand bed seeded with sand from my minibow.
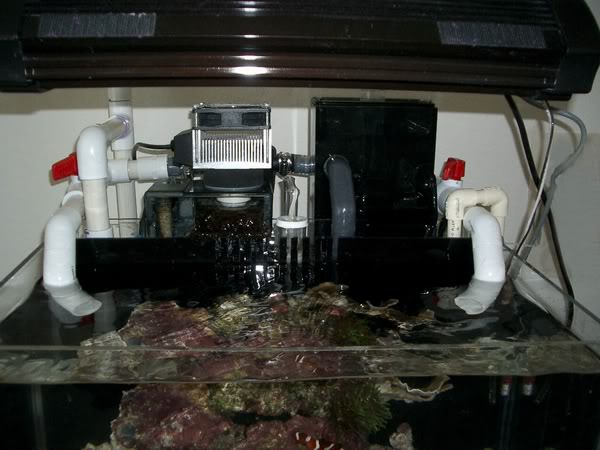
Pics of equipment on tank

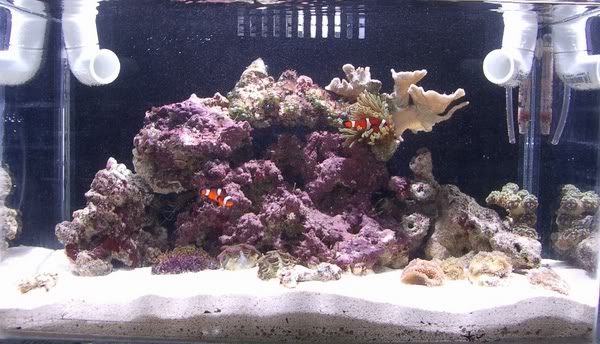
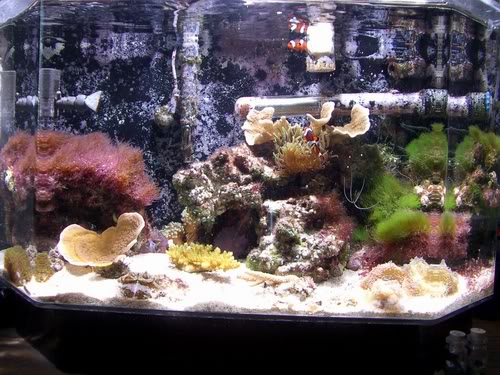
Here is pic of the newly setup tank. Excuse the micro bubbles that is produced by my Remora(still breaking in) Aquascaping isn't really complete yet since I'm going to add more rock at a later date. Waiting for the BTA to be sure of its spot before I add the SPS back into the tank.
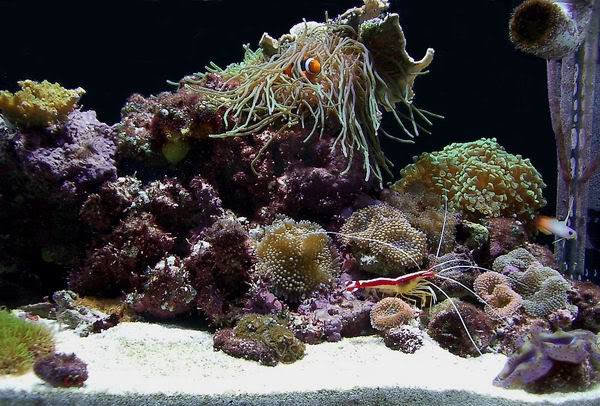
pic of old tank before swap
I'm really excited and can't wait to start buying corals again and I really like the SCWD. A list of my equipment is in my signature. Thanks for looking all.
I tore down my 10g acrylic tank because it was getting over taken from some kind of red macro algae and I gave up on pulling the stuff out weekly. It would infest everything and because of that I had to place all my corals on the sand bed which prevented me from buying anything new. My buddy mentioned that he can get a good price on starphire glass and that's when I decided it's time for a replacement tank.
Here are some pics of the beginnings of my 14g starphire tank that a buddy and me put together ourselves. The total cost of the starphire glass was around $30. The tank measures 20"L x 12"H x 13.5"W.
This was our first time building a glass tank, it wasn't hard but it took us a good 3-4hrs to put together including prep time. We also built a 20g starphire tank as the same time. We let the tanks sit waterless for a week for the silicon to cure. Than we filled the tanks up for a week to test for leaks.
I added a removable partition to the tank to hide all the equipment so the tank has an overall cleaner look to it. I used end channels (grooved extrusions) so I can easily remove the partition for maintenance. I divided the partition into two parts. The upper part can be removed while the lower part stays so the sand bed doesn't spill over to the back.
I sanded down the bottom edges of the lower partition so it wouldn't dig into the silicon
I used a dremel to cut out some teeth and to drill holes for water flow.
I finished my closed loop SCWD and testing it for leaks. Thanks to Melev for the DIY. http://www.melevsreef.com/closedloop.html
Making sure everything is the correct measurement before gluing together.
Testing for leaks in the scwd and tank for week. The ball valves on the returns are used to control flow rate.
The Remora skimmer was too tall for my tank so I took the feet off and used a dremel for finishing touches. Than it was a bit too short and I fixed that by using some old credit cards for height adjustments.
The tank swap including prep and clean up time took me 6-7 hours. I placed my fishes, bta, snails, hermits, and shrimp into the same container with a heater and a battery operated air pump. The softies in another cooler and my SPS in my minibow(sps will stay in minibow for a week until I’m certain the anemone found a spot it likes). I used about 90% of the water from my old tank and ditched the sand. Started with a new sand bed seeded with sand from my minibow.
Pics of equipment on tank
Here is pic of the newly setup tank. Excuse the micro bubbles that is produced by my Remora(still breaking in) Aquascaping isn't really complete yet since I'm going to add more rock at a later date. Waiting for the BTA to be sure of its spot before I add the SPS back into the tank.
pic of old tank before swap
I'm really excited and can't wait to start buying corals again and I really like the SCWD. A list of my equipment is in my signature. Thanks for looking all.